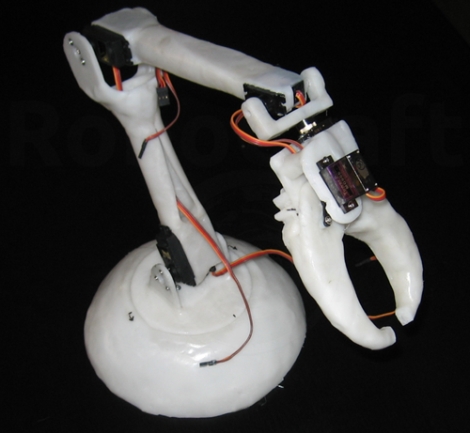
Robotic Arm And Claw Sculpted Entirely From ShapeLock

shapelock_robotic_claw

[Alexey] wrote in to share a mechanical claw (Google Translation) he has been hard at work on for quite some time. While a lot of people will turn to some sort of 3D plastic printer such as the MakerBot if they need plastic parts built, [Alexey] didn’t have access to one. Instead, he carefully crafted the entire mechanism from polycaprolactone, or as it’s more commonly known, Shapelock.

Using a wide range of tools from hair dryers and knives to lighting fixtures, he manually sculpted the claw and its control arm out of plastic, piece by piece. We are particularly impressed by the gearing he was able to cut from the plastic, which can be finicky at times.

As you can see in the video below, The claw mimics each movement he makes with the control arm via a handful of Arduino-driven servos. Everything seems to work quite well, and despite the rough translation by Google, we think this is a great project. If you are looking to do something similar yourself, he has plenty of pictures on his site, which should give you a pretty good idea as to how things were put together.

Continue reading “Robotic Arm And Claw Sculpted Entirely From ShapeLock”

The Hand-Mounted Haptic Feedback Sonar Obstacle Avoidance Asstance Device.. Or The Tacit

Here is a hack that takes the stick out of the blind mans hand. [Steve] has been working on the Tacit, a wrist mounted sonar device with haptic feedback, it’s like strapping a bat to your wrist to help you see. The Tacit uses two sonar ping sensors to measure the distance to the nearest obstacle, the relative distance to an object is then fed back to the user using two servos which apply pressure to the back of the wrist. The Tacit is sporting an Arduino pro mini to control the ping sensors and drive the servos, and runs off a 9 volt battery.

This is not an entirely new concept, haptic headbands have been around on the net for a while, but the Tacit allows the user to detect  obstacles on the ground waiting to trip you up. All in all a neat hack that may have a future in helping the blind. Check out the video after the break to see it in action.

Continue reading “The Hand-Mounted Haptic Feedback Sonar Obstacle Avoidance Asstance Device.. Or The Tacit”

Building A Message Board With A Web Interface

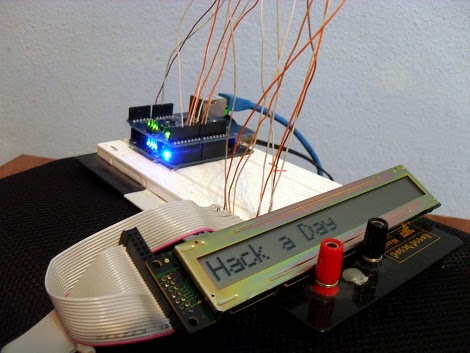
[Sergio] is just getting into hardware hacking. He started by getting an HD44780 compatible LCD screen running with his Arduino. To take the project to the next level, he decided to add a web interface for changing the message displayed on the LCD.

He’s doing things on the cheap (a man after our own hearts), purchasing many of his components off of eBay. Unfortunately that decision came back to bite him when it was time to connect his Arduino to the network. The Ethernet Shield knock-off wasn’t the same as the official version. That one’s got a Wiznet W5100 ethernet chip with does a lot of the heavy lifting for you. Instead, [Sergio] is using a board with an ENC28J60. It took a bit of searching, but eventually he came up with an example to help him get his Arduino serving web pages and listening for updates from them.

The ENC28J60 is actually not a bad piece of hardware. It’s cheap enough, and there are a few hardware/software demos out there that are worth taking a look at.

Adding USB Control For Ikea RGB LED Strips

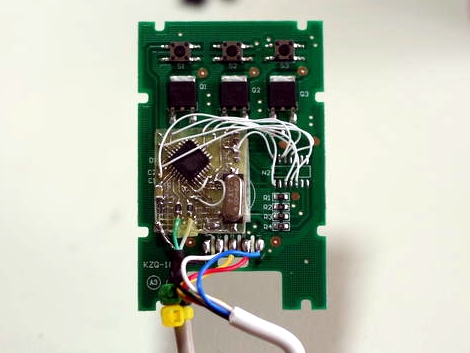
Here’s an altered PCB that gives USB control to an Ikea Dioder. This is a $50 product that comes with four strips each containing nine RGB LEDs. The stock controller has a color selection wheel and a couple of buttons. [Rikard Lindström] wanted to use it to match ambient light to the colors of his computer monitor — yes, it’s another ambilight clone.

Since he already had a bunch of AT90USB162 chips on hand he chose that route. These chips have native USB support (he’s using the LUFA package which is a popular choice), but no on-board ADC. That means no need for the potentiometer from the original controller because there’s no easy way to read its value. Removing it made plenty of room for his add-on PCB. He also depopulated the PIC microcontroller that originally drove the unit, soldering to the empty pads in order to connect is own board. The finished product fits back in the original case, with the addition of a USB cable as the only visible alteration. Now he can dial in colors using a program he wrote.

In case you’re wondering, it looks like this is a newer version of control circuitry when compared to the original Dioder hack we covered.

Using An MSP430 For Time Lapse Photography

vistaquest_keychain_timelapse_msp430

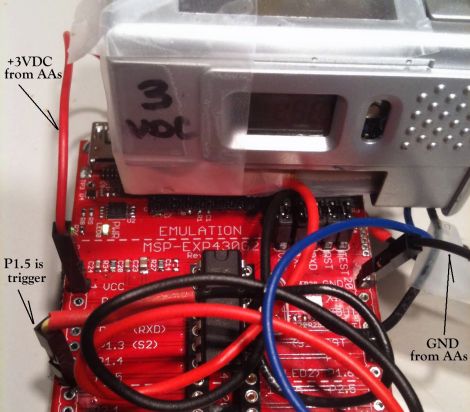
Hackaday reader [onefivefour] had an old VistaQuest VQ1005 keychain camera kicking around, and wanted to do something useful with it. A while back he hooked up a 555 timer and did a bit of time lapse photography, but he wanted more control over the process. Specifically, he desired the ability to tweak the delay between shots in a more granular fashion, as well as way to prevent the VistaQuest from going to sleep after sitting idle for 60 seconds.

His weapon of choice to get this task done was an MSP430, since the microcontroller can be found quite cheaply, and because it is relatively easy to use. He added a few header pins to the LaunchPad board wiring them up to the camera’s trigger as well as the on/off switch. When the wire connected to the trigger is pulled low, the camera snaps a picture. The wire connected to the on/off switch is always held low, ensuring that the camera is on and ready to go whenever it’s time to take a shot.

It’s a relatively simple project, but definitely useful. While there are many ways to build an intervalometer, the MSP430 is a great platform to use, especially for beginners.

Stick around to see a quick video [onefivefour] put together, showing off his time lapse rig’s capabilities.

Continue reading “Using An MSP430 For Time Lapse Photography”

Heathkit Is Back From The Dead

Although now it’s impossible for a DIY nut to build electronics for less money than a factory, this wasn’t always the case. For 45 years, Heathkit produced inexpensive kits for just about everything. Heathkit closed it’s kit business in 1992, but now they’re back. They’re starting out with a few DIY kits at first, namely an ultrasonic garage parking assistant and a wireless swimming pool monitor.

Heathkit is calling all builders to submit their ideas for future kits. While this comeback rings of some other outlets with a rich heritage, Heathkit is still remembered fondly; Barry Goldwater jetted out to the Heath HQ twice a year for kits. Not many people are that attached to Realistic and Optimus gear.

If you’re wondering about the kind of stuff Heathkit offered, feel free to check out the 1984 catalog that features computers with 128kB of RAM available for only $1899.00 (yes, a very competitive price)

Tip ‘o the hat to [Jeffrey Bail (N1BMX)].

High Voltage: Using Enclosed Relays For HV Switching


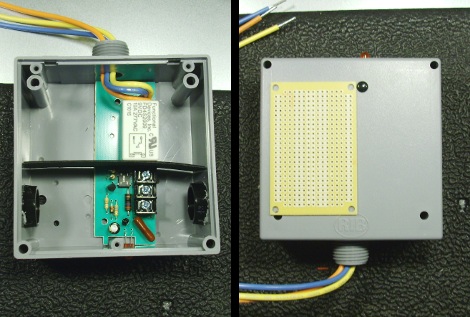
After seeing many projects that use microcontrollers to switch mains voltages [Rob Miles] decided to share his preferred method. The shots you see above are an enclosed relay, part number RIBTU1C manufactured by Functional Devices Inc.

This in itself is not the full control scheme that he uses, but it takes care of the bulk of the hardware. He uses a triggering circuit based on a 555 timer (PDF). [Rob] mentioned that if you shop around, you can get the relay, 555 timer, and other components for under $15. This is a great solution for the money when you consider that you get an enclosure meant for handling high voltage and a nice terminal block to which you can connect the mains wiring. The relay itself can be triggered by a 9V battery via the transistor in the control circuit.

Notice the protoboard in the image above. There’s plenty of room for your driver circuit to rest inside the box, protected by that barrier from the HV circuitry. Check out the rest of the images he sent us after the break.

Continue reading “High Voltage: Using Enclosed Relays For HV Switching”