Ball Bot Constructed From Power Tools And Pet Toys

ballbot

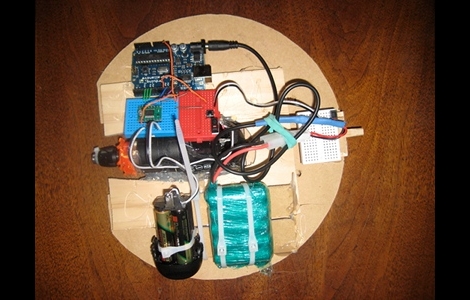
Hackaday forum member [machinelou] says he’s been fascinated with remote controlled hamster balls for quite some time. Inspired by a ball bot he saw on a BBC show, he finally picked up a 12″ plastic ball and got to work.

He used a small drill to provide the power required to roll the ball, and an Arduino is used as the brains of the device. This is his first major project outside of simple I/O and servo control, so he’s taking things slowly. While all this is a bit new to him, he already has things up and running to a degree as you can see in the video below. In its current state, the ball is programmed to roll forward and backwards for a few seconds before going back to sleep.

His future plans include adding a servo-controlled weight to allow him to steer the ball as well as using a pair of Zigbee modules in order to control the ball remotely.

It’s a neat little project, and definitely one that would be a fan favorite among kids. Stick around to see a quick video of his bot’s progress thus far.

Continue reading “Ball Bot Constructed From Power Tools And Pet Toys”

Retrode Gets An Upgrade

We’ve been following the Retrode since it was an obscure video on YouTube that we swore was an elaborate hoax. Now, [Matthias] tell us it’s getting its third major upgrade, and it is really starting to resemble a commercial project. The video features the new prototype case for the Retrode II, which has been 3d printed. The fact that such advanced protyping facilities are availavble to the common hacker is just incredible.  The new Retrode II will have ports built in so SEGA and SNES controllers can be plugged in. Since its launch the community has been collaborating to build plug-in boards allowing people to play Virtual Boy, Atari 2600, GBx, Turbografix-16, Neo Geo Pocket, and even N-64 cartridges directly from the cartridge on their computers. Very Cool.

Continue reading “Retrode Gets An Upgrade”

DIY MP3 Player Shows That No Hack Is Ever Obsolete

wacken_death_box

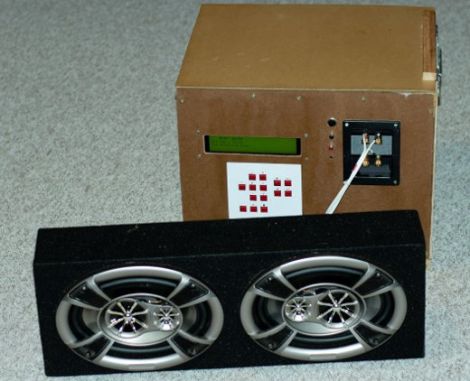
[Ole Wolf] wrote in to tell us about a project he has been working on for several years now. The Wacken Death Box serves as a reminder that once you start a DIY project, it’s probably a good idea to finish it in a reasonable amount of time, lest it risk becoming obsolete.

His Death Box is an MP3 player that he takes along on his annual trip to the Wacken Open Air Festival. His goal was to construct a portable amplified music player that could be powered from either a car battery or charger. A Via EPIA Mini-ITX computer serves as the brains of the device, blaring his tunes from a set of car loudspeakers via a two-channel 100W amp.

[Ole Wolf] used the music player for a few years, improving it as he went along. He does admit however, that with the continually dropping prices of MP3 players, he decided to bring a small portable unit along with him to the 2010 festival, leaving his box at home.

Given the fact that far smaller and more portable devices make his music box seem clunky and obsolete in comparison, you might ask why he even keeps it around. We think that every hack has its place, and while you won’t be strapping the Death Box on your back for your morning jog, it fits quite well in a variety of situations. This rugged music box would be an appropriate choice to use in your workshop, at the beach, or even on a construction job site – places where you might not want to use your comparatively fragile iDevice.

Print Your Own Header Shrouds

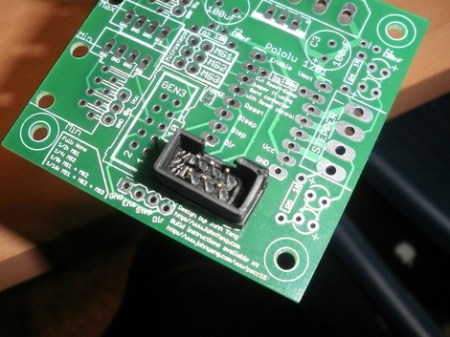
Don’t get us wrong, printable whistles are cool and all, but these printable header shrouds make us think that filament printers like the Makerbot and RepRap might just be worth their salt. This utilitarian purpose is a departure from the souvenirs, toys, and art that we’re used to seeing from the expensive development toys tools.

The six and ten pin header shrouds are designed for a snug fit that makes it easy to glue them onto the plastic spacers of male pin headers. We use IDC plugs and ribbon cable all the time in our projects, but never seem to order shrouded connectors; this is perfect for us. It makes us wonder what other PCB-friendly printable designs we’ve been missing out on? Surely someone’s been printing stand-offs with threaded inserts, right? If you know of something useful that we can share with the rest of the readers, don’t hesitate to send in a tip.

[via Dangerous Prototypes]

Potentially Explosive Spritz Cookies

Do you recognize the shapes of these spritz cookies? Theoretical physicists and nuclear engineers might. They are representative of a hydrogen atom in several different states. Oh, and they’re delicious. [Windell] over at Evil Mad Scientist Labs cut his own spritz cookie discs in order to bake the hydrogen look-a-likes.

To bring you up to speed: spritz cookies are not rolled out and cut with a cookie cutter – although you could print your own cutters in these shapes if you wanted to. Instead, a cookie press is used to squeeze out dough onto a baking sheet. The press looks like a very wide syringe. The dry dough is packed into a cylinder, and a ratcheting ram presses it toward the business end. A disc with wisely placed slits lets the dough squeeze out into the final shape.

We made some shamrocks for St. Patrick’s Day, but now we’re wondering if we can make our own Hackaday logo cookies. [Windell] grabbed some melamine dinner plates to use as raw material for his custom discs (remember to use food safe material). He then designed the cutouts in Inkscape and headed over to the laser cutter to fabricate the disc. We don’t have a laser cutter but we’d bet you can do a similar, but slower, job with a drill and a lot of filing/sanding.

[via Dangerous Prototypes]

Fan And Vent Holes Prevent Sweaty Gaming Hands

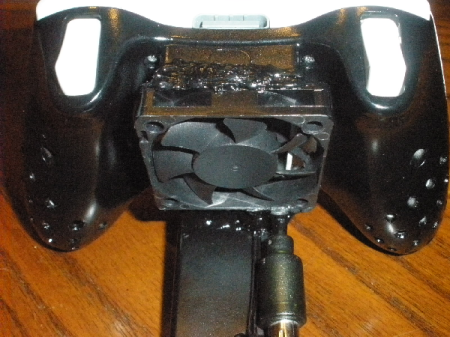
[Happy Dragon] grew tired of wiping moist palms on his pants during intense gaming sessions. To combat the issue he tried adding a fan to an Xbox 360 controller that he had sitting around. He pulled a small PC fan from a Nyko Airflow and glued it over a hole he cut into the battery compartment of the controller. This forces air into the body of the unit, which exits through holes he’s drilled in the wings. He added an external battery pack to power the controller since the original batteries were removed before the fan was glues in place. The fan itself isn’t powered from this external pack, but requires a USB connection that he attaches using the disconnect from a wired Xbox controller.

After some testing, [Happy Dragon] seems… happy… with the results. He tells us that his hands are not sweaty, and that he finds he’s not gripping the controller quite as tightly as he used to so as not to block the vent holes. We can see a couple of issues with this design, like the holes filling up with crud, or the fan blowing dust and dirt into the controller (we’re thinking about the analog sticks). But perhaps a future design could create dedicated ducts inside that keep the electronics isolated from the cooling. Or maybe the exhaust from portable console builds could be used in a similar way?

You’ll notice that there’s no direct link for this hack. [Happy Dragon] didn’t write a post about this, he just sent us a half-dozen images and his description of the project. Check out the rest of the pictures after the break.

Continue reading “Fan And Vent Holes Prevent Sweaty Gaming Hands”

flipflop_clock

FlipFlop Clock Uses Mains Frequency To Keep Time

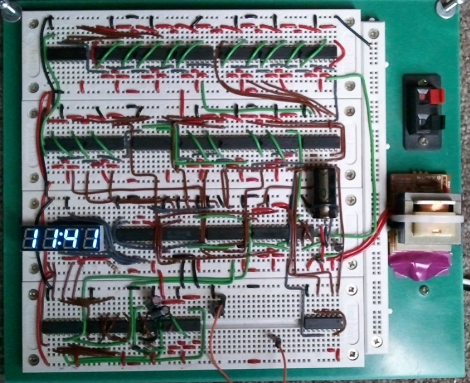
One afternoon, [Sam] was a bit bored and decided he would build a clock. Not wanting to spend any money on the project, he set off to construct his clock using only the components he had on hand – this meant no micro controllers would be used whatsoever.

Built on a set of four breadboards, his clock sports a pretty short parts list. It uses just over a dozen flipflops, a few NAND chips, a 555 timer, and a small handful of other components. What you won’t find on the bill of materials however, is any sort of crystal or real-time clock. Instead of using a separate chip for keeping time, he opted to use the 60hz mains frequency as the basis for his time keeping.

The mains sine wave is passed through a series of frequency dividers to reach a 1/60hz signal, which is used to trigger the clock counters he constructed. The time is displayed on a 4-digit seven segment display, using a pair of multiplexers clocked by a 555 timer.

The clock seems to work nicely, though you have to be pretty well-versed in how the clock was built to set the time. The only means of doing so is to probe into the clock of the digit you are setting while pressing the lone pushbutton mounted on the breadboard.

While we are pretty sure no one will ever mess with his clock’s time, we have to wonder if it blinks on and off like our old VCR when the power goes out.