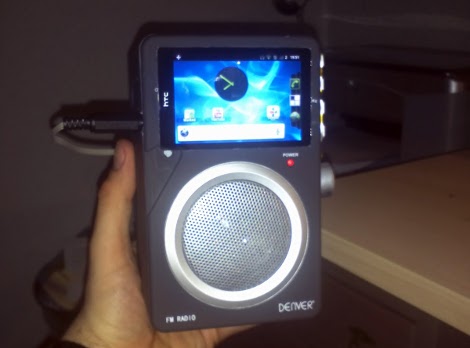
Old Radio + Old Phone = Android Media Station

[Bjørn] combined some aging electronics he had around the house to create this Android media center. The enclosure is an FM-radio, but since he only listens to online media it wasn’t of much use to him. After sizing it up he realized it was a perfect candidate to receive his old HTC Hero Android phone.

The upper portion of the stock radio used to host controls for tuning the FM dial, adjusting volume, and switching the unit on and off. He cracked open the case, ditching the radio receiver and patching in to the amplifier. The volume knob was moved to the right side of the case, and a hole cut to receive the phone. Audio is pulled from the phone with the jack sticking out the left side. We’d love to see a future improvement using a right-angle jack (kind of like this charging hack) or patched directly into the phone’s circuit board. This way everything would fit inside the box.

Now he can listen to Internet radio, or stream some video like in the clip after the break.

Continue reading “Old Radio + Old Phone = Android Media Station”

Workout Timer Has Its Own Fight Bell

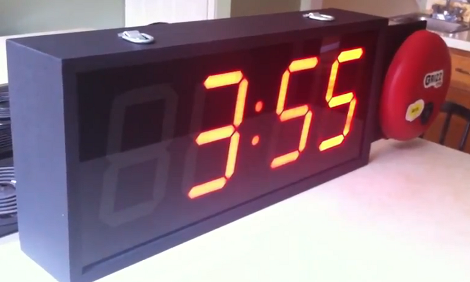
This workout timer turned out great. We think [Douglas] managed to end up with a professional look and a full range of features even though he was doing a lot of learning along the way.

He wanted a clock that was capable of counting up or down to time different segments of his workout. In order to be really useful it needed to have a remote control and a way to signal when time had run out. He grabbed an Arduino and started prototyping with an LED marquee at first, but after adding a second Arduino to deal with the display scanning issues he finally switched over to these LED segment displays.

The timer includes an IR receiver so that it can be controlled with a handheld remote. The large red bell to the side has a heck of a ding and is used to signal the start and end of timing. Perhaps the driver for that bell could be incorporated into the home automation project from Wednesday. Once the hardware decisions were finalized [Douglas] set out to build an enclosure that he could be proud of (mission accomplished!). Don’t miss the video after the break where he walks through all various aspects of the user interface. Continue reading “Workout Timer Has Its Own Fight Bell”

LED Tutorial Demystifies Several Control Techniques

Controlling LEDs is really quite simple. As you know, they need to be current limited which is as easy as applying Ohm’s law to your given set of values. To make things even more even there’s a slew of constant current LED driver chips out there that can be had for a song. But do you have any idea how those constant current circuits work? If not, then [Giorgos Lazaridis’] guide on LED driving and controlling methods will bring you up to speed in no time.

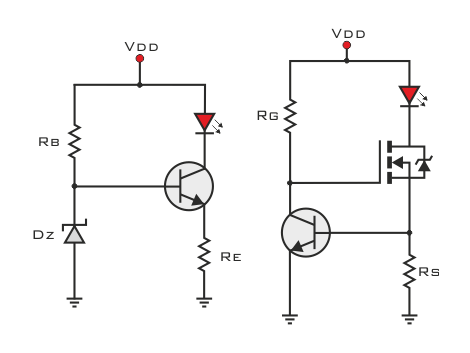
He starts out with the most basic concept, how to light an LED using proper current limiting resistors. But from there he moves on to the juicy bits. He builds a transistor-based constant current driver, then adds voltage regulation for the circuit as seen in the schematic on the left. He moves on to the more robust and efficient method on the right which pairs a MOSFET with that transistor circuit. This is the technique found on each pin of many of those constant current drivers and functions well regardless of the voltage input level.

He’s been producing videos to go along with these articles. After the break you can watch the episode that accompanies the schematic on the left. Continue reading “LED Tutorial Demystifies Several Control Techniques”

Reinventing The Clapper With A Knock-based Home Automation Controller

Clap On!… Clap Off!… was super awesome when The Clapper came out in the mid-eighties. Now [Mathieu Stephan] is trying to make the concept much more functional. He put together a controller that lets you knoch on walls to control things around the house. It’s called the Toktoktok project and uses small boxes to receive user input and control items like lamps and computers.

A piezo element picks up the noises made by a user. Above [Mathieu] demonstrates how sensitive the element is, picking up scratching and knocking anywhere along this wall and displaying it as a waveform on the computer monitor. Clever processing and filtering of these noises lets the device convert them into different commands. He covers all of this in the video after the break, then demonstrates a bunch of functionality such as waking up and starting audio playback from a computer just by tapping on the coffee table.

This isn’t the first time we’ve seen the concept. One of our favorites is this door lock which listens for the secret knock. But [Mathieu] is trying to extend the functionality and bring it to a more general market. Continue reading “Reinventing The Clapper With A Knock-based Home Automation Controller”

Building A Magnetic Rotary Encoder

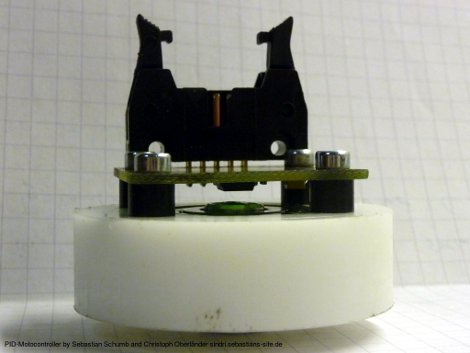
[Long Haired Hacker] has undertaken a high-resolution 3D printer build. He got his hands on some motors to drive the build platform but it doesn’t have a built-in encoder. He knows that optical encoder wheels can have problems due to dirt and grim as well as ambient light so he set out to find a better way of providing feedback to the controller. He ended up building his own magnetic rotary encoder which is shown above.

At the heart of the system is an AS5043 magnetic rotary sensor. The chip, which runs from $6.50-$11, can detect and report the rotation of a magnetic field with great precision. The rotation data can be read out in degrees using SPI, but it sounds like there’s also grey code output on a few pins if that suits your needs a bit better. The magnet which the chip measures is mounted in a sleeve milled to seat inside of a bearing ring.

The 3D printing method [Long Haired Hacker] has chosen uses a projector and light-cured resin to achieve the kind of results seen in this other hi-res printer.

Hard Resetting Your Ford Touch System The Easy Way

ford-sync-reset

[Jeff Clymer] owns a Ford Focus, and while he’s generally happy with the car, the “My Ford Touch/Sync” system can be buggy at times. He spends a lot of time in the car each day, so when the entertainment center locks up as it is frequently known to do, he has to turn off the car and pull a fuse to reset the system. Since pulling a fuse while on the road is pretty impractical, he decided to install a reset button, making system reboots a breeze.

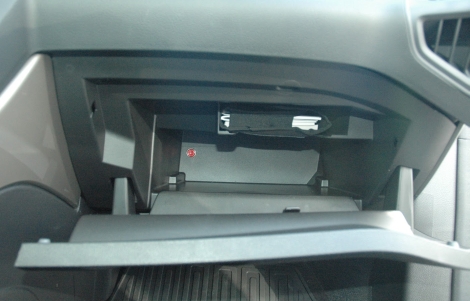
He started by disassembling various fuses until he found one with an easy to remove fusible link. Once it was in pieces, he soldered a pair of wires to the fuse terminals and connected everything to a normally closed momentary pushbutton switch. After adding an inline fuse holder and reinserting the original fuse, he installed the button into the back of his glove box

Now instead of physically removing the fuse each time his stereo locks up, he can simply push a button and be on his way. Here’s hoping a software fix is coming for [Jeff’s] car sooner rather than later!

Reverse Engineering A Nokia LCD

LCD displays taken from old Nokia phones have been a staple of the hardware makers for years now, so we’re very happy to see [Andy] reverse engineering a full color QVGA display so we can move our grayscale projects over to a full-color display.

The screen in a Nokia 2730, 5000, and 7100 cell phone is a wonder of technology – its 18-bit color with a very high-resolution piqued [Andy]’s interest. He bought a second-hand Nokia 2730 off of eBay and started taking it apart. After checking out the schematics for the phone, [Andy] had a few breakout boards made; especially useful since he found a few connectors as well.

With a great deal of Googling, [Andy] found another lost soul who successfully broke into a similar LCD display and discovered it was command-compatible with a Magnachip LCD controller. The only way forward was to send a few of these commands over to the display and watch what happens.

[Andy] managed get pixels drawn on the screen, and found a few interesting features: hardware scrolling is enabled, as is changing between portrait or landscape orientations. From a second-hand phone on eBay, [Andy] now has a very nice QVGA display. We’re calling this a win, but you can judge the video after the break for yourself.

Continue reading “Reverse Engineering A Nokia LCD”