Router Controlling Choo-choos Over The CAN Bus

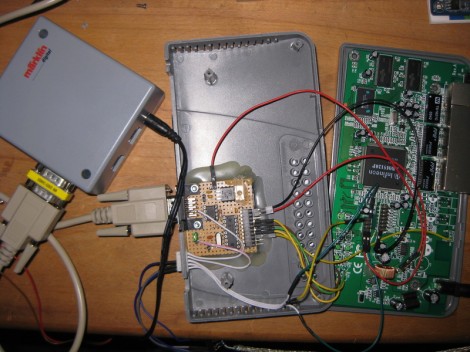
This setup is used to control a model railroad. Well, not entirely this setup. [Gerhard Bertelsmann] already has a proper railroad controller, and it just happens to offer CAN bus communications. He’s using OpenWRT and a cheap router to connect the bus to the network.

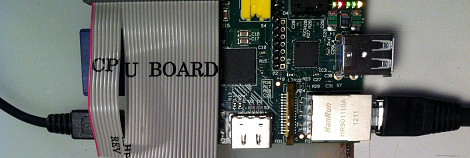
Originally he wanted to use a Raspberry Pi board for the project, but the incredible backorder  situation with that hardware led him to grab an old router. After loading OpenWRT he started working out how to connect a couple of ICs (MCP2515 and MCP2551) that will take care of the CAN bus communications. The hardware connections end up being pretty simple, with five data lines (and their pull-up resistors) connecting to the router’s serial header. From there it was a matter of mapping the device in software so that the hardware can be controlled over the network.

We like this example since CAN is used is a lot of other applications.

Using The GPIO Pins On A Raspberry Pi

In addition to being a serviceable single board computer, the Raspberry Pi also has a header full of GPIO pins at your beck and call. [Tedbot] sent in a great tutorial on using these pins with Python, Bash, and C.

The GPIO pins on the Raspi are arranged in a 2×13 header. Until Sparkfun manages to manufacture a decent Raspi protoboard, the easiest way to break these pins out is with an old IDE ribbon cable. After plugging the other end into a breadboard, [Tedbot] had an easily accessible set of Raspi pins.

To control these pins, [Tedbot] found two libraries: the first is WiringPi that implements a C-style, Arduino-like programming environment on the Raspi. The second is the RPi.GPIO Python package. Since the Raspi runs Linux, and everything in Unix is a file, [Tedbot] used a shell script to blink a LED.

One word of warning if you’re building a board to extend the capabilities of the Raspi: these pins aren’t 5 V tolerant, so you’ll need to throw in a buffer or level converter when building a Raspi circuit.

Edit: Adafruit is releasing a Pi Plate prototyping board in a few weeks. Neat, huh?

BattMan II: The Charger Your Batteries Deserve

When your radio controlled device batteries are drained, you’ve got no better option than to call on BattMan II. This device is packed full of features for cycling and charging various types of batteries. It is computer controlled via your parallel port (yeah, remember those?) and has companion software that allows you all kinds of control and data.

The writeup is rather extensive and includes schematics so you could build your own. There’s also a step by step breakdown of how each section functions as well as an explanation of each different charging method. Great work [Stefan]

if you just want a peak at the lengthy feature list, keep reading.


Continue reading “BattMan II: The Charger Your Batteries Deserve”

Template For Building STM32F0-Discovery Project In GCC

Yep, that blue light is blinking and I made it happen. I’ve been hard at work since I got my free STM32F0-Discovery board in the mail. Most recently I put together a starting template for building STM32F05x project on Linux. You’ll still need to install your own tool chain (I’m using the Code Sourcery G++: Lite Edition), but this makes it a snap to compile your projects with support for STM’s peripheral libraries.

As for programming, you may remember that I added support for writing to RAM in the stlink project. I’ve wasted spent a ton of time trying to get support for writing to Flash into that project. It’s just less of a hassle to use stlink than it is to work with OpenOCD. But I’ve really hit a wall getting the flash loader code to work. If you want to check out what I’ve done so far in that area I committed a very messy branch (see the commits for what code changes I’ve made).

In the mean time you can use OpenOCD to write images compiled with the template to your device. I included the ‘make program’ option in the Makefile to do this from command line. If you need help compiling OpenOCD check the readme in the template repository.

Finally, A 3D Printer For Burritos

[Marko] created a robot that prints burritos. Truly, we’ve reached new heights as a species.

The Burritob0t is based on the ORD Hadron 3d printer with a pair of air compressor/syringe-based extruders based on the Makerbot Frostruder. All the ingredients – rice, meat, salsa, and molten cheese – will be printed onto the surface of a tortilla heated by a Makerbot heated build platform.

[Marko] has some pretty neat plans for his Burritob0t such as an iPhone app for ordering your burritos and some sort of social commentary thing using burritos. We’re assuming [Marko] hasn’t yet got this Burritob0t up and running for the lack of any action shots or demo videos. That said, there’s a wonderful Flickr gallery and an about page that covers the artistic statement behind the Burritob0t.

If you want to get your own Burritobot, [Marko] hopes to have a Kickstarter up sometime in July.

Recording Off A Reel-to-reel With A Credit Card Reader

If you’ve got a few reel-to-reel recordings of 1940s radio, how do you transfer those to a digital medium? [Evan Long] and his dad used a credit card reader built for the iPhone to transfer a vintage [Art Kassel] recording from magnetic tape to the digital domain of .MP3s.

A few months ago, we saw what goes into these Square credit card readers. They’re just a magnetic tape head with a resistor an 1/8″ jack that plugs directly into the headphone jack of any iDevice. Because there’s no hardware limitation of what the Square credit card reader can do, [The Long boys] decided to back up some old reel-to-reel tapes with an iPod Touch.

[Evan] and his father needed to perform a few modifications to the credit card reader; the tape head pressed against the plastic case too tightly to allow feeding 70-year-old tape through the device. After bending a bit of metal the credit card reader was ready to record the dulcet tones of the Big Band era.

It’s a neat build, and anything that reuses proprietary hardware (however limited) is alright in our book. Nice job, guys.

Building Your Own Atari Cartridges

Have you ever wanted to create your own atari games from scratch? Thanks to the Grand Idea Studio, you can download the files to make your own cartridge PCBs. There isn’t a ton of information here, as this is an old project that isn’t being supported anymore. However, you can download the instructions, schematics, and gerber files for carts that work in the 3 main models of the atari 2600. As [Tyler] over at Adafruit points out, you could easily 3d print your own shell as well.