tempescope_in_bookshelf

An Extemely Unique Weather Display

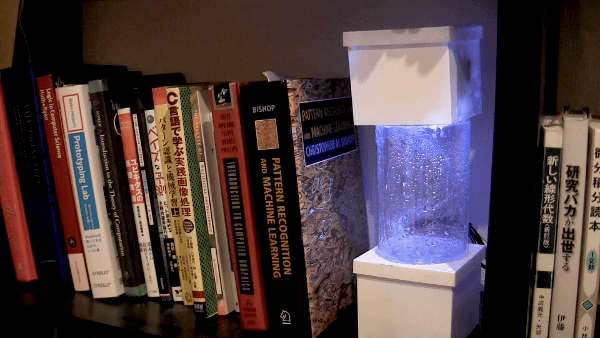
Most home weather displays use an LED screen or other moderately interesting methods of showing you what’s going on outside. The [Tempescope], however, takes an entirely different route, actually recreating a tiny weather environment on your bookshelf!

This active weather device is controlled via an Arduino as well as a pump, ultrasound diffuser, and other assorted components connected to a computer. It was originally meant to display, or more accurately recreate (precreate?) tomorrow’s weather. What is even more interesting is that using [World Weather] software, it’s able to simulate the weather on any place on earth.

Early in this article [Ken] lists the art of [bonsai] as one of his inspirations. He’s open to suggestions as to how to expand this device, which can be seen after the break. We (I at least) would think it was awesome if there was actually a bonsai tree in the environment in keeping with its influences. Certainly our readers can give him some feedback as well! Continue reading “An Extemely Unique Weather Display”

Turning 3D Shutter Glasses Into Automatic Sunglasses

[Dino’s] hack this week seeks to create sunglasses that dim based on the intensity of ambient light. The thought is that this should give you the best light level even with changing brightness like when the sun goes behind a cloud or walking from inside to outside. He started with a pair of 3D shutter glasses. These have lenses that are each a liquid crystal pane. The glasses monitor an IR signal coming from a 3D TV, then alternately black out the lenses so that each eye is seeing a different frame of video to create the stereoscopic effect. In the video after the break he tears down the hardware and builds it back up with his own ambient light sensor circuit.

It only takes 6V to immediately darken one of the LCD panes. The interesting thing is that it takes a few seconds for them to become clear again. It turns out you need to bleed off the voltage in the pane using a resistor in order to have a fast response in both directions. Above you can see the light dependent resistor in the bridge of the frame that is used to trigger the panes. [Dino] shows at the end of his video that they work. But the main protective feature of sunglasses is that they filter out UV rays and he’s not sure if these have any ability to do that or not.

Continue reading “Turning 3D Shutter Glasses Into Automatic Sunglasses”

Demystifying Camcorder CRT Viewfinders

Every smartphone (and most dumb phones) has a video camera built into it these days. Some of them are even capable of recording respectable HD video. So we’d bet that the decades old camcorder you’ve got kicking around isn’t getting any use at all anymore. [John] wants to encourage you to hack that hardware. He published a post showing just how easy it is to salvage and use a camcorder CRT.

The gist is that you simply need to hook up power and feed it video. The board that is attached to the CRT has its own voltage hardware to drive the tube. He demonstrates a 9V battery as a power supply, but also mentions that it should be pretty easy to power the thing from a USB port. As for video, all it takes is a composite signal. Of course you’ve got to determine the pinout for your particular CRT module. The method he chose was to use a continuity tester to find the path from a capacitor’s negative leg to the appropriate pin header. Next he used a bench supply to inject a current-limited low voltage until he saw response when probing the pins. Finding the composite-in is a similar trial and error process.

So what can you use this for? Why not make it the display for a simple video game?

A Wearable Pipboy 3000

[Zachariah Perry] builds a lot of replica props, and judging from the first few offerings on his blog he’s quite good at it. We enjoyed looking in on the Captain America shield and Zelda treasure chest (complete with music, lights, and floating heart container). But his most recent offering is the wearable and (kind of) working Pipboy 3000 from the Fallout series.

From his description in the video after the break it sounds like the case itself came as a promotional item that was part of a special edition of the game. He’s done a lot to make it functional though. The first thing to notice is the screen. It’s domed like the surface of a CRT, but there’s obviously not enough room for that kind of thing. The dome is made from the lens taken out of a slide viewer. It sits atop the screen of a digital picture frame. [Zachariah] loaded still images from the game into the frame’s memory, routing its buttons to those on the Pipboy. He also added a 12 position rotary switch which toggles between the lights at the bottom of the screen.

A little over a year ago we saw a more or less fully functional Pipboy. But that included so many added parts it was no longer wearable.

Continue reading “A Wearable Pipboy 3000”

Mesh Networking With Multiple Raspberry Pi Boards

Since he’s got several Raspberry Pi boards on hand [Eric Erfanian] decided to see what he could pull off using the robust networking tools present in every Linux installation. His four-part series takes you from loading an image on the SD cards to building a mesh network from RPi boards and WiFi dongles. He didn’t include a list of links to each article in his post. If you’re interested in all four parts we’ve listed them after the break.

He says that getting the mesh network up and running is easiest if none of the boards are using an Ethernet connection. He used the Babel package to handle the adhoc routing since no device is really in charge of the network. Each of the boards has a unique IP manually assigned to it before joining. All of this work is done in part 3 of the guide. The link above takes you to part 4 in which [Eric] adds an Internet bridge using one of the RPi boards which shares the connection with the rest of the mesh network.

If the power of this type of networking is of interest you should check out this home automation system that takes advantage of it.

Continue reading “Mesh Networking With Multiple Raspberry Pi Boards”

Put Your Dev Board To Work As A Demoscene Display

If you’re looking for a way to push your comfort zone with that slick new microcontroller you’ve been working with we think [Morgan Gangwere] has the answer. He took his chipKit development board and used it as a demoscene platform.

Demoscene refers to audio and visual demos written to squeeze as much entertainment out of a given platform as possible. We’ve seen demos for a lot of different platforms; for instance, here’s a Propeller chip demo. But this use of the onboard OLED screen brings a smile to our faces. With well under 100 lines of code [Morgan] implemented several different video effects (the music heard in the clip after the break is not being produced by the board). There is a star field which serves as the background. Over the top of it a scrolling message is displayed following a sine wave shape. The speed at which it scrolls is set by the trimpot, which you can see adjusted about 50 seconds into the clip.

Continue reading “Put Your Dev Board To Work As A Demoscene Display”

Wristband RFID Unlocks Car Door And Starts Engine

[João Ribeiro] is an electronics engineer by day, but in his free time he likes to ply his trade on everyday items. Recently he’s been integrating his own microcontroller network to unlock and start his car via RFID. In addition to the joy of pulling apart the car’s interior, he spent time designing his own uC breakout board and developing an RFID reader from a single chip.

He’s working with a 1988 Mercedes that has very little in the way of electronics. It sounds like the stock vehicle didn’t even include a CAN bus so the prelude to the RFID hack had him installing a CAN bus network made up of two microcontrollers. One reads the velocity and RPM while the other displays it on the tachometer. When he began the tag-based entry system he used an RFID reader module for prototyping, but eventually built his own reader around the TRF7960 chip. This included etching his own receiver coil which was mounted in the side-view mirror bracket. To unlock the doors he holds the bracelet up to the mirror and the vehicle lets him in. The video after the break starts with a demonstration of the completed project and moves on to some build videos.

We certainly like the idea of using a bracelet rather than implanting the tag in the meaty part of your hand.

Continue reading “Wristband RFID Unlocks Car Door And Starts Engine”