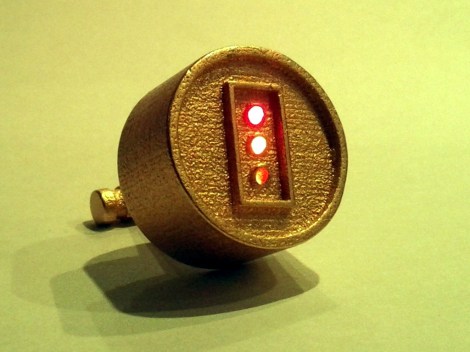
Traffic Light Cufflinks

[Brendan Sleight] has been hard at work on this wearable piece of tech. He doesn’t wear much jewelry, but a wedding ring and some cufflinks are part of his look. To add some geek he designed a set of cufflinks that function like traffic lights. Since he still had some program space left he also rolled in extra features to compliment the traffic light display.

That link goes to his working prototype post, but you’ll want to look around a bit as his posts are peppered with info from every part of the development process. The coin-sized PCB hiding inside the case plays host to a red, amber, and green surface mount LED. To either side of them you’ll find an ATtiny45 and a RV-8564-C2. The latter is a surface mount RTC with integrated crystal oscillator, perfect for a project where space is very tight.

The design uses the case as a touch sensor. Every few seconds the ATtiny wakes up to see if the link is being touched. This ensures that the coin cell isn’t drained by constantly driving the LEDs. The touch-based menu system lets you run the links like a stop light, or display the time, date, or current temperature. See a quick demo clip after the break.


Continue reading “Traffic Light Cufflinks”

Reproduce 3D Printed Models By Making Your Own Molds

Need fifty copies of that 3D printed whirligig you’re so proud of? It might be faster to just cast copies by using the 3D printed model to make a mold. [Micah] found himself in this situation and managed to cast one copy every 10-12 minutes using the mold seen above.

With the object in hand, you need to find a container which will fit the mold without too much waste. The bottom half of the mold is then filled with modeling clay, a few uniquely shaped objects to act as keys, and the model itself. After getting a good coating of release agent the rest of the mold is filled with a silicone rubber product which is sold for mold making. This creates one half of the mold. After it cures the clay and key objects are removed, everything is sprayed with the release agent, and the other half of the mold is poured.

Now your 3D object can be copied by pouring two-part resins in the to shiny new mold.

Moulding New Gears For A Micro Helicopter

heli_09

So you’ve got a broken gear for you model helicopter, and don’t have a 3d printer handy. If you need your little helo flying right away, [James] wrote in to tell us about his solution. As you may have guessed from the title, he made a tiny mould and produced a copy of the gear he needed with it. Given the complications of printing or some tiny subtractive method, this little gear turned out really nicely!

The video after the break shows all the steps for doing this procedure. If you’d rather just skip to the results, check out around 10:00 to see the finished gear, and eventually the little guy in flight. As noted, he did have to drill a hole in the middle of the gear after the mould process, but this was the only machining operation.

The helicopter gears worked out nicely, but be sure to check out some of the other really interesting projects on the [xrobots], some of which we’ve featured here! Continue reading “Moulding New Gears For A Micro Helicopter”

Reading An N64 Controller With A Microcontroller

We’ve seen NES, SNES, Sega, and just about every weird controller Atari put out connected to microcontrollers, but connecting the N64 controller to a project has remained one of those seldom-seen, rarely copied endeavors, not often tackled by makers around the globe. [Pieter-Jan] decided to throw his hat in the ring and give reading an N64 controller with a PIC a try, and we’re pleased to report he’s been completely successful.

One of the difficulties of reading an N64 controller is simply the speeds involved; with only three pins on the controller port, the N64 controller uses a serial protocol to send 32 bits of controller data at a fairly fast rate. Armed with a PIC18F ‘micro, [Pieter] realized that programming in C would be too slow, he needed to go all the way down to the bare metal and program his micro in assembly.

Every time the N64 controller data needs to be read, the console sends out a 9-bit polling request. The controller responds in turn with a 32-bit sequence informing the console of the status of all the buttons and joysticks. Once [Pieter] got his micro sending the correct polling response, it was only an issue of parsing the data returned from the controller.

Right now, [Pieter] has a small demo board rigged up that flashes a LED whenever the A, B, or Z buttons are pressed. This can be expanded to the remaining buttons and joystick, but for now we’ll just enjoy [Pieter]’s demo after the break.

Continue reading “Reading An N64 Controller With A Microcontroller”

Tiny OLED Oscilloscope Gets A Fancy Case

[Gabriel Anzziani] has just unleashed a newer, more convenient version of his Xprotolab portable oscilloscope, logic analyzer, and function generator. It’s up on Kickstarter, and the price is actually very nice for a tool of this caliber.

We first saw the Xprotolab early last year and ran into [Gabriel] at this year’s World Maker Faire in New York. On both occasions we were impressed with the size and capability of this very, very small OLED-display oscilloscope and general breadboarding Swiss army knife.

The Xprotolab features a two-channel, 200 kHz oscilloscope, 8-input logic analyzer, and an arbitrary waveform generator that should be good enough for all your breadboarding adventures. On top of that, the Xprotolab can sniff SPI, I2C, and UART protocols, and even has a small spectrum analyzer tucked away in a device small enough to lose in your pocket.

The updated-for-Kickstarter Xprotolab features an enclosure with a LiPo battery good for 12 hours of use per charge. Sure, it’s not a bench full of old HP and Tektronix gear, but for the budding maker, this seems like a very useful tool indeed.

Directing An Alarm System Straight To The Internet

[Scott] has a pretty nice alarm system at his house – it will give the operator at his alarm company enough information to determine if it’s a fire alarm, burglary, or just a cat walking in front of a sensor. [Scott] wanted to cut out the middle man and receive notifications from his alarm system on his phone. He did just that, with the help of a trusty Arduino and the very cool Electric Imp.

[Scott]’s build began with an Arduino attach to a Raspi to monitor state changes in the alarm system. Because the designers of the alarm system included a very helpful four-wire bus between the alarm panels and the part connected to the phone line, [Scott] found it fairly easy to tap into these lines and read the current alarm status.

Dedicating a Raspberry Pi to the simple task of polling a few pins and sending data out over WiFi is a bit overkill, so [Scott] picked up an Electric Imp Arduino shield to transmit data over WiFi. We’ve played around with the Imp before, and [Scott] would be hard pressed to come up with a cleaner solution to putting his alarm monitor on the Internet.

Now [Scott] has a very tidy alarm monitor that sends updates straight to his cell phone, no middle man required. A very neat build, and an excellent use of a very cool WiFi device.

Storing User Data On Your FPGA

We’ve seen FPGAs used to recreate everything from classic arcade games to ancient computers, but with each of these builds a common problem arises. Once you’ve got the hardware emulated on an FPGA, you’ve also got to get the ROMs into the project as well. In a very interesting hack, [Mike] figured out that the serial Flash chip that stores the FPGA settings has a lot of space free, so why not store user data there?

[Mike] got the idea from seeing a recreation of the classic BombJack arcade game we featured last month. In that build, [Alex] needed to store 112Kb of game data stored in 16 ROM chips. Unfortunately, [Alex]’s FPGA only had space for 40Kb of data. After realizing his FPGA had a 512Kb SRAM chip, [Alex] decided to put all the sprites, sounds, and levels of BombJack in the SRAM.

Impressed with [Alex]’s build, [Mike] set to work generalizing the hack to work with other projects. [Mike] notes that only a few FPGA boards are capable of storing user data next to the  configuration bitstream; the hack is impossible on the Digilent Basys2 board, but it works wonderfully on a Papilio One 250K.

As a very cool build that makes FPGA-related builds even easier, we’ve got to tip our hat to [Mike] for writing up a great tutorial.