Interview: Mill CPU For Humans Parts 3 And 4

Welcome back to the conclusion of our interview on Mill CPU architecture with [Ivan Godard]. If you missed yesterday’s offering you can watch the preview video or go back and read the original article. Above is the third part, with the final installment found after the break.

We’d like to address some concerns from the comments of yesterday’s post. Several readers noted that Mill is only in the simulation phase. [Ivan] is very up-front about that… there is no silicon. But that doesn’t mean we should disregard a company that looks to build on successes from the current generation of processors while avoiding their drawbacks. It is incredibly costly to design silicon from scratch. This is why we don’t see new architectures sprouting up on a monthly basis.

We simply think it’s exciting to see what kinds of changes may be coming and how designers plan to accomplish advances in processing power while reducing power consumption at the same time.

Continue reading “Interview: Mill CPU For Humans Parts 3 And 4”

Posterior Posture Videogame Controller

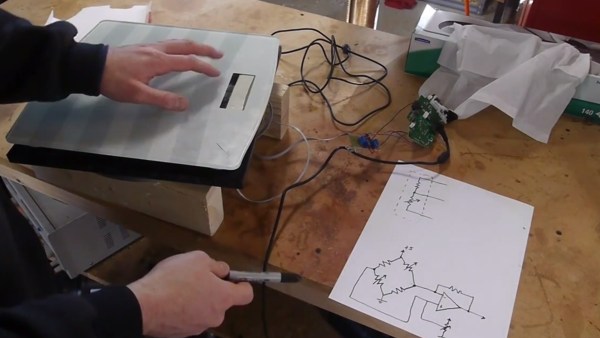
Normally we see some crazy mad science projects coming from [Ben Krasnow’s] laboratory. This week [Ben] changes gears a bit and hacks his Xbox controller to interface with his bathroom scale and function as a posture controlled input device. You may want to take a moment for that to tumble around in your noggin before we trying to explain. What this means is you sit catawampus on a bathroom scale and when you lean forward your game character moves forward, lean back your character backs up and lean side to side for strafe left and right.

A modern digital bathroom scale has four pressure point transducers — one in each corner — which are read by the central controller and summed to generate the weight of the object setting on the scale. To use the scale as a controller input [Ben] removed the central scale controller and created two amplified Wheatstone bridge differential circuits, one for each diagonal axis between load cells. After adding an offset potentiometer to fix the resting point at 0.8 volts, the amplified differential voltage signals are fed directly into an Xbox controller’s thumb stick input for game control.

Additionally, to add rotation to his new game controller he hacked a an old ball type mouse and added a bit of rubber tubing that contacted and tracked the base of a  Lazy Susan platter. The scale sits on the Lazy Susan and allows for the partial rotation of your torso to controlled game rotation. However, [Ben] still needed a regular mouse interfaced with the game for full 360° rotation control.

There is more after the break, plus the build and demonstration video.

Continue reading “Posterior Posture Videogame Controller”

Hacking A Cheap Toy Quadcopter To Work With Arduino

Building your own quadcopter is an expensive and delicate ordeal. Only after you navigate a slew of different project builds do you feel confident enough to start buying parts, and the investment may not be worth your effort if your goal is to jump right into some hacking. Fortunately, [Dzl] has a shortcut for us; he reverse engineered the communication protocol for a cheap toy quadcopter to work with an Arduino.

The cheap toy in question is this one from Hobbyking, which you can see flying around in their product demonstration video. [Dzl] cracked open the accompanying control handset to discover which transceiver it used, then found the relevant datasheet and worked out all the pin configuration involved in the SPI communication. Flying data is transmitted as 8 byte packets sent every 20 mS, controlling the throttle, yaw, pitch and roll.

[Dzl] took the build a step further, writing an Arduino library (direct Dropbox download link) that should catch you up to speed and allow you to skip straight to the fun part: hacking and experimenting! See his quick video after the break, then convince yourself you need a quadcopter by watching this one save its creator, [Paul], the trouble of walking his son to the bus stop.

Continue reading “Hacking A Cheap Toy Quadcopter To Work With Arduino”

Wireless SNES Controller For Logitech Receiver

SNES

A while back, Logitech introduced their version of a wireless interface for keyboards, mice, and other human-oriented peripherals. Yes, they could have used Bluetooth, but that’s neither here nor there. What we do know, though, is that it’s now possible to stuff one of these Logitech transmitters into a Super Nintendo controller, allowing it to operate with your fancy-schmancy wireless keyboards and mice.

[Warrior_Rocker] wanted to retain as much of the stock appearance of the original controller as possible. To do this, he salvaged the Logitech transmitter from an old handheld Logitech keyboard/touchpad combo. The membrane of the keyboard connected directly to the transmitter, meaning tracing out the connections of the membrane to each pin was required to get a button mapping that made sense.

Once the lines of the SNES controller were wired up to the transmitter, [Warrior] needed a way to power his new wireless controller. The old keyboard used a pair of AA cells wired in parallel. With two AA cells, the keyboard had about a year of battery life, so with a single AAA cell, [Warrior]’s SNES controller should last a few months or more.

Except for a switch and a missing cable, [Warrior]’s wireless controller looks exactly like a stock controller. Pretty impressive, given this build is the product of stuff he just had lying around.

An Awesome Wireless Motion Sensor

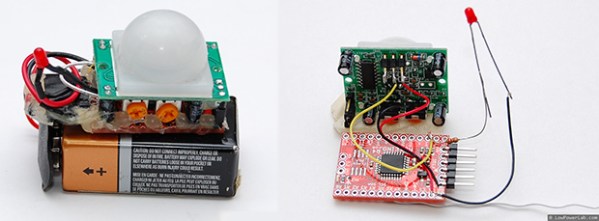
Wireless sensor networks are nothing new to Hackaday, but [Felix]’s wireless PIR sensor node is something else entirely. Rarely do we see something so well put together that’s also so well designed for mass production.

For his sensor, [Felix] is using a Moteino, a very tiny Arduino compatible board with solder pads for an RFM12B and RFM69 radio transceivers. These very inexpensive radios – about $4 each – are able to transmit about half a kilometer at 38.4 kbps, an impressive amount of bandwidth and an exceptional range for a very inexpensive system.

The important bit on this wireless sensor, the PIR sensor, connects with three pins – power, ground, and out. When the PIR sensor sees something it transmits a code the base station where the ‘motion’ alert message is displayed.

The entire device is powered by a 9V battery and stuffed inside a beautiful acrylic case. With everything, each sensor node should cost about $15; very cheap for something that if built by a proper security system company would cost much, much more.

A Simple, Overkill, Electric Car

If you’re building an electric car nowadays, you’re probably looking at taking a normal, gas-powered car and replacing the engine and transmission with an electric motor and batteries. [Gahaar] thought this is a rather dumb idea; all the excesses of an internal combustion-powered car, such as exhaust, cooling, differential, and fuel storage is completely unnecessary. Building a new electric car from the frame up is a vastly more efficient means of having your own electric car. So that’s what he did.

[Gahaar] build his new chassis around a single box made of 3mm aluminum sheet. Attached to this box are two AC induction motors at the rear of the car, negating the need for a differential, with 45 lithium cells stuffed into the middle of the box. There’s no gearbox here, greatly reducing the complexity of the build, and with the batteries providing 145V and 100Ah, this simple car has more than enough power for a lot of fun.

The suspension and steering were taken from a wrecked car, in this case a Mazda MX5, or Miata for those of us in North America. The Miata suspension easily unbolts from the frame of the wrecked car, and with just a little bit of welding can easily be attached to the new electric chassis.

Even though [Gahaar]’s car is basically just a bit of aluminum, motors, suspension, and batteries, he’s getting some awesome performance out of it; he estimates a top speed of 100mph with about 60 miles per charge. It’s an awesome way to get around the farm, and with a custom fiberglass body, we can easily see this being one of the coolest electric vehicles ever made.

Salvaging Gold From Old Electronics

If you’re hoarding old electronics like us, there’s a good probability you have a decent amount of gold sitting around in cardboard boxes and storage containers. Everything from old PCI cards, IC pins, and even printers have a non-negligible amount of precious metals in them, but how do you actually process those parts and recover that gold? [Josehf] has a great tutorial for gold recovery up on Instructables for the process that netted him an ounce of gold for three months’ work.

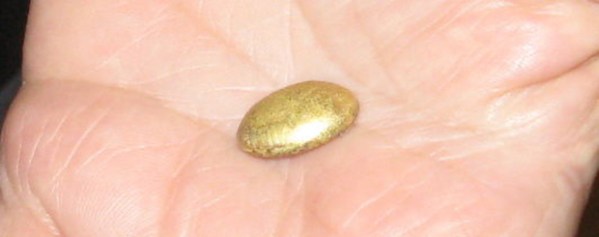
After cutting up a few circuit boards to remove the precious gold-bearing parts, [Josehf] threw these parts into a mixture of muriatic acid and hydrogen peroxide. After a week, the acid darkened and the gold slowly flaked off into dust. This gold dust was separated from the acid by passing it through a coffee filter and readied for melting into a single nugget.

Gold melts at 1064 ˚C, much hotter than what can be obtained by a simple propane torch. This melting point can be reduced by the addition of borax, allowing the simplest tools – a propane torch and a terra cotta crucible – to produce a small gold nugget.

For three months of collecting, stripping, and dissolving electronic parts, [Josehf] netted 576.5 grains of gold, or at current prices, about $1500 worth of the best conductor available. Not too bad, but not something we’d use as a retirement plan.

Thanks [Matthias] for sending this in.