Smart Brake Lights And More With OpenXC

smart-brake-light

At a recent hack-a-thon event, [Al Linke] tapped into a vehicle’s OBD port with an OpenXC vehicle interface and hacked an LED screen in the rear window to display data based on events. If you haven’t heard of OpenXC, you can expect to read more about it here at Hackaday in the near future. For now, all you need to know is that OpenXC is Ford’s open source API for real-time data from your vehicle: specifically 2010 and newer model Ford vehicles (for now).

[Al] connected the OpenXC interface to his Android phone over Bluetooth, transmitting data from the OBD port to the phone in real time. From here, the Android can do some really cool stuff. It can use text to speech to announce how much your lead foot cost you, add sound effects for different car events, and even interact with additional devices. Although he managed all of those features, [Al’s] primary goal was to add an LED screen that displayed messages on the vehicle’s back window.

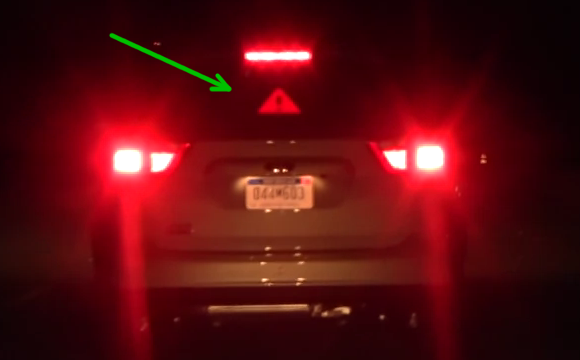
When the phone detected a braking event from the car, it directed the LEDs to light up with a “braking” image, adding some flavor to the process of stopping. He could also change the image to a “Thank You” sign with a waving hand, or—for less courteous drivers—an “F U” image with a slightly different hand gesture. You’ll want to check your local and/or national laws before attempting to strap any additional lighting to your vehicle, but you can watch [Al’s] car light up in the video below. For a more detailed look under the hood, he’s also provided an Instructables page.  If OpenXC catches on, the number of vehicle hacks such as the Remote Controlled Car may skyrocket.

Continue reading “Smart Brake Lights And More With OpenXC”

Cloning An Infrared Disarming Remote Of A $8 Home Security System

5

[Sylvio] decided to buy one of the cheap alarm systems you can find on the internet to have a look at its insides. The kit he bought was composed of one main motion sensor and two remote controls to arm/disarm it.

Communication between the remotes and the sensor is done by using infrared, requiring a direct line of sight for a signal to be received. Modern alarm systems typically use RF remotes with a typical frequency of 434MHz or 868MHz.  In his write-up, [Sylvio] first tries to replicate the IR signal with one of his ‘learning remote controls’ without success and then proceed to reverse engineering the remote circuit shown in the above picture. Hackaday readers may figure out just by looking at it that it is a simple astable multivibrator (read ‘oscillator’). Its main frequency is 38.5kHz, which is typical for IR applications. Therefore, if one of your neighbours had this ‘security system’ one could just disarm it with any of the same remotes…

[Sylvio] then explains different ways to replicate the simple IR signal, first with an Arduino then with a frequency generator and finally using the USB Infrared Toy from Dangerous Prototypes. We agree with his conclusion: “you get what you pay for”.

A Sublime PVC Cannon

PVC

Not to be outdone with hair spray powered PVC cannons, [William] created an even cooler device: a cannon powered by dry ice.

Once dry ice is loaded into the pressure vessel, a burst disk is placed in the breech and the barrel is screwed on. The trigger isn’t very precise – the entire gun is powered by dry ice turning from a solid into a gas – but the resulting cloudy booms more than make up for any imperfections.

Despite building a cannon and using PVC as a pressure vessel, [Bill]’s project is actually quite safe. The ‘trigger’ is a burst valve made out of a disc of aluminum foil held between two sections of PVC. When the pressure rises, the aluminum foil inevitably tears, shooting whatever is in the barrel out and hopefully not into an eye. The ‘safety’ on the gun is a ball valve connected directly to the pressure vessel, and with a pressure gauge and a release valve. We’re more than confident in saying this is pretty darn safe as far as PVC cannons are concerned.

A Touch Screen Geiger Counter Without A Geiger Tube

geiger

We’re assuming [Toumal] was desperately bored one day, because in the depths of the Internet he found some really cool components to build a solid state Geiger counter.

The Arduino and touchscreen are rather standard fare [Toumal] picked up on eBay for about $30. What really sets this project apart from all the other geiger counter builds we’ve seen is the solid state geiger counter [Toumal] used. This device uses a specially-made photodiode made by First Sensor to detect gamma emissions from 5 to 1000 keV.

[Toumal] put all the software for his Arduino touch screen radiation detector up on github. To be honest, we’re really impressed with the rad sensor [Toumal] used for this project, so if you ever decide to pick one of those up, he’s got your back with an Arduino library for it.

Using Google Authenticator With An Arduino

Google Authenticator is an app that generates one time passwords (OTPs). These passwords are often used as a second factor of authentication, along with your normal password. OTPs work by having a shared secret and a synchronized clock on two devices. When you generate the password, a hash based on the secret and timestamp is created. This proves that you have access to the secret, and can only be used once.

To secure his Lego mini-figures, [Luca] built an authentication system using Google Authenticator and Arduino. A web app is used to generate a secret that can be configured into the Arduino using an array, and into Google Authenticator using a QR code. The Arduino is using a library that implements Time-based One Time Password authentication (TOTP).

There are some challenges, including keeping a good clock source on the Arduino, but this look like an interesting way to do authentication. After the break, watch a quick video overview of the project (for English captions, hit the CC button).

Continue reading “Using Google Authenticator With An Arduino”

SNESoIP: It’s Exactly What It Sounds Like

prototype-small

Here’s a cool hack for those of you wishing to play some retro multiplayer SNES games online!

[Michael Fitzmayer] is a resident hacker at shackspace; der hackerspace in StuttgartHe’s come up with this clever little ethernet adapter network-bridge that can share local controller-inputs over the internet. The entire project is open-source, and readily available on github. It’s still in the early stage of development, but it is already fully functional. The firmware is small and will fit on an ATmega8, and by the looks of the component list it’s a fairly easy build.

He’s even integrated a switch mode (hold B and Y during boot), which avoids trying to figure out which controller will be player one! After all, don’t you remember untangling the controller cords, trying to figure out which one is which?

We know you had a favorite controller and would give the other “crappy” one to your guest.

Example video is after the break.

Continue reading “SNESoIP: It’s Exactly What It Sounds Like”

USB Ableton Foot Controller Reuses Old Keyboard

footLooper2

No, Hackaday hasn’t started advertising shoes, this is [Matlek’s] foot controller for Ableton Live.

Matlek plays guitar and needed an easy way to control Ableton Live, which he uses as a looper. Ableton normally expects keyboard input, so that’s exactly what he gave it.

An old dell keyboard was gutted down to its controller board. This exposes  the leads the keyboard uses to scan the key matrix.  From there it is simply trial and error connecting different pins together and seeing which keys are printed on the PC screen (A text editor works well for this). Only 8 characters are needed to control the looper, so [Matlek] chose digits 1-8.

Since some of the wires are going to be sharing pins, a small piece of stripboard comes in handy between the buttons and the keyboard controller. [Maltek] used basic momentary push buttons for his mini key matrix, though we think that box looks sturdy enough to support some larger stomp box style buttons.

Everything comes together inside a sturdy shoebox, which also serves to insulate the exposed keyboard PCB from shorting out.

The only major downside to the project is that the box is light enough that it slides easily on the floor when recording or triggering loops. Adding some heavy items (or dare we say, some shoes) would solve this problem. Self adhesive rubber feet on the bottom of the box would help too.

Continue reading “USB Ableton Foot Controller Reuses Old Keyboard”