Dad-Built Rocket Control Module

Like a lot of parents, [justbennett]’s kids like to play rocket and spaceship command. His kids’ imagination-assigned controls kept shifting from this LEGO to that banana to the dog’s tail, so [justbennett] did what he had to do: make this Dad-built rocket control module for them.

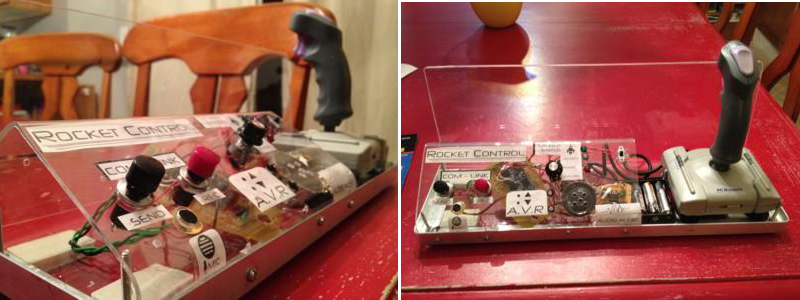
The module supports all of the vital sub-modules required for rocket and spaceship administration. There is a launch status indicator, an acceleration vector resonator (AVR), and a com-link. He used mostly parts on hand, and the Arduino count is zero. He built a NASA-grade Plexiglas enclosure to avoid juice box incidents. The two pieces are connected with aluminum angle bar so that he can make repairs or modifications.

The analogue joystick was a thrift store find. [Justbennett] wired the trigger and thumb buttons up as the AVR which activate a recycled PICAXE 08M project of his. The PICAXE senses the button pushes to flash an LED and play an ascending or descending tone. Long-pressing one button will result in an explosion noise as you might expect.

The launch status indicator is a potentiometer wired to a second PICAXE and three LEDs that light up in sequence. In the future, [justbennett] intends to add haptic feedback with a tiny vibration motor. The com-link packet messaging system is a Radio Shack recording module and two big, tempting buttons. The control module ships with a message from Star Command that explains the controls.

Under Water Record Player Is Very Mesmerizing

Once in a while we get a really awesome tip about a technical art installation — there sometimes isn’t much info behind it, but the idea and concept behind it alone sparks our curiosity. That is most definitely the case for this submerged record player.

Artist [Evan Holm] has created this awesome installation which features a black pool of water — with a built-in record player. He’s somehow waterproofed the player itself, and integrated the controls and needle into a tree, which is part of the installation.

He has a very long and artsy description about the meaning of it, how it represents loss and mystery, and the collective subconscious of the human race… We just see it as a really cool hack. There’s also a full documentary about how he sets up the installation at various shows.

We’ve included both videos following the break — it is very tempting to try recreating something similar!

Continue reading “Under Water Record Player Is Very Mesmerizing”

Lichtspiel Crosses Board Games With Video games

Lichtspiel

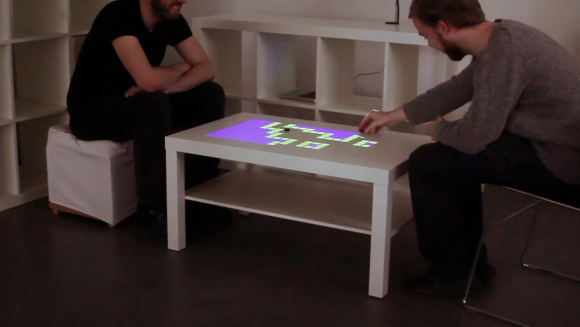
Video games are amazing these days. Cinemagraphic game play, incredible accelerated graphics, you name it. The average tabletop board game though, has not received the benefit of all this technology. [Marcel] hopes to provide some options for changing that with Lichtspiel, an Interactive Digital Boardgame. Lichtspiel uses a Philips Pico-Beamer projector to project the game board onto a white surface. A camera (either a Raspberry Pi camera module or a Logitech USB webcam) then picks up the players interactions with the game board. Actual interaction is done with small black chips. When a player moves their chip, the vision system sends the x,y coordinates main processor. The game then changes based upon the chip position. [Marcel’s] video shows two demonstrations, a matrix style board game simulation for two and a co-operative asteroids style game. In the asteroids style game one player moves the ship while the other aims the weapons.

We can’t help but see the similarities between this system and the board game demos for castAR , though we feel they fill different niches. Lichtspiel does away with 3D, and by doing so doesn’t require projection glasses to play. Lichtspiel definitely has possibilities. We’d love to see [Marcel] open up his software design so that it can be further developed.

Continue reading “Lichtspiel Crosses Board Games With Video games”

Hackaday Links: February 16, 2014

hackaday-links-chain

[Moogle] wrote in to see if anyone can figure out why his unused electrolytic capacitors are popping. This is the behavior you see in populated caps whose electrolyte dries out. But these are still in his parts bin. Anyone know why they would pop when going unused?

We see a lot of BIOS flashing hacks; but it’s always a handy thing to know about when you get in a bind. Here [Adan] shows us how to reflash a corrupt BIOS using a Tiva C Launchpad board.

Wanting to hack together her own blow gun [Carlyn] scrapped a handheld vacuum cleaner. When she discovered the pump could not easily be converted from suck to blow she made a handheld suction manipulator which picks up paper plates and a few slightly heavier objects.

Unfortunately a drill press is not one of the tools we have in our lair right now. If we did, this tip about using it to help tap threads in a hole would come in really hand.

Retro computing fans will appreciate this Z80 computer build (translated). It’s a fairly large mainboard with plenty of chips, resistors, buttons, and seven segment displays. Excellent. [Thanks Daniel]

We start to drool a little bit when we see a teardown post that shows off a piece of equipment really well. We’ve already reached for a bib to catch the slobber from pawing our way through [David’s] teardown of an HP 6010A bench supply.

Building A Better Sewing Machine

sewing

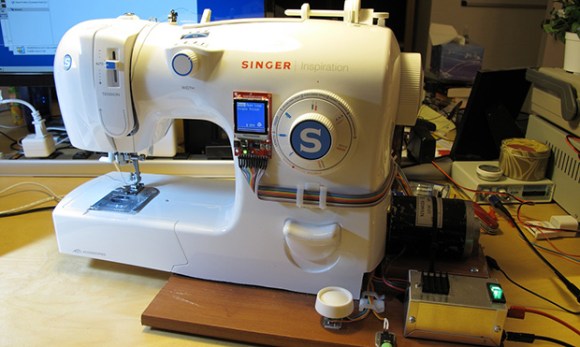
After making a few fabric RFID tags, [Micah] had a sewing machine sitting in her workshop completely unused. This was due at least in part to how crappy this entry-level sewing machine was; it stalled easily, unusable at low speeds, and noises like a robot with bronchitis. The solution, of course, was to replace the motor and add electronic control, turning a terrible sewing machine into one that should cost several hundred dollars more.

After some experimentations with an AC motor, [Micah] came upon a small DC motor. This, combined with an LMD18200 H-bridge, Propeller microcontroller, and a beefy power supply gave [Micah] enough torque to run the sewing machine without mechanical wheezing and grinding.

The new update to the motor allowed [Micah] several control modes for the machine, all controlled by the foot pedal: an open-loop mode is pretty much the same as the stock machine, a closed-loop mode keeps a constant RPM on the motor regardless of resistance. There are a few more interesting modes that moves the needle down when the pedal is released, perfect for detailed work.

A small addition to this project was an LCD attached to the front of the machine, allowing [Micah] to toggle modes without the microcontroller being connected to the computer.

Continue reading “Building A Better Sewing Machine”

Fixing The Unfixable: Pebble Smartwatch Screen Replacement

[Colt] found himself with a broken Pebble, so he fixed it. The Pebble watch really ignited the smartwatch world with its record-breaking Kickstarter campaign. Working on the Pebble has proved to be frustrating experience for hardware hackers though. Ifixit’s teardown revealed the Pebble extremely difficult to repair. This isn’t due to some evil plan by the smartwatch gods to keep us from repairing our toys. It’s a problem that comes from stuffing a lot electronics into a small waterproof package. [Colt’s] problem was a bad screen. Pebble has a few known screen issues with their early models. Blinking screens, snow, and outright failed screens seemed to happen at an alarming rate as the early Kickstarter editions landed. Thankfully all those issues were corrected and replacements sent to the unlucky owners.

The actual screen used in the Pebble is a Sharp Memory LCD. Memory is an apt name as the screens actually behave as a SPI attached write only memory. Sharp sells flexible printed circuit (FPC) versions of the LCDs to aid in debugging. For space constrained designs though, an elastomeric or “zebra strip” connector is the common way to go. Alternating bands of conductive and insulating material make electrical connections between the Pebble’s circuit board and the conductive portions of the LCD glass.

[Colt] found himself with a dead screen out of warranty, so he decided to attempt a screen replacement. He found a replacement screen from Mouser, and proceeded to remove the top case of his watch. The top plastic case seems to be the hardest part of getting into a Pebble. It appears to be bonded with a glue that is stronger than the plastic itself. [Colt] broke the glass of his screen during the removal, which wasn’t a big deal as it was already dead. Prying only destroyed the top plastic, so he broke out a rotary tool which made quick work of the plastic.  The new screen worked perfectly, but had to be held in just the right position over its zebra connector. Some waterproof epoxy held it in place permanently. The next step was a new top cover. An old flip phone donated its plastic shell to the effort, and hot glue kept everything in place. [Colt] finished his work with a couple of layers of model paint. The result certainly isn’t as pretty or waterproof as the original. It is functional though, and about $120 USD cheaper than buying a new Pebble.

Continue reading “Fixing The Unfixable: Pebble Smartwatch Screen Replacement”

Nrf24l01+ Using 3 ATtiny85 Pins

[Ralph] wasn’t satisfied with the required 5 control pins to drive his nrf24l01+ transceiver module, so he used this circuit needing just 3 pin using an ATtiny85.

One of the key components was to effectively drive the chip select (CSN) line from the clock (SCK) line. The nrf24l01+ needs the CSN line to transition from high to low on the beginning of a communication.  [Ralph] put the SCK line behind a diode, put a capacitor in parallel with the CSN line and altered the arduino-nrf24l01 library to encode extra delays for the clock line.  This allowed the CSN line to be driven by the SCK line. Subsequent line transitions during transmission happen too fast to charge the capacitor, leaving the CSN line in a low state.

After tying the chip enable line high and dropping the 5V power line to 1.9-3.6V across a red LED, [Ralph] had an ATtiny85 controlling a nrf24l01+ module.

Though deceptively simple, a very cool hack that opens up a couple more lines on the ATtiny85.