High Tech Convertible Desk Takes It Up A Notch

Standing desks seem to be all the rage today — but do you really want to commit fully to always standing? [Jeff Minton] didn’t, and when he found out how much convertible standing desks cost… he decided to make his own.

While brainstorming ways of accomplishing this he started browsing around eBay and found 18″ linear actuators for sale. They were $45 each, ran at 24V and could lift 600lbs each. Bingo. Actually, that’s kinda overkill…

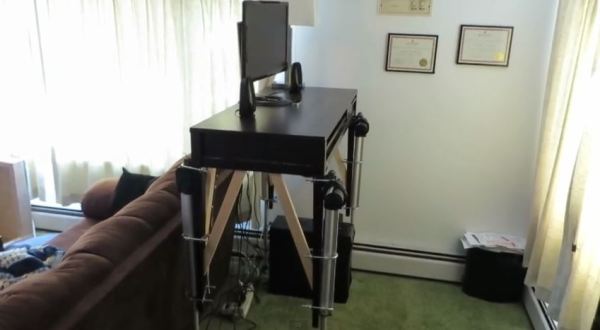
He picked up a 24V power supply, an Arduino, and a 8-channel relay board.  The actuators are attached to the desk’s original legs using U-bolts which keep the legs straight and take the load of the desk. The untreated wood supports are there to reinforce the original desk, because they weren’t that sturdy in the first place.

It takes about a minute to fully actuate the legs, so while it’s not the prettiest nor the quickest solution — it does the trick and allows you to easily switch between standing and sitting.

Continue reading “High Tech Convertible Desk Takes It Up A Notch”

Hackaday’s Guide To Shanghai

We happened to be in Shanghai for Electronica trade fair this year and had a great time exploring heavy industrial gear and fantasizing about all the things we could do with it. However, we simply couldn’t ignore the fact that there was a whole city out there that we’re completely missing out on. So after less than a day of being surrounded by businesspeople and Miss Universe-dressed promoters, we decided to pack our bags and hit the streets.

The question was, where should we go? Finding interesting things in a city that keeps shapeshifting (the whole Shanghai skyline did not exist 20 years ago) can be a challenge. Fortunately, our friend [David Li] gave us a list:

  1. Xin Che Jian
  2. Jiu Xing market
  3. Beijing Lu electronic market
  4. Qiujiang Lu CNC/lasercut market
  5. DFRobot.com

…and off we were.


Continue reading “Hackaday’s Guide To Shanghai”

The Auto Parking Mecanum Robot

mecanum

A while back, Hackaday visited the Clark Magnet School in Glendale, California to sneak a peek on their STEM-focused curriculum, FIRST robotics club, awesome A/V classroom, and a shop that puts most hackerspaces to shame. We saw a few builds while we were there, but [Jack]’s auto parking mecanum robot was in a class by itself. It deserves its own Hackaday post, and now that [Jack] is on Hackaday Projects, he’s sharing all the details.

The most impressive aspect of [Jack]’s build is the mecanum wheels; the side plates for the wheels were designed by [Jack] himself and machined on his school’s Haas mill. When the plates came out of the mill they were flat, and each of the fifteen little tabs on the plates needed to be bent at a 45 degree angle. With a CNC jig and a lot of time on his hands, [Jack] bent the tabs for all eight plates.

In addition to the plates, the rollers were custom made from non-expandable polyurethane poured into a CNC milled mold. That’s a one-part mold; [Jack] needed to make sixty of these little parts, one at a time.

The electronics are built around an Arduino Mega communicating with a joystick via an XBee. [Jack] found the relays in the off-the-shelf motor board couldn’t handle the current, so he replaced them with much, much larger ones in a hack job we’d be proud to call our own handiwork. There’s also a little bit of code that allows this motorized cart to pull off the best parallel parking job anyone could ever wish for. You can see that and a few videos of the construction below.

Continue reading “The Auto Parking Mecanum Robot”

A Mini Op-Amp Based Line Following Robot

LineRobot

There’s no denying it. Super small robots are just cool. [Pinomelean] has posted an Instructable on how to create a mini line following robot using only analog circuitry. This would make a great demo project to show your friends and family what you’ve been up to.

Analog circuitry can be used instead of a microcontroller for many different applications, and this is one of them. The circuit consists of two op-amps that amplify the output of two phototransistors, which control each motor. This circuit is super simple yet very effective. The mechanical system is also quite cool and well thought out. To keep things simple, the motors drive the wheel treads, rather than directly through an axle. After the build was completed, the device needed to be calibrated by turning potentiometers that control the gain of each op-amp. Once everything is balanced, the robot runs great! See it in action after the break.

While not the smallest line follower we have seen, this robot is quite easy to reproduce. What little robots have you build lately? Send us a tip and let us know!

[via Embedded Lab]

Continue reading “A Mini Op-Amp Based Line Following Robot”

An Etch-A-Sketch To Fetch The Time

For someone who has never used stepper motors, real-time clocks, or built anything from scratch, [Dodgey99] has done a great job of bending them to his will while building his Etch-A-Sketch clock.

He used two 5V stepper motors with ULN2003 drivers. These motors are mounted on the back and rotate the knobs via pulleys. They are kind of slow; it takes about 2 1/2 minutes to draw the time, but the point of the hack is to watch the Etch-A-Sketch. [Dodgey99] is working to replace these steppers with Nema 17 motors which are much faster. [Dodgey99] used an EasyDriver for Arduino to drive them. He’s got an Arduino chip kit in this clock to save on the BOM, but you could use a regular Arduino. He left out the 5V regulator because the EasyDriver has one.

[Dodgey99] has published three sketches for the clock: one to set up the RTC so that the correct time is displayed once the Etch-A-Sketch is finished, some code to test the hardware and sample the look of the digits, and the main code to replace the test code.

The icing on this timekeeping cake is the acrylic base and mounting he’s fashioned. During his mounting trials, he learned a valuable lesson about drilling holes into an Etch-A-Sketch. You can’t shake an Etch-A-Sketch programmatically, so he rotates it with a Nema 17. Check it out after the jump.

If you’re paying attention, you’ll realize we just saw the exact opposite of this project a few hours ago: a CNC tool (laser cutter) controlled by turning Etch-A-Sketch knobs.

Continue reading “An Etch-A-Sketch To Fetch The Time”

RiotNAS: Mobile Storage For Street Photography

riotnas1

You’re likely aware of the protests and demonstrations happening throughout Venezuela over the past few months, and as it has with similar public outcries in recent memory, technology can provide unique affordances to those out on the streets. [Alfredo] sent us this tip to let us know about riotNAS: a portable storage device for photos and videos taken by protesters (translated).

The premise is straightforward: social media is an ally for protesters on the ground in these situations, but phones and cameras are easily recognized and confiscated. riotNAS serves up portable backup storage via a router running OpenWRT and Samba. [Alfredo] then connected some USB memory for external storage and a battery that gives around 4 hours of operating time.

For now he’s put the equipment inside a soft, makeup-looking bag, which keeps it inconspicuous and doesn’t affect the signal.  Check out his website for future design plans—including stashing the device inside a hollowed out book—and some sample photos stored on the riotNAS system. If you’re curious what’s going on in Venezuela, hit up the Wikipedia page or visit some of the resources at the bottom of [Alfredo’s] site.

Laser Cutter Becomes An Etch A Sketch

etch

The mirror in a laser cutter moves along an X Y axis. An Etch A Sketch moves its stylus along an X Y axis. Honestly, this laser cutter with Etch A Sketch controls is so obvious, we’re shocked we haven’t seen it before.

The Etch A Sketch interface is extremely simple – just two rotary encoders attached to laser cut knobs set inside a small, laser cut frame. The lines from the encoders are connected to an Arduino Pro Mini that interfaces with the controller unit on the laser cutter, moving the steppers and turning on the laser only when the head is moving. There’s an additional safety that only turns on the laser when the lid is closed and the water pump is running.

The circuit is extremely simple, and with just a few connections, it’s possible to retrofit the Etch A Sketch controller to the laser cutter in just a few minutes.  Just the thing for a weekend hackerspace project.


Continue reading “Laser Cutter Becomes An Etch A Sketch”