Sublime Text As An Arduino IDE

If you’ve played with an Arduino, you’ve probably been frustrated by the IDE. It works, but it’s not the best editor. It’s especially painful for bigger files and larger projects. The Stino plugin for Sublime Text aims to solve this issue by bringing the full functionality of the Arduino IDE to the Sublime Text editor.

Sublime Text is a powerful text editor with support for most programming languages. What it’s missing is support for compiling and uploading code to an Arduino. Stino bridges that gap. Sublime is a commercial product, and retails for $70 USD. However Sublime does have an indefinite trial period, so Stino can be evaluated for free. Stino itself is an open source plugin written in Python, and you can contribute to the project on Github.

After installing Sublime and Stino, you point the plugin at an Arduino install folder. It then allows you to build and flash directly from the editor. For anyone who’s been frustrated with the Arduino IDE, this looks like a slick solution.

[Thanks to Matt for the tip!]

The Raspberry Eye Sees All

[Roman Rolinsky] wanted to try to do something interesting with his Raspberry Pi and a 2.4″ LCD he had laying about… So he made a rather bulky version of Google Glass.

We’ve seen a few examples of home brew Google Glass before, or even real-life subtitle glasses used for translation on the fly, but what we really like about [Roman’s] project (besides the fact he hosted it on our very own awesome project hosting site) is that he’s put together the projection system himself out of basic components.

To create the HUD, he’s using a semi-transparent mirror which he took out of a game of Khet 2.0 called the Eye of Horus Beamsplitter — which is a really cool real-life puzzle board game like those games where you have to reflect the laser to solve a puzzle. He’s then using a 3x Fresnel magnification lens which is placed over top of his 2.4″ LCD in a 3D printed enclosure. This magnifies and reflects the image onto the mirror which is placed directly over his eye, allowing for a see through display.

Stick around after the break to see a video of the Raspberry Eye in action!

Continue reading “The Raspberry Eye Sees All”

Hackaday Links: April 20, 2014

hackaday-links-chain

[Josh] hit the same issue we’ve faced before: cable modems don’t match a form factor and usually don’t make themselves easy to mount on something. We could complain about routers as well, but at least most of those have keyhole slots so you can hang them on some screws. Inspiration struck and he fabricated his own rack-mount adapter for it. Velcro holds it in place, with a cutout bezel to see the status lights and an added fan to keep things cool.

Here’s a pair of strange but possibly interesting ones that were sent in separately. The first is an analysis of how much energy short-run CNC prototyping consumes versus traditional manufacturing. The other is an article that [Liz] wrote about getting started with CNC mill bits. She says she compiled all that she learned as she was getting started in the field and wants to save others the effort.

This one goes back several years, but who doesn’t love to hear about a voice-controlled wheelchair?

So you can solder QFN parts but you can’t hammer a nail straight into a piece of wood? The answer, friend, is a laser guided hammer. Someone hire this [Andybot] person, because the solution to the problem shows the ability to out-think an interesting dilemma: how do you put a laser in a hammer head and still use it to hit things?

We’ve seen a lot of these long-range WiFi hacks over the years. This one is worth looking at because of the work done to create an outdoor mount that will stand the test of time.

And finally, we’re still really fond of this 2-bit paper processor that helps you wrap your brain around what’s going on with those silicon wafers that rule our everyday lives. [glomCo] liked it as well, and actually coded an emulator so that you can play with it without printing anything out on paper. We think it takes away some of the fun, but what an excellent programming exercise!

Sci-Fi Contest Roundup: Stargate

stargate

The 90s were a remarkable time for Sci-Fi movies, in that there actually were sci-fi movies, and not sequels to a reboot of yet another comic book movie. One of the breakout hits from this era was Stargate, the film and three syndicated television series. With a corpus this large, a few Stargate builds made it into our Sci Fi contest, and from the looks of things, they’re pretty cool.

The Ma’Tok Staff

546381397503980641
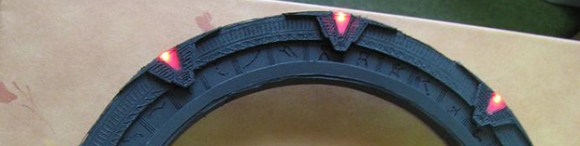
The Ma’Tok staff is an energy weapon used by Jaffa warriors that fires a concentrated plasma bust over 70 yards. While we question the utility of a weapon that’s only accurate to 70 yards on the battlefield (like, arrows are better, man) [frankstripod] is making his own version. Instead of plasma bolts, it’ll be a hairspray-powered PVC potato cannon.

It’s totally not a tricorder

scanner
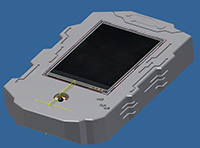
The Ancients in Stargate Atlantis had a multifunction handheld device capable of detecting life signs, observing multiple frequencies of the electromagnetic spectrum, and finding power sources.  Basically, it’s a smartphone that’s not from Star Trek. This scanner became an important piece of commandeered technology, and these guys are building their own. Qi wireless charging, touch screen, IR transceiver, and everything a real tricorder should be.

Wait. Where did he get Naquadah?

Stargate

What good would a post on Stargate builds be without an actual Stargate? [shlonkin] and [dkopta] are doing just that, complete with a rotating right and light-up chevrons. Here’s a video. Video below, of course.

The Sci-Fi contest runs until the end of the month, so there’s still time for you to get in on the action and get your hands on some really great prizes. We’re giving away O’scopes, soldering stations, dev boards, some sweet Sci-Fi prizes, and awesome Hackaday T-shirts.

Continue reading “Sci-Fi Contest Roundup: Stargate”

Blinky LED Necklace That Actually Looks Chic

LED bib necklace by Agy

[Agy] a fabric hacker in Singapore has made a chic light sensitive LED necklace, and written up the tutorial on her blog  Green Issues by Agy. The lovely thing about this hack is that it doesn’t look like a breadboard round her neck, and most of the non-electronic components have been upcycled. [Agy] even used Swarovski crystals as LED diffusers for extra bling.

Using a LilyPad Arduino with a light sensor and a few LEDs, [Agy’s] circuit is not complicated. She seems to be just branching out in to wearable tech, so it is nice that she learnt to program different modes for bright and low light (see video below). Her background in sewing, refashioning and upcycling does show through in her crafty use of an old pair of jeans and lace scraps for this project.

We love tech focused jewelry like [TigerUp’s] LED matrix pendants or [Armilar’s] Nixie-ify Me Necklace, but they do scream Geek. DIY electronically enhanced accessories are becoming more commonplace with the variety of micro-controller platforms expanding rapidly. Low energy wearable boards like MetaWear are making it easy for the tech to be discreet and easily connected to your smartphone.  3D printing is enabling us to create durable enclosures, settings and diffusers like the ones used for LED Stegosaurus Spikes. With all these things, hobby wearable projects can not only be functional and durable, but can also look great too.

Do you think this necklace would look out of place in a non-geeky gathering? Have you got any helpful tips for [Agy’s] code? Have you tried using gems or crystals as diffusers and what were the results? Let us know in the comments below.

Continue reading “Blinky LED Necklace That Actually Looks Chic”

The Computer Without A CPU

1bit

[Jeff Laughton] was contacted by a customer that was interested in adding some automated functions to a printing press. Before eventually settling on a microcontroller for the job, [Jeff] went old school and started looking at logic gates, counters, and flip-flops. This lead him to the Motorola 14500 industrial control unit, a minimal processor with only 16 instructions. After a few ‘back of the napkin’ sketches, he came up with an extremely minimal computer that doesn’t use a microprocessor. It’s an interesting design notable not only for its electronic brevity, but also because it only uses one instruction.

The only instruction this computer will ever execute is an input test, the result of which controls a two-way branch. Instructions consist of an input address, output address, and a single bit of data. If the data bit is true, the computer jumps to one location in ROM, and if the data bit is false, a jump to another location is executed.

A computer really isn’t a computer without some form of memory, and this design is no exception. [Jeff] managed to add two bits of data between the 8-bit latch and 8-bit multiplexer in the design. This is enough to call a few subroutines which test the I/O-mapped memory to decide what the next instruction should be.

It’s a truly bizarre design, but actually much closer to a true Turing machine than the computers in your pocket, on your wrist, on your desk, and in your car.

Thanks [James] for the tip!


Make A 3D Scanner For 60€ Using Old Hardware

3d laser scanner

[Till Handel] just put the finishing touches on a paper he wrote about how to build a cheap 3D scanner — mostly out of spare parts.

Using parts from old printers and notebooks, he’s cobbled together this rather rough-looking laser scanner. But don’t be fooled by its looks! It’s capable of scanning 360° around itself at distances from 0.3 – 5m, making it an excellent candidate for scanning rooms.

It uses a line laser and a webcam mounted on an arm driven by a stepper motor, which looks like it’s out of an old optical drive. An Arduino Uno and an A4988POW stepper driver control the system. The paper (Caution: PDF) is very detailed and published under GPLv3 (a general public license).

Continue reading “Make A 3D Scanner For 60€ Using Old Hardware”