Huge RGB Ring Light Clock

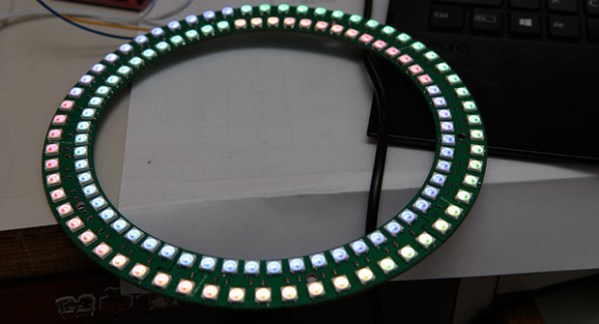
After several months of work, [Greg] has completed one of the most polished LED clocks we’ve ever seen. It’s based on the WS2812 RGB LEDs, with an interesting PCB that allowed [Greg] to make a huge board without spending a lot of money.

The board is made of five interlocking segments, held together with the connections for power and data. Four of these boards contain only LEDs, but the fifth controller board is loaded up with an MSP430 microcontroller, a few capsense pads for a 1-D touch controller, and programming headers.

Finishing up the soldering, [Greg] had a beautiful LED ring light capable of being programmed as a clock, but no enclosure. A normal plastic case simply wouldn’t do, so [Greg] decided to try something he’d never done before: casting the PCB inside a block of resin.

A circular mold was made out of a piece of MDF and a router, and after some problems with clear resin that just wouldn’t cure, his ring light was embedded in a hard, transparent enclosure.  Conveniently stuck in the mold, of course. The MDF had absorbed a little bit of the resin, forcing [Greg] to mill the resin ring free from the wood, with a lot of finish sanding to make the clock pretty.

It’s a clock that demonstrates [Greg]’s copious manufacturing skills, and also his ability to troubleshoot the problems that arose. While he probably won’t be casting things inside an MDF mold anymore, with the right tools [Greg] could easily scale this up for some small-scale manufacturing.

 

TERMES: Termite Inspired Robots

termite inspired robots

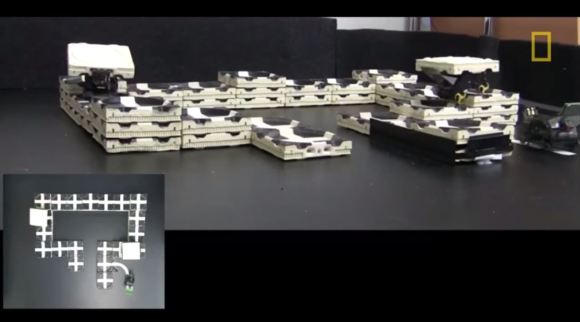
Termites, if you think about it, are actually quite amazing. They are capable of building massive complex structures without direct leadership. The Wyss Institute at Harvard is attempting to create robots that can act in a similar way.

Typically if you have a robotic assembly line, if one robot goes down, the whole line shuts down. If it’s an assembly line of people, and one person calls in sick — they still manage, because people are adaptable. What the Wyss Institute is researching is  how to create robots that can work together, or by themselves, with one goal in mind — in this case, building a 3D structure.

In the following demonstration videos they show off their construction-bots assembling a building using basic building blocks. Each robot is completely independent — unaware of the other robots working the same task. It wouldn’t matter if you had one, or even 10 robots — the end result would be the same.

Continue reading “TERMES: Termite Inspired Robots”

Rechargeable Work Lamp Brightens Your Night

Portable power station has DC, AC and Light on board.

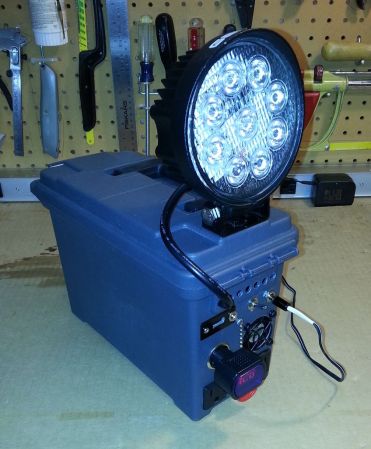
Most of us tinkerers will at some point find ourselves needing electrical power in a remote area. Cordless tools are an option, but what if you need more than that? [Garage Monkey San] set out to solve this problem by creating a portable power station that has on-board AC outlets, 12v and 5vdc outputs and an integrated spot light.

This project is housed in a plastic ammo case that’s large enough to contain all of the necessary parts and has a convenient carrying handle. The 12vdc sealed lead acid battery power source is kept topped off by a car battery float charger. Light is provided by an LED off road fog lamp mounted to the top of the case that has a small appetite for power, ensuring long battery life. An easy addition at this point was a 12v car accessory outlet which only adds to the versatility of the project.

Continue reading “Rechargeable Work Lamp Brightens Your Night”

Hackaday Links: May 4, 2014

hackaday-links-chain

We’ve seen a few builds from the Flite Test guys before, like a literal flying toaster, airsoft guns mounted to planes, and giving an electric plane an afterburner (that actually produced a little extra thrust). Now the Flite Test crew is gearing up for the Flite Fest, an all things remote-controlled flight convention in Malvern, Ohio during the last weekend in July. Seems like a pretty cool way to spend spend a weekend.

Unless you get one of those fancy resistor kits where every value has its own compartment in a case or plastic baggie, you’ll soon rue the day your loose resistors become disorganized. [Kirll] has an interesting solution to hundreds of loose resistors: packaging tape. If you want a resistor, just grab a pair of scissors.

Okay, these Adafruit “totally not Muppets™” are awesome. The latest video in the Circuit Playground series is titled, “C is for Capacitor“. There’s also “B is for Battery“, because when life gives you lemons, light up an LED. Here’s the coloring book.

A few years ago, a couple of people at the LA Hackerspace Crashspace put together an animated flipbook device – something between a zoetrope and the numbers in those old electromechanical clocks – and launched a kickstarter. Now they’re putting on a show, presented by Giant Robot, featuring the animated art of dozens of artists.

Vintage electronics? Yes. Vintage Soviet electronics? Here’s 140 pages of pictures, mostly of old measurement devices.


Block Noise, Listen To Music

Noise Blocking headphones made from industrial earmuffs

Noise-Cancelling Headphones actively cancel external sounds so the listener can hear their media without distraction. They do this by taking external sound waves from an on-board microphone, inverting the audio signal and mixing that with the media audio. The outside sounds and their inverses cancel each other out before reaching the listener’s ears. There is one downside to these types of noise-cancelling headphones, they are very expensive.

[Mike] works in a wood shop and didn’t want to pony up the hundreds of dollars it would cost for a pair of noise-cancelling headphones, let alone having such an expensive electronic device in a dusty workshop. The solution? Make some headphones that will block out the noise but still allow the comfortable listening of music. This project is simple but effective; inexpensive headphones taken apart and installed in a pair of Industrial Ear Muffs. If you’d like to make your own, [Mike] gives step by step on the above link.

Continue reading “Block Noise, Listen To Music”

Restoring A Violin With 3D Printed Parts

Violin


Every family has an heirloom. It might be a watch, a book, or a stuffed pet. [Mike’s] family heirloom was an antique violin. Well, not an entire violin. This particular violin consisted of a detached neck, a body, and one tuning peg. As far as [Mike] knows, no living member of his family has heard it played.  [Mike] decided to restore it to playable condition.

[Mike’s] violin had been brought over to America when his family emigrated from France. The primary reason it has been saved is because it bears the name Stradivarius.  Stradivarius copies and tributes are plentiful in the wild. Many of the copies are now antiques and good playing instruments in their own right, though not nearly as revered as the real thing. [Mike’s] first step was to determine if his violin was a real Strad, or a copy. Luckily he was able to get in touch with the caretaker of a real Strad in Milwaukee. It turns out that the label on his violin marks it as a copy. According to the caretaker, genuine Stradivarius instruments were signed directly on the wood. The caretaker was further able to identify that [Mike’s] violin was about 100 years old, and a relatively cheap model for the time.

While it wasn’t a real Stradivarius, the violin was still an important part of [Mike’s] family history, and deserved to be played again. Rather than re-create the missing parts to perfectly match the originals, [Mike] decided to use the resources of the Milwaukee Makerspace to create 3D printed parts.

Similar violin parts were scanned at the Makerspace. The final .stl files were sent to Shapeways for printing. [Mike] sent all the parts to a luthier for final fitting and assembly. [Mike’s] family heirloom is no longer an item to be hidden away, but a living breathing instrument for a new generation to enjoy.


Spin A PCB For Your Most Beloved Sensors

sensorstick-breakout

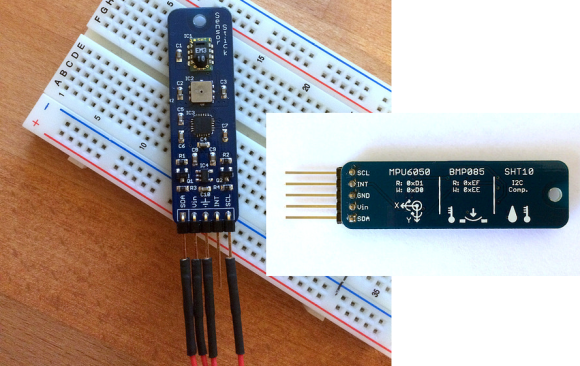
If you follow [Ioannis’] lead you’re going to thank yourself every time you sit down to work on a new prototype. He took all of the sensors which he most commonly uses and spun one dev board to host them all.

As long as you’re willing to wait for delivery, the cost of small-run professionally made PCBs has become unbelievably reasonable. That’s really nice when you need to test your layout before exploring larger production. But it also means you can develop your own dirt-cheap yet reliable dev tools. This example combines three sensors which all communicate via I2C:

  • MPU6050 accelermoter/gyro
  • BMP085 pressure sensor
  • SHT10 humidity sensor

Obviously this is a great idea, but key is the cheat sheet which [Ioannis] included on the bottom of the board. It testifies as to which chips are on the board, but also includes the device addresses for the data bus. We’ve adopted the mantra that if a breadboarded prototype is not working, it’s always a hardware problem. For those oft-used parts this should alleviate some of the heartache at your bench.

You could still make something like this without spinning or etching a board. You’ll just have to be creative with the soldering.