The Un-Digital Robotic Arm

556When you think of a robotic arm, you’re probably thinking about digital control, microcontrollers, motor drivers, and possibly a feedback loop. Anyone who was lucky enough to have an Armatron knows this isn’t the case, but you’d still be surprised at how minimal a robotic arm can be.

[viswesh713] built a servo-powered robotic arm without a microcontroller, and with some interpretations, no digital control at all. Servos are controlled by PWM signals, with a 1 ms pulse rotating the shaft one way and a 2 ms pulse rotating the shaft the other way. What’s a cheap, popular chip that can easily be configured as a timer? Yep, the venerable 555.

The robotic arm is actually configured more like a Waldo with a master slave configuration. [viswesh] built a second arm with pots at the hinges, with the resistance of the pots controlling the signal output from a 556 dual timer chip. It’s extremely clever, at least until you realize this is how very early robotic actuators were controlled. Still, an impressive display of what can be done with a simple 555. Videos below.

Continue reading “The Un-Digital Robotic Arm”

Chocolate Quadrotor Proves You Can Make Anything Fly

Chocolate Quadrotor

With the advancements in quadrotor parts and technology over the years, it’s become possible to make just about anything fly if you can strap some high-speed rotors to it. Introducing the first edible quadrotor!

[Michael] enjoys building and flying quadrotors. His girlfriend enjoys baking and making chocolates. One day she had a crazy idea — what if they made a quadrotor together, combining their unique skill sets? [Michael] was a bit skeptical at first. After all, chocolate doesn’t really compare to aluminum or carbon for a frame material… and chocolate melts at room temperature. Regardless — they were curious enough to try it out and see for sure.

First they built a wooden prototype and then created a silicone mold from it. Using Styrofoam and metal spacers for the electronics mounts they filled the mold with chocolate and let it set. A bit of assembly later and they had a chocolate quadrotor. It flies too.

Continue reading “Chocolate Quadrotor Proves You Can Make Anything Fly”

Raspberry Pi Coin Dozer Won’t Make You Rich

Raspi in a coin dozer case

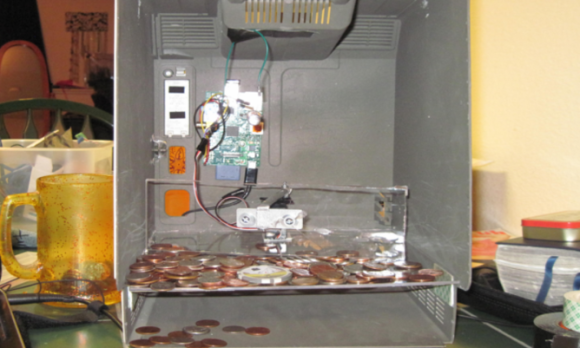
[SoggyBunz] lucked up and scored an Ultimate Raspberry Pi Bundle from Element 14. His idea was to use a Raspberry Pi to make a retro-mechanical arcade Coin Dozer game, and decided to build his first prototype inside a vacant Macintosh Plus shell.

The game is based on a Raspberry Pi running a small Python script. The Raspi operates a small servo that moves a piece of acrylic back and forth in a somewhat random fashion. The coins are inserted into slots cut into the Macintosh shell and eventually pile up. The moving acrylic lever pushes your winnings out of the machine and deposits them on whatever it’s sitting on, unlike this coin dispensing machine.

[SoggyBunz] concedes that the build is a bit rough and a servo is not the best choice of an actuator. But he aims to build a much improved version, and we can only hope he puts it on Hackaday.io and tips us in! Stick around after the break for a video of the Pi Dozer in action.

Continue reading “Raspberry Pi Coin Dozer Won’t Make You Rich”

Controlling RC Toys With The Raspi

signal

An interesting trick you can do with a a fast CPU and a GPIO pin mapped directly to memory is an FM transmitter. Just toggle a pin on and off fast enough, and you have a crude and kludgy transmitter. [Brandon] saw a few builds that turned a Raspberry Pi into an FM radio transmitter and realized a lot of toy remote control cars use a frequency in the same range a Pi can transmit at. It’s not much of a leap to realize the Pi can control these remote control cars using only a length of wire attached to a GPIO pin.

The original hack that turned a Pi GPIO pin into an FM transmitter mapped a GPIO pin to memory, cycled through that memory at about 100 MHz, and added a fractional divider to slightly adjust the frequency, turning it into an FM transmitter. Cheap RC cars usually listen for radio signals at 27 and 49 MHz. It doesn’t take much to realize commanding RC cars with a Pi is possible.

The only problem with this idea is that most RC cars use pulse modulation. For an RC transmitter to send the command for ‘forward’, a synchronization pulse is sent, then a series of pulses and pauses. The frequency doesn’t change at all, something the originally FM code doesn’t do. [Brandon] realized that if he just moved the frequency up to something the RC car wasn’t listening to, that would register as a zero.

All that was left was to figure out the command codes for his RC truck. For this, [Brandon] decided brute force would be the best option. Armed with a script and a webcam, he cycled through all possible combinations until the webcam detected a moving truck. Subtlety brilliant, if you ask us. Of course more complex commands required an oscilloscope, but now [Brandon] has a git full of all the code to control a cheap RC car with a Pi.

The Race Is On To Build A Raspi Kinect 3D Scanner

pinect

The old gen 1 Kinect has seen a fair bit of use in the field of making 3D scans out of real world scenes. Now that Xbox 360 Kinects are winding up at yard sales and your local Goodwill, you might even have a chance to pick one up for pocket change. Until now, though, scanning objects in 3D has only been practical in a studio or workshop setting; for a mobile, portable scanner, you’d need to lug around a computer, a power supply, and it’s not really something you can fit in a back pack.

Now, finally, that may be changing. [xxorde] can now get depth data from a Kinect sensor with a Raspberry Pi. And with just about every other ARM board out there as well. It’s a kernel driver that’s small, fast, and does just one thing: turns the Kinect into a webcam that displays depth data.

Of course, a portabalized Kinect 3D scanner has been done before, but that was with an absurdly expensive Gumstix board. With a Raspi or BeagleBone Black, this driver has the beginnings of a very cheap 3D scanner that would be much more useful than the current commercial or DIY desktop scanners.

THP Judge: Ian From Dangerous Prototypes

ian-dangerous-prototypesAs we start to get into the swing of The Hackaday Prize we want to take some time to talk to the judges.

[Ian Lesnet] is an accomplished hardware developer. He is, of course, near and dear to our hearts as a Hackaday writer emeritus.

During his time here he came up with an idea for an amazing tool that would let you work with components using a multitude of protocols before heading off to write your firmware. The tool was called the Bus Pirate and [Ian] built an formidable Open Hardware community up around this and several other tools and unique ideas.

[Hackaday] Why do you think people should put together an entry for The Hackaday Prize?

[Ian] There’s never a bad time to hack something together, but with an incentive like SPACE!!! how can you refuse?

[Hackaday] If you could enter, what style of project would you build and where would you try to go with the idea?

[Ian] We like to make electronics hardware that helps debug stuff, but lately we’re rocking more potentially deadly machines that do things. I’d finish up our death chomp robot that slices and dices reels of components into handy kit-sized lengths, while printing values and part numbers on the back paper. Definitely not a winner, but it looks great when it’s chewing parts!

[Hackaday] Is there anything that participants can do with their project write-ups to make your life easier as an adjudicator?

[Ian] Writing and English classes are a special hell for me, but there are some good tips for clear communication. I always start with an overview – “tell them what you’re going to tell them”. This usually means a description of the hack, the major components used, and how they work together. The introduction should have enough info that another hacker can piece everything together without digging through the whole writeup. An overview illustration or hand drawing explaining the methodology is really helpful for visualizing a complex hack.

[Hackaday] You have vast experience with Open Hardware projects. I think one of the tough things for beginners is navigating the Open Hardware licenses available. Do you have any advice for noobs to learn more about licenses and perhaps on narrowing them down?

[Ian] If you want the world to be a better place put all your work in the Public Domain (Creative Commons Zero) for anyone to use however they want. That’s the license with the least bullshit attached. If you have a billion dollar secret idea by all means keep it in your closet and show it to no one, because that’s about the only thing that will protect it from innovators and imitators. Other licenses fall somewhere in the middle, but for our stuff we’ve decided to go Public Domain wherever possible.

[Hackaday] We’ve seen a lot of collaborative projects come out of DP. Do you have any advice you can share for finding collaborators for a hardware project?

[Ian] The best advise I’ve heard (not mine) is to wait until a project is done to decide ownership share. Hackers are quick to settle on equal ownership, but during the project (or the long haul support period) collaborators may loose interest or be unable to continue as planned. With equal ownership remaining team members must finish the whole project just get a portion of the future gains. It demotivates the remaining team members and kills momentum. By waiting to see how things play out you’ll have a much better idea how to divide ownership for a successful long term collaboration.

[Hackaday] Can you name a favorite piece of bench equipment and tell us why it is at the top of your list?

[Ian] For years I used $10 “fire starter” soldering irons, even for surface mount soldering. An adjustable iron is a nice thing to have though, along with a bright light and head magnifier. A hot air rework station is the tool I can’t live without. It’s for fixing mistakes, which I make constantly, and when it dies everything crashes to a halt.

[Hackaday] What do you think of the evolution of the kit and small-run electronics industry over the last decade? Where would you like to see it go, and do you have any insights about what will get it there, or possible barriers that stand in the way?

[Ian] It’s huge now. Crowd source funding sites alone have become home to how many cool hacks, designs, and projects? Local, short-run assembly houses using a fairly standard set of components would make it a lot easier to get into hardware without 1337 soldering skillz.


SpaceWrencherThe Hackaday Prize challenges you to build the future of connected devices. Build the best and claim a trip into space or one of hundreds of other prizes.

Solar Energy Provides An Outlet For Hurricane-Related Woes

Hurricane season in the US Atlantic region officially began on June 1st. While [mikesoniat] is hoping for a mild one in his Gulf Coast town, he’d like to be as prepared as possible in the event of a power outage. He’s been experimenting with solar power lately, and while he’d love to go all out with some hefty system that could keep all his appliances running, solar outlethe’s not quite ready for that kind of investment. While thinking about this dream system, he noticed all the phone jacks around his house that he hasn’t used for several years. After consulting the phone company and researching the capabilities of 22-26AWG POTS copper lines, he devised a solar-powered system to provide enough power to run lights, fans, and a couple of phone chargers.

At the heart of this hack are two 12V solar panels, two 12V batteries in a weatherproof junction box, and a 100W solar charge controller.  He started by re-wiring Ma Bell’s junction box up to the panels with thermostat wire. After prying out the RJ11 jack panels all over his house, he wired in regular outlets and marked them as 12V solar to avoid confusing his house guests. He was able to find 12V LED bulbs with standard bases, so all he has to do is screw in these bulbs and plug the lamps into his solar outlets. He also installed a floodlight outside and ran all of the wiring through the floodlight box.

To soak up more sun for this or any other solar hack, try a 2-axis solar tracker.