Tricking Tinder With A 3D Printed Finger

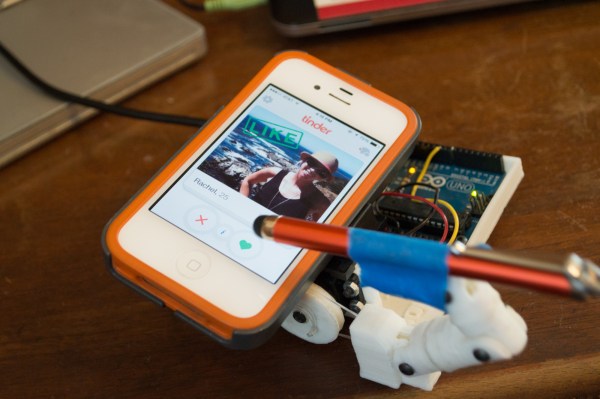
Online matchmaking has taken the internet by storm as mobile dating applications like Tinder attempt to take the work out of locating a soul mate. As of mid-2014, Tinder is rumored to have around 10 million daily active users making it a prime target for automated spam bots. The real spammers surely use coded attacks, but this robot is a fun example of a hardware-based attack. [Andrew] built it to be an automatic heart-shaped, button presser.

The device began as a single finger robot-hand project that was inspired by ‘InMoov’, which as their website states is “the first life-size humanoid robot you can 3D print and animate.” An Arduino Uno and servo motor laid the foundation for the system. After which, the joints of the 3D printed finger were assembled in place so that a touchscreen stylus could be attached. Once coded, the little robot was able to ‘like’ a new profile every 4 seconds. This adds up to approximately 900 likes per hour.

The project is cute, and shows one way that fake profiles can be elevated on the Tinder platform. An article written on Symantec’s blog describes a few other instances of spammers flirting with you via the Android app. This post is a continuation of an article released a year prior, yet Tinder has not addressed the issues relating to fake profiles since then.

Let’s try to focus in on the good. With a bit of additional ingenuity, this device could be transformed into a love searching robot that could choose between people. Get a camera hooked up with a face-recognition program, and add some user preferences so that the robot isn’t just hitting ‘like’ over and over, and we might be able to get some interesting research done. Still, it feels like it would be better to go meet people face-to-face.

Check out the video of the bot in action after the break, then let us know what other silly things you could do by targeting different apps.

Continue reading “Tricking Tinder With A 3D Printed Finger”

THP Semifinalist: The Moteino

One of the apparent unofficial themes of The Hackaday Prize is the Internet of Things and home automation. While there were plenty of projects that looked at new and interesting ways to turn on a light switch from the Internet, very few took a good, hard look at the hardware required to do that. [Felix]’s Moteino is one of those projects.

The Moteino is based on the Arduino, and adds a low-cost radio module to talk to the rest of the world. The module is the HopeRF RFM12B or RFM69. Both of these radios operate in the ISM band at 434, 868, or 915 MHz. Being pretty much the same as an Arduino with a radio module strapped to the back, programming is easy and it should be able to do anything that has been done with an ATMega328.

[Felix] has been offering the Moteino for a while now, and already there are a few great projects using this platform. In fact, a few other Hackaday Prize entries incorporated a Moteino into their design; Plant Friends used it in a sensor node, and this project is using it for texting and remote control with a cell phone.


SpaceWrencherThe project featured in this post is a semifinalist in The Hackaday Prize.

Goliath And The Rough Road To Space

No one said the road to The Hackaday Prize would be easy. Many of us have been following [Peter McCloud] as he vies for the Hackaday Prize with Goliath – A Gas Powered Quadcopter. [Peter] literally hit a snag on Monday: his own belts.

Peter had hoped to be performing tied down hover tests by Monday afternoon. Weather and a set of fouled spark plugs conspired against him though. After fighting with engine issues for the better part of a day, [Peter’s] 30 horsepower Briggs & Stratton engine finally roared to life. Then all hell broke loose.

[Peter] only let the engine run a couple of seconds before cutting the ignition. In his own words, “Things were running good until the engine was shutoff. At this point one of the belt started losing tension.”

goliath-1
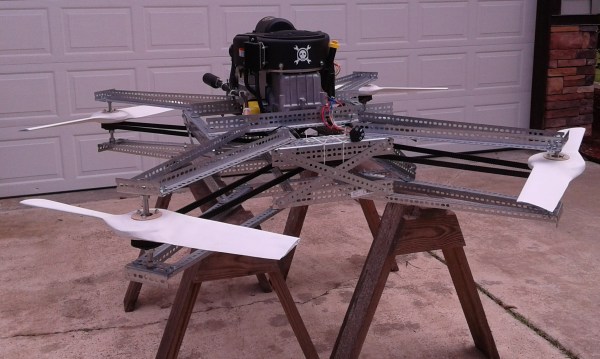
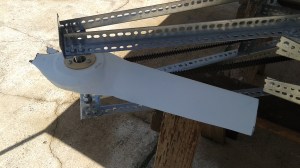
While the tight new engine was quickly losing RPM, the propeller and belt system still had quite a bit of inertia. As the video after the break shows, the belts started flapping and caught on the propeller blades. The front right prop tip caught the double-sided toothed belt, pulling it up and over the propeller. The other end of that same belt lives on the right rear prop. It too caught a propeller blade, snapping the composite blade clean off its hub. The bent steel pulley axles are a testament to the forces at work when things went wrong.

[Peter] isn’t giving up though. He has a plan to add belt guides and a one way bearing to the engine’s crankshaft. The one way bearing will allow the rotor system to overspeed the engine when throttle is reduced. The same bearings are commonly used on R/C helicopters to facilitate autorotation landings.

We want to see all 50 Hackaday Prize semifinalists succeed, so if you have any ideas to help with the rebuild, head over to Goliath’s Hackaday.io page and let [Peter] know!

Continue reading “Goliath And The Rough Road To Space”

Retrotechtacular: Time For Coffee

If you ask us, it’s almost always a good time for coffee. In the spotlight this week is an educational/promotional film made by A&P, who started in the 1800s as with a chain of shops offering coffee and tea. By the 1950s, they were operating full self-serve grocery stores with a trail of shuttered mom and pop operations in their wake.

This is the story of coffee as it goes from the nursery to the field to the shelves of your local A&P. It covers the growing, cultivation, and distribution of coffee from South American crops that at the time covered more than one million square miles of Brazil alone.

Coffee trees leave the nursery at two years old and are planted in nutrient-rich red soil. Two to three years later, they bear their first crop. Coffee blossoms appear first, and the fruit ripens over the next 8-9 months. Skilled workers pick the berries by hand. We are told that the average tree produces one pound of roasted coffee per year.

sun dried beans
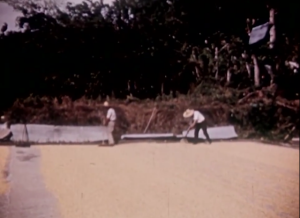
The day’s harvest is collected, weighed, and bagged for further production. The fruits are crushed to remove each bean from its red jacket. Then, the beans are washed and spread out in the sun for 8-10 days. They are frequently rotated so they dry evenly. The dried coffee is packed in bags and sent into the city.

bag stabbingAt a warehouse, the coffee is inspected, sorted, and graded. Bags are stamped with the coffee’s country of origin and intended destination before going to the seaport. A very important step happens here. As each bag walks by on the shoulders of a worker, another guy stabs it to get a sample of the beans. The on-site A&P officials take over at this point and do their own inspections, sending samples to the US. Here, the coffees are roasted and taste tested for both strength and flavor from a giant lazy Susan full of porcelain cups. taste testing

The film takes a brief detour to tell us that the great cities of Latin America were built upon the labors of coffee exportation. We see a montage of vistas, skylines, and shorelines, which bring it back to the subject of shipping the coffee to various ports of call. At the dock, bags are tumbled onto large nets to be loaded on the ship. As coffee is susceptible to moisture, special care is taken to avoid the ill effects of traveling out of the tropics.

Continue reading “Retrotechtacular: Time For Coffee”

[Ben Krasnow] Hacks A Scanning Electron Microscope

[Ben Krasnow] is quite possibly the only hacker with a Scanning Electron Microscope (SEM) collection. He’s acquired a JEOL JSM-T200, which was hot stuff back in the early 1980’s. [Ben] got a great deal, too.  He only had to pay shipping from Sweden to his garage. The SEM was actually dropped during shipment, but thankfully the only damage was a loose CRT neck plug. The JSM-T200 joins [Ben’s] homemade SEM, his DIY CT scanner, the perfect cookie machine, and a host of other projects in his lab.

The JSM-T200 is old tech; the primary way to store an image from this machine is through a screen-mounted Polaroid camera, much like an old oscilloscope. However, it still has a lot in common with current SEMs. In live video modes, an SEM can only collect one or two reflected electrons off a given section of a target. This creates a low contrast ghostly image we’ve come to associate with SEMs.

Attempting to fire more electrons at the target will de-focus the beam due to the electrons repelling each other. Trying to fire the electrons from higher voltages will just embed them into the target. Even SEMs with newer technology have to contend with these issues. Luckily, there is a way around them.

When “writing to photo”, the microscope switches to a slow scan mode, where the image is scanned over a period of a minute. This slower scan gives the microscope extra time to fire and collect more electrons – leading to a much better image. Using this mode, [Ben] discovered his microscope was capable of producing high-resolution digital images. It just needed a digital acquisition subsystem grafted on.

Click past the break to see how [Ben] modernized his microscope!

Continue reading “[Ben Krasnow] Hacks A Scanning Electron Microscope”

Extrinsic Motivation: BASIC For Bluetooth

There’s a lot more to those fancy radio modules you use with your Arduino projects than meets the eye. Many of them are systems on a chip, complete with their own microcontroller and memory that can control your entire blinking LEDs project. Developing for these radio modules is a bit of a challenge, as the IDEs and compilers cost several thousand dollars. [Tim]’s entry for the Hackaday Prize looks at one of these Bluetooth LE modules – Texas Instrument’s CC2540 and CC2541 – and puts an embedded BASIC interpreter right on the chip.

[Tim]’s inspiration for this project came from looking at a few popular devices using the CC254X chip. Many of these included a microcontroller and the added costs, complexity, and power requirements that come along with an additional chip. This radio module could easily run any code an ATMega could, and adding another chip to a product seemed like a terrible waste, and certainly not in the spirit of open hardware and software.

The alternative is writing an interpreter for the CC254X chip. He’s chosen BASIC, but added a little bit of Arduino language syntax to make it even easier to develop on. Having already run through a few successful tests involving SPI, I2C and 1-wire devices, [Tim] has a basic system working, but [Tim] admits it does need a little rework to make it easier to use.

It’s a great project, and personally astonishing that it didn’t make the quarterfinal selection for The Hackaday Prize. [Tim] is still working on his project, though, in a great example of extrinsic motivation; he doesn’t need a trip to space to convince him to build something cool.

You can check out [Tim]’s two minute concept video below.


SpaceWrencherThis project is an official entry to The Hackaday Prize that sadly didn’t make the quarterfinal selection. It’s still a great project, and worthy of a Hackaday post on its own.

Continue reading “Extrinsic Motivation: BASIC For Bluetooth”

Soundwave Tunes Up Your Portable Workbench

[Tez_Gelmir] built an awesome portable workbench. Not satisfied with just mundane designs, he patterned his box after Soundwave from the classic Transformers: Generation 1 series. This portable bench keeps his tools organized and ready to roll out.

[Tez] has all the basic tool groups covered – screwdrivers small and large, pliers, crimpers, soldering iron, fume extractor, vice, and wire spool. He’s also got room for parts boxes to hold his components.

soundwave
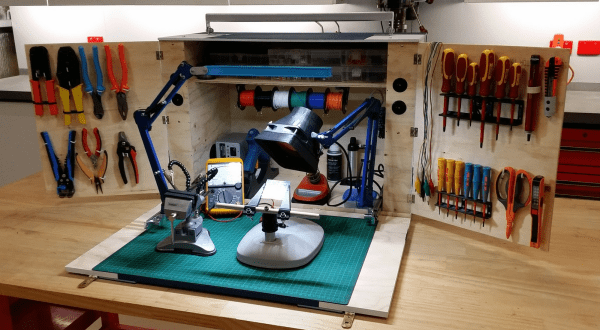
The basic box is built from a single sheet of 7mm plywood. The front work area is a smaller piece of 12mm plywood. Working with 7mm plywood did prove to be a challenge – [Tez] had to use some very small screws for his hinges.  The basic box construction was easy though – [Tez] used a pneumatic nailer and PVA (wood) glue.

[Tez] used a number of 3D printed parts in his design. He kept the Transformer theme going with a Decepticon logo built into his screwdriver holder. The fume extractor and lamp were also especially clever – [Tez] mounted them to drawer sliders, so they are there when he needs them, and out of the way when he doesn’t.

[Tez] spent quite a bit of time setting up his power system, and it shows. The inside of the box is framed with four power points. The main cord has its own “mouse door”, and everything tucks neatly away when not in use.

The Soundwave paint job is what sets this box apart – [Tez] spent quite a bit of time getting everything just right. It looks like Ravage is ready to spring out at any moment.

We really love this setup – Our only suggestion would be to add some sheet metal to protect the corners of the box while in transit.

Continue reading “Soundwave Tunes Up Your Portable Workbench”