WirePrint

WirePrint Is A Physical ‘Print Preview’ For 3D Printers

3D printers may be old news to most of us, but that’s not stopping creative individuals from finding new ways to improve on the technology. Your average consumer budget 3D printer uses an extrusion technology, whereby plastic is melted and extruded onto a platform. The printer draws a single two-dimensional image of the print and then moves up layer by layer. It’s an effective and inexpensive method for turning a computer design into a physical object. Unfortunately, it’s also very slow.

That’s why Hasso Plattner Institute and Cornell University teamed up to develop WirePrint. WirePrint can slice your three-dimensional model into a wire frame version that is capable of being printed on an extrusion printer. You won’t end up with a strong final product, but WirePrint will help you get a feel for the overall size and shape of your print. The best part is it will do it in a fraction of the time it would take to print the actual object.

This is a similar idea to reducing the amount of fill that your print has, only WirePrint takes it a step further. The software tells your printer to extrude plastic in vertical lines, then pauses for just enough time for it to cool and harden in that vertical position. The result is much cleaner than if this same wire frame model were printed layer by layer. It also requires less overall movement of the print head and is therefore faster.

The best part about this project is that it’s a software hack. This means that it can likely be used on any 3D printers that use extrusion technology. Check out a video of the process below to see how it works. Continue reading “WirePrint Is A Physical ‘Print Preview’ For 3D Printers”

Neat DIY Valve for watering system

Automated Watering System Uses Neat DIY Water Valve

[Valentin] is an engineering student and hobbyist gardener. He was planning on going home for a 3 week semester break and certainly could not leave his balcony plants to fend for themselves. The clearly obvious solution was to make an automated watering system!

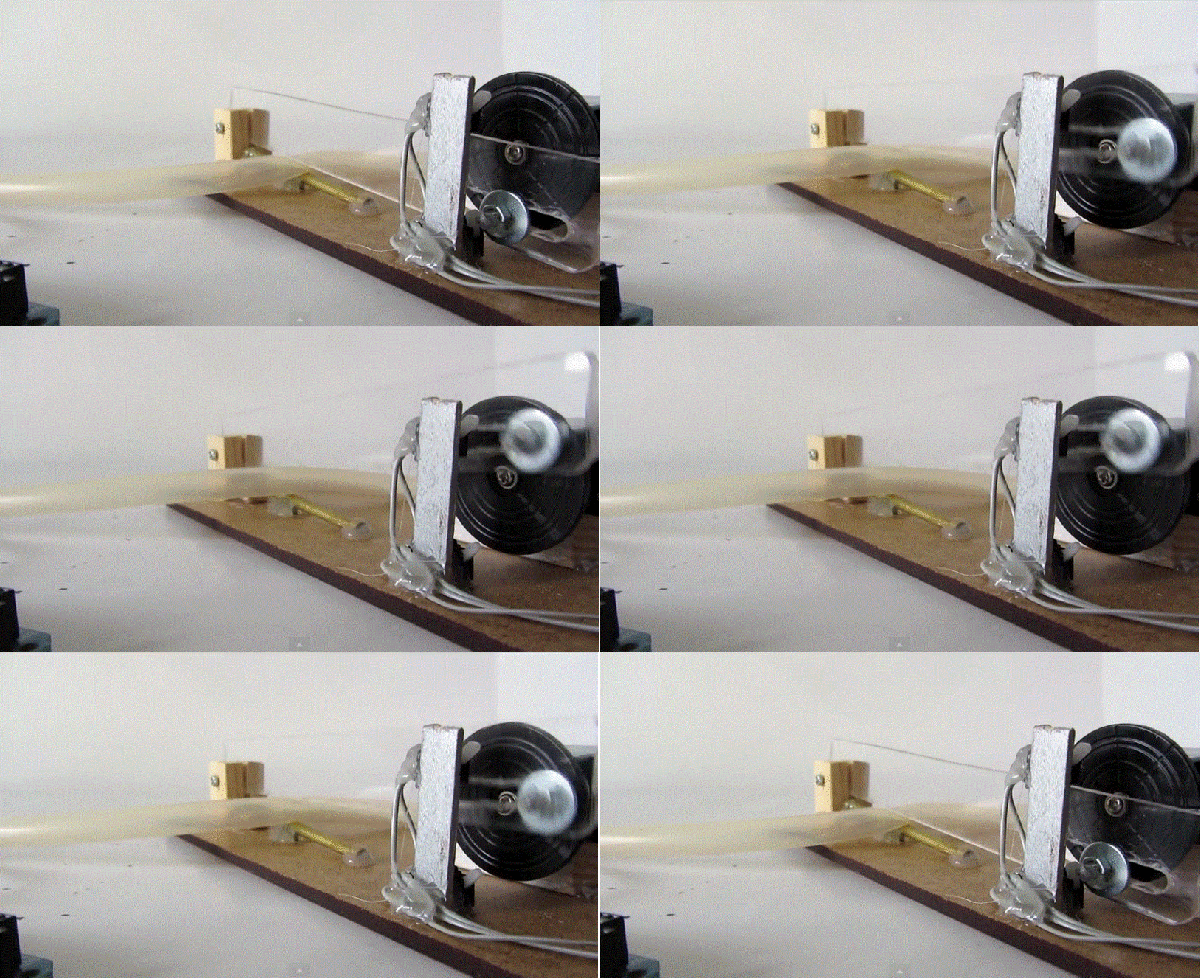
The most interesting part of this build is the valve. Anyone could have bought an off-the-shelf solenoid valve, not [Valentin], he designed his own. It is simple and just pinches the water supply tube to stop the flow of water coming from the elevated 20-liter water container. The ‘pinching’ arm is raised and lowered by an RC Car servo. When the valve is in the closed position, the servo does not need to continually apply pressure, the servo is powered down and the valve stays closed. This works because when the valve is closed, all forces are acting in a strictly radial direction on the servo’s drive disk. Since there is no rotation force, the drive disk does not rotate and the valve stays closed.

The servo is controlled by a microcontroller. Instead of rotating the servo to a certain degree, the servo rotates until it hits a limit switch. Those limit switches tell the microcontroller that the valve is either in the open or closed position. You must be asking yourself ‘what happens if the limit switch fails and the servo wants to keep rotating?’ [Valentin] thought of that too and has his code measure how long it is taking to reach the limit switch. If that time takes too long, the servo is powered down.

Video below.

Continue reading “Automated Watering System Uses Neat DIY Water Valve”

THP Semifinalist: A Robotic Lawn Mower

For all the Roombas in the world, you have to wonder why robotic lawn mowers aren’t more common. Sure, you can go out and buy one, but mowing the typical suburban yard is a piece of cake for a robot; there aren’t stairs, there are relatively few obstacles, and a boundary wire system is much simpler than simply bouncing into things like an iRobot.

[Schuhumi]’s autoCut is the only household robot to make the semifinalists in The Hackaday Prize. Underneath, this bot is electric, has fully automatic operation, and even has a motor to change the height of the blades. The blades are actually designed more like a stringless weedwacker; the blades pivot back when they encounter a hard obstacle, although this safety cage is a really good idea

Instead of doing the random ‘bump and turn’ algorithm found in a roomba, there’s a lot of thought put into navigation with this bot. [schuhumi] is using ultrasonic navigation that triangulates the position of the bot in a yard. That’s a great idea; there’s no need to waste time or power rolling over what the bot has already cut.

You can check out [schuhumi]’s overview video and a demo below.


SpaceWrencherThe project featured in this post is a quarterfinalist in The Hackaday Prize. 

Continue reading “THP Semifinalist: A Robotic Lawn Mower”

Third Person Skydiving

GoPros were invented for a few reasons, and skydiving is right at the top of that list. You’ll be hard pressed to find a regular skydiver that doesn’t own at least one of the little cameras, and there are a few examples of helmets with three or four GoPros tacked on.

This is an entirely new application. Yes, you can now film yourself skydiving with a third person view.

[Jason] hacked together this camera rig in an hour by strapping a GoPro on a Nerf Vortex football, tying a length of paracord to the camera mount, and connecting the other end to a hip ring on the parachute harness. It took three flights to get the canopy in the camera’s field of view, but the results are spectacular. It’s a tad bit unstable when turning, but the fins on the Nerf football make for a very, very stable shot.

[Jason] isn’t jumping out of a plane with this contraption already dangling underneath him; the football, camera, and paracord rig isn’t launched until the canopy fully deploys. It’s perfectly safe, but we’ll expect someone to get the idea of strapping a keychain camera to their pilot chute soon.

A Description Of Maddening Battery Terminology

Once again, [Afroman] is here for you, this time breaking down electrolyte and the terminology behind batteries.

Volts and Amps are easy mode, but what about Amp hours? They’re not coulombs per second hours, because that wouldn’t make any sense. An Amp hour is a completely different unit podcast, where a 1Ah battery can supply one amp for one hour, or two amps for 30 minutes, or 500 mA for two hours.

Okay, what if you take two batteries and put them in series? That would double the voltage, but have the same Ah rating as a single cell. Does this mean there is the same amount of energy in two batteries as what is found in a single cell? No, so we need a new unit: the Watt hour. That’s Volts times Amp hours, or more incorrectly, one joule per second hour.

Now it’s a question of the number of cells in a battery. What’s the terminology for the number of cells? S. If there are three cells in a battery, that battery has a 3S rating. You would think that C would be the best letter of the alphabet to use for this metric, but C is entirely different. Nothing here makes any sense at all.

What is C? That’s related to the number of amps a battery can discharge safely. If a 20C battery can discharge 2200mAh, it can deliver a maximum current of 44 A, with 20C times 2.2Ah being 44A.

So there you go. A complete description of something you can’t use logic and inference to reason through. Video below.

Continue reading “A Description Of Maddening Battery Terminology”

Reanimating A Philips HDD 1420 MP3 Player

[OiD] had a dusty, old, forgotten Philips HDD1420 GoGear mp3 player kicking around his place. As you can imagine, the battery was dead. He had no charger or connector for the thing, but decided to try to resurrect it anyway.

He thought it would simply be a matter of providing alternative power, but the GoGear wasn’t having it and insisted on being connected to a computer. He had some luck consulting Pinouts.ru and found Philips’ own device manager software, but it still wasn’t easy. The device manager doesn’t work on Windows 7. He tried an XP box, but it didn’t detect the device.

Finally, he discovered that the hard drive was kaput and replaced it with an 8GB Microdrive. That helped, but he still had a hard row to hoe. [OiD] formatted the new HD and gave it the official firmware, but still had to replace some system files according to the Philips manual. He ended up using RockBox to reanimate it and decided to keep it on the device.

There was still an issue with charging, though. It has an IC that handles selection of either the proprietary external adapter or USB power, but the RockBox firmware doesn’t implement switching and defaults to the adapter. Several tweaks and a hacked-in mini USB later, the patient is in stable condition and cranking out the tunes.

ESP8266 Distance Testing

With progress slowly being made on turning the ESP8266 UART to WiFi module into something great, there is still the question of what the range is for the radio in this tiny IoT wonder. [CNLohr] has some test results for you, and the results are surprisingly good.

Connecting to the WiFi module through a TPLink WR841N router, [CN] as able to ping the module at 479 meters with a huge rubber duck antenna soldered on, or 366 meters with the PCB antenna. Wanting to test out the maximum range, [CN] and his friends dug out a Ubiquiti M2 dish and were able to drive 4.28 kilometers away from the module and still ping it.

Using a dish and a rubber duck antenna is an exercise in excess, though: no one is going to use a dish for an Internet of Things thing, but if you want to carry this experiment to its logical conclusion, there’s no reason to think an ESP8266 won’t connect, so long as you have line of sight and a huge antenna.

There’s still a lot of work to be done on this module. It’s capable of running custom code, and since you can pick this module up for less than $5 USD, it’s an interesting platform for whatever WiFi project you have in mind.