Android Flip Dot Display

Controlling A Flip-Disc Display Using Android

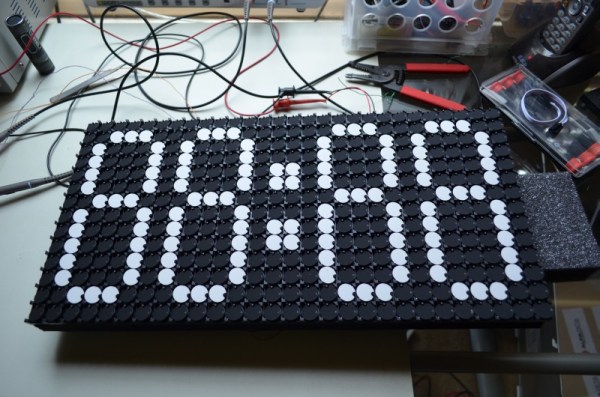
There’s just something about electro-mechanical displays that enthralls most people when they see them; and while you’ll be hard pressed to find a split-flap display for cheap, you can still easily buy flip-disc displays! That’s what [Scott] did, and he’s been having a blast messing around with his and building a system to control it via his Android phone.

He picked up the display from a company called Alfa-Zeta in Poland, a company that’s been making electromagnetic displays since 1988. No mention of price, but it looks like some pretty awesome hardware. The beauty with electromagnetic displays is they don’t consume any electricity in idle state, making them far more efficient than almost any other display technology – not to mention perfect contrast in any lighting conditions!

They work by using permanent magnets, electromagnets, and a material that can retain magnetization. A short pulse to the electromagnet causes the disc to flip into the second position, which will then hold in place due to the permanent magnet — no more electromagnet needed.

The display comes with all the necessary hardware to drive the electromagnets and interface with a microcontroller. But, it uses the RS-485 standard, which isn’t natively supported by most other microcontrollers. [Scott’s] using an Arduino which does have an RS-485 shield, but he decided he wanted to challenge himself and build a circuit to drive them himself!

All the info is on his blog if you’re looking to try something similar. Once he had it interfaced with the Arduino it was just a simple matter of writing an Android app to transmit controls over Bluetooth for the display. Take a look:

Continue reading “Controlling A Flip-Disc Display Using Android”

Solid State Tesla Coil Plays Music

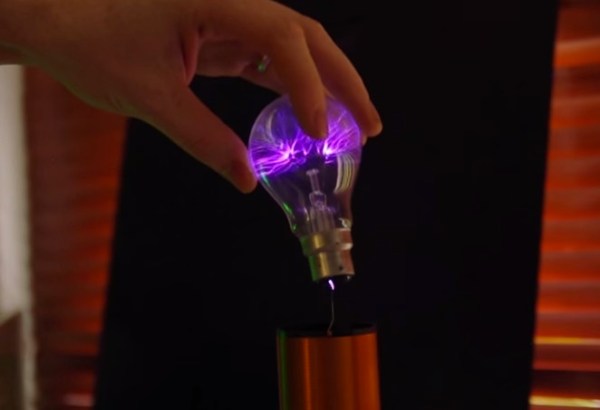
If you’ve ever wanted to build a Tesla coil but found them to be prohibitively expensive and/or complicated, look no further! [Richard] has built a solid-state Tesla coil that has a minimum of parts and is relatively easy to build as well.

This Tesla coil is built around an air-core transformer that steps a low DC voltage up to a very high AC voltage. The core can be hand-wound or purchased as a unit. The drive circuit is where this Tesla coil built is set apart from the others. A Tesla coil generally makes use of a spark gap, but [Richard] is using the Power Pulse Modulator PWM-OCXi v2 which does the switching with transistors instead. The Tesla coil will function with one drive circuit but [Richard] notes that it is more stable with two.

The build doesn’t stop with the solid-state circuitry, though. [Richard] used an Arduino with software normally used to drive a speaker to get his Tesla coil to play music. Be sure to check out the video after the break. If you’re looking for a Tesla coil that is more Halloween-appropriate, you can take a look at this Tesla coil that shocks pumpkins!

Continue reading “Solid State Tesla Coil Plays Music”

Your New Winter Hat Should Express Your Brain Waves Like A Neon Sign… Just Saying

We’ve seen a few cool hacks for mainstream commercial EEG headsets, but these are all a tad spendy for leisurely play or experimentation. The illumino project by [io] however, has a relatively short and affordable list of materials for creating your own EEG sensor. It’s even built into a beanie that maps your mental status to a colorful LED pompom! Now that winter is around the corner, this project is perfect for those of us who want to try on the mad scientist’s hat and look awesome while we’re wearing it.

How does all the neuro-magic happen? At the heart of [io’s] EEG project is a retired Thinkgear ASIC PC board by Neurosky. It comes loaded with fancy algorithms which amplify and process the different types of noise coming from the surface of our brain. A few small electrodes made from sheets of copper and placed in contact with the forehead are responsible for picking up this noise. The bridge between the electrodes and the Thinkgear is an arduino running the illumino project code. For [io’s] tutorial, a Tinylilly Arduino is used to mesh with the wearable medium, since all of these parts are concealed in the folded brim of the beanie.

eegBeanie3

In addition, a neat processing sketch is included which illustrates the alpha, beta, gamma, and other wave types associated with brain activity as a morphing ball of changing size and color. This offers a nice visual sense of what the Neurosky is actually reading.

If all of your hats lack pompoms and you can’t find one out in the ether that comes equipped, fear not… there is even a side tutorial on how to make a proper puff-ball from yarn. Sporting glowing headwear might be a little ostentatious for some of us, but the circuit in this project by itself is a neat point of departure for those who want to poke around at the EEG technology. Details and code can be found on the illumino Instructable.

Thanks Zack, for showing us this neat tutorial!

Continue reading “Your New Winter Hat Should Express Your Brain Waves Like A Neon Sign… Just Saying”

The Internet Of Things Chip Gets A New Spectrum

Last year we learned about Weightless, an Internet of Things chip that solves all the problems of current wireless solutions. It’s low power and has a 10-year battery life (one AA cell), the hardware should cost around $2 per module, and the range of the Weightless devices range from 5+km in urban environments to 20-30km in rural environments. There haven’t been many public announcements from the Weightless SIG since the specification was announced, but today they’re announcing Weightless will include an additional spectrum, the 868/915 MHz ISM spectrum.

weightless

The original plan for Weightless was to use the spectrum left behind by UHF TV – between 470 and 790MHz. Regulatory agencies haven’t been moving as fast as members of the Weightless SIG would have hoped, so now they’re working on a slightly different design that uses the already-allocated ISM bands. They’re not giving up on the TV whitespace spectrum; that’s still part of the plan to put radio modules in everything. The new Weightless-N will be available sooner, though, with the first publicly available base station, module, and SDK arriving sometime next spring.

Weightless has put up a video describing their new Weightless-N hardware; you can check that out below. If you want the TL;DR of how Weightless can claim such a long battery life and huge range from an Internet of Things radio module, here’s an overly simplified explanation: power, range, and bandwidth. Pick any two.

Continue reading “The Internet Of Things Chip Gets A New Spectrum”

Hackaday Munich Speaker: Sprite_TM

Plans for Hackaday Munich are coming along quite nicely. Today we’re happy to announce that [Sprite_TM] will be speaking at the event. Click that link above and make sure you get your tickets for November 13th. You can do some hands-on hacking at the Embedded Hardware Workshop, hear the talks, find out which of the five finalists will be the grand prize winner, and enjoy The Hackaday Prize Party along with the Hackaday crew.

You may also know [Sprite_TM] as [Jeroen Domburg], one of the judges for The Hackaday Prize. That’s him on the left in the image above (we love a good avatar!). If you follow Hackaday, you should already be thrilled about meeting him and hearing his talk. The last talk we remember reading about was an epic hard drive controller hack. Just last month we saw a well-executed clock radio overhaul from him. While we’re on the topic, his micro-bots were a spectacular project.

[Sprite_TM] has also offered to help out with the reverse engineering workshop. We’re hard at work making sure everything is in place for those afternoon hacking events. As we solidify details we’ll be adding workshop pages (and emailing those already registered for Hackaday Munich) to let everyone know what to expect. We can report that we have shipped [Sprite_TM] a Bus Pirate so that he can be familiar with it. This will be the primary tool provided for this particular workshop.

The entire Hackaday crew is looking forward to it. See you there!

Think Before You Measure – Old Test Gear And Why It Is Awesome

Good, workable test gear is key to enabling our hobby. In this post we will discuss where to procure it at rock-bottom prices, what to look for, how to fix it, and how to tailor your laboratory practices around gear that may not be reliable.

We are lucky to be living in an era with plentiful high-quality test gear. Since the Second World War, surplus test gear has been in abundance at low costs enabling hobbyists, innovators, and academics to experiment and build great things. If you are willing to think before you measure you can save serious amounts of money and have a professional laboratory in your home.

Where to buy
The obvious answer is eBay, but the deals on test equipment are at the hamfests. Don’t be fooled by the name. Hamfests sell much more than amateur radio equipment. Hamfests are swap meets where hobbyists trade electronics of all kinds. Check out the ARRL hamfest calendar to find the next local one near you! I suggest you arrive early, however. The culture of hamfests tends to favor showing up as soon as the doors open and leaving about two hours before the official end. The early bird gets the worm!

Continue reading “Think Before You Measure – Old Test Gear And Why It Is Awesome”

A Single Pixel, Color Digital Camera

[Ben] has written all sorts of code and algorithms to filter, sort, and convolute images, and also a few gadgets that were meant to be photographed. One project that hasn’t added a notch to his soldering iron was a camera. The easiest way to go about resolving this problem would be to find some cardboard and duct tape and built a pinhole camera. [Ben] wanted a digital camera. Not any digital camera, but a color digital camera, and didn’t want to deal with pixel arrays or lenses. Impossible, you say? Not when you have a bunch of integral transforms in your tool belt.

[Ben] is only using a single light sensor that outputs RGB values for his camera – no lenses are found anywhere. If, however, you scan a scene multiple times with this sensor, each time blocking a portion of the sensor’s field of view, you could reconstruct a rudimentary, low-resolution image from just a single light sensor. If you scan and rotate this ‘blocking arm’ across the sensor’s field of view, reconstructing the image is called a Radon transform, something [Ben] has used a few times in his studies.

camera [Ben]’s camera consists of the Adafruit RGB light sensor, an Arduino, a microSD card, a few servos, and a bunch of printed parts. The servos are used to scan and rotate the ‘blocking arm’ across the sensor for each image. The output of the sensor is saved to the SD card and moved over to the computer for post-processing.

After getting all the pixel data to his laptop, [Ben] plotted the raw data. The first few pictures were of a point source of light – a lamp in his workspace. This resulted in exactly what he expected, a wave-like line on an otherwise blank field. The resulting transformation kinda looked like the reference picture, but for better results, [Ben] turned his camera to more natural scenes. Pointing his single pixel camera out the window resulted in an image that looked like it was taken underwater, through a piece of glass smeared with Vaseline. Still, it worked remarkably well for a single pixel camera. Taking his camera to the great outdoors provided an even better reconstructed scene, due in no small part to the great landscapes [Ben] has access to.