Propeddle, The Software Defined 6502

When it comes to building retrocomputers, there are two schools of thought. The first is emulation, that allows for greater compatibility and ease of use, and much easier to find parts. The second requires real, vintage hardware with all the bugs and idiosyncrasies found in vintage chips. Reconciling these two ideas is hard, but the software defined Propeddle manages to do it, all while using a real 6502 CPU.

The trick here is using a Parallax Propeller for the heavy lifting of loading the ROM into RAM with an extremely clever technique using the Reset and NMI pins, generating the clock and other signals required by the 6502, and hosting the keyboard, serial, and video I/O. Already [Jac] has the Propeddle running as an Apple 1 emulator (video below), making it possible to write programs for the Propeddle in BASIC or assembly.

It’s a great design that allows for emulation of a lot of the classic 6502 computers with a real CPU, all while doing away with the cruft of expensive ACIAs and video generation hardware. Awesome work, and we can’t wait for the next version that will be dedicated to [Bill Mensch].

Continue reading “Propeddle, The Software Defined 6502”

CNC 3020 Router Gets A Power Supply Upgrade

CNC3020 Router power supply upgrade

We’ve covered these CNC 3020’s in the past. They are physically solid machines but the electronics offer some room for improvement. [Peter] is certainly no novice at working on these machines. He’s already fixed a failed power supply and he’s back at the upgrades, again focused on the power supply. This time he’s replacing the transformer-based one with a couple switching power supplies.

The stepper controllers and spindle speed circuit need both 48 and 24 VDC. [Peter] purchased two separate power supplies, one for each voltage required. Before installing the new supplies, the stock one had to be removed, along with the transformer. Even with the old parts removed, there was still not enough room for both new supplies to be installed inside the stock case. [Peter] decided that mounting them to the top of the case would be appropriate.

Continue reading “CNC 3020 Router Gets A Power Supply Upgrade”

Koch Lamp Is 3D Printed With A Twist

Koch Lamp

[repkid] didn’t set out to build a lamp, but that’s what he ended up with, and what a lamp he built. If the above-pictured shapes look familiar, it’s because you can’t visit Thingiverse without tripping over one of several designs, all based on a fractal better known as the Koch snowflake. Typically, however, these models are intended as vases, but [repkid] saw an opportunity to bring a couple of them together as a housing for his lighting fixture.

Tinkering with an old IKEA dioder wasn’t enough of a challenge, so [repkid] fired up his 3D printer and churned out three smaller Koch vases to serve as “bulbs” for the lamp. Inside, he affixed each LED strip to a laser-cut acrylic housing with clear tape. The three bulbs attach around a wooden base, which also holds a larger, central Koch print at its center. The base also contains a PICAXE 14M2 controller to run the dioder while collecting input from an attached wireless receiver. The final component is a custom control box—comprised of both 3D-printed and laser-cut parts—to provide a 3-dial remote. A simple spin communicates the red, green, and blue values through another PICAXE controller to the transmitter. Swing by his site for a detailed build log and an assortment of progress pictures.


Soda Can Theremin Made In Minutes

Looking for a fun weekend project? How about building your very own sci-fi Theremin using just a soda can and a few simple components you probably already have.

Not familiar with Theremins? It’s an electronic instrument that can be played without any physical contact. Essentially, the antenna (soda can) acts as half of a capacitor — your hand acts as the other. By varying the distance of your hand to the soda can, you change the capacitance, which can then be used to modulate a sound. It was invented in 1928 by the Russian inventor [Leon Theremin], and you can actually see a video of him playing it on YouTube — we’ve never seen this before, but we must say it’s actually quite impressive!

Anyway, back to the hack. All you need are some op-amps, a few capacitors, some resistors, a diode, a breadboard, and of course — a speaker. [Will’s] gone into great detail in how each circuit works with both schematics and diagrams of the breadboard configuration — it’s a great little project even kids can follow along.

Take a listen after the break.

Continue reading “Soda Can Theremin Made In Minutes”

NES RetroPi

Original NES Guts Upgraded With RetroPie

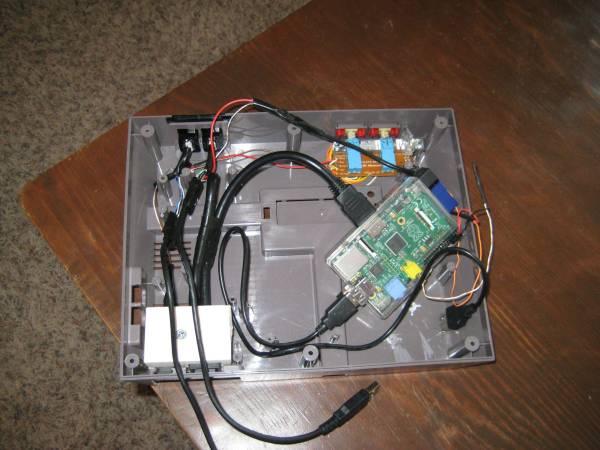
If you have an old broken NES lying around and have no idea what to do with it, you may want to check out [snoius’s] latest project. He replaced the guts of his old NES with a Raspberry Pi. [snoius] started out by removing most of the electronics from his original NES to make room for the Pi. He left the original control panel board so he would be able to use the original power button and power LED. The NES power switch is an on/off toggle switch. [snoius] decided to just route the 5V USB power input directly through this switch. The result is a hard power switch for the tiny computer. The original power LED is wired up to the Pi’s 3.3V GPIO header through a 330 ohm resistor. Now when the Pi has power, the LED lights up.

The next step was controllers. It looks like [snoius] is using some USB SNES controller clones. He wanted to use the original NES controller ports but obviously the NES did not utilize USB. [snoius] used a saw to cut the backs off of the controller ports, leaving a flat surface. He then used a utility knife to carve out a hole in the shape of a female USB port. He mounted some ports in place and then wired the inside up to some short USB cables with male ends. These were plugged into a USB hub that is hidden inside of the NES case.

The Pi is also hooked up to a short HDMI cable and a short power cable. The loose ends of the cables are mounted to a small block of wood. Notches are cut out of the wood to better fit the cable ends. The rear of the NES has two holes cut out where the original connectors used to be in order to accommodate the new connectors.

With all of the hardware taken care of, [snoius] still needed a way to actually play his games. That’s where RetroPie saved the day. RetroPie is a Linux distribution for the Raspberry Pi that is specifically created to make it easy to play old video games. It includes emulators for many old systems including NES, SNES, SEGA Genesis, Gameboy, etc. [snoius] installed RetroPie onto an 8GB SD card and copied over all of the ROMs he could find. The end result is what appears to be an original NES at a glance, but is in fact multiple retro gaming systems in one. It also contains hundreds of video games in on board memory instead of requiring a large library of physical cartridges.

[via reddit]

Poor Man’s 3D Printer Looks Rough, Prints Great!

In this Instructable, [Gelstronic] proves anyone can afford a 3D printer. Why? Because you can literally build one out of computer e-waste — specifically, DVD/CD drives.

His goal was to build a printer for less than a hundred euros. And he darn well did it. The most expensive part was the hot-end coming in at 20 euros. He managed to find a Chinese Arduino MEGA 2560 for only 10 euros, and everything else was basically pocket change.

The hot end features a geared NEMA 17 look-a-like stepper motor he found in a printer, and the XYZ axis all make use of the DVD drive trays. The only downside to this massive reusing of e-waste is the bed size. Due to the limited range of motion on the DVD trays, his build area is only 40 x 40 x 40 mm, which in the world of 3D printing is pretty tiny. On the plus side, he’s even thrown in a heated bed making use of two 7W resistors which can get it all the way up to 110°C!

After a bit of tweaking he was able to get some surprisingly good prints, with a 10mm cube coming out at 10.06mm! He must have a pretty good caliper Anyway, check out the following demo!

Continue reading “Poor Man’s 3D Printer Looks Rough, Prints Great!”

Wiimote Controlled Extermination: Dalek-Style

Dalek Build

Convention-goers have likely strolled past a number of Daleks: the aliens drive around the event space, spouting threats of extermination and occasionally slapping folks with a rotating eyestalk. [James Bruton] has been hard at work building this Wii-remote-controlled Dalek with his fellow hackers at the SoMakeIt Hackerspace (you may remember our write-up from earlier this year).

Most Dalek builds seat a driver inside the body at the helm of a salvaged electric wheelchair, where they plunk around using a joystick control and simmer in an increasingly potent aroma. This version started like most, with a wooden structure from plans sourced at Project Dalek. Inside, however, [James] and his crew have tapped into the wheelchair’s motor controller to feed it a PWM signal from an Arduino Shrimp, which is linked to a Raspi. The Pi receives a Bluetooth signal from a Wiimote, and, through their custom Python script, directs the Dalek with ease.

They’re still working on finishing the Dalek’s body, but they’re using some clever tactics to push onward: using a 3D-printer to solve some of the nuanced styling choices. They’ve uploaded a gallery with additional photos on Facebook, and you can watch them goofing around with their creation (losing their balance and nearly exterminating themselves) in a video after the break.

Continue reading “Wiimote Controlled Extermination: Dalek-Style”