Stellated Snowdecahedra

snoe deca

It’s been a pretty crazy winter here in Canada and the northern States, but at least one maker is having fun with it! He’s been making Snowdecahedras!

According to him, snow sculpting is an ancient art that was originally first discovered over 16,000 years ago outside of the caves of Lascaux, France. Despite whether this claim is true or just tongue in cheek, he’s crafted some amazing nonconvex regular polyhedra—or, stellated snowdecahedras—with a few fancy tools.

He’s created five steel molds for the sculpture by shearing 50 triangles out of steel sheet at his local hackerspace. After taping the cones together, he then welded them into place, creating a rather intricate five-piece mold. He’s welded nuts onto the outside of the pieces in order to tie the mold shut when it is filled with snow.

Plop it upside down, untie your ropes or other fastening device, and carefully remove each face, one at a time.  Et voila, a beautiful spiky star for all to enjoy.

The project is part of the New American Public Art initiative.

Ketchup Bottle… Flexible Hose?

ketchup pipe

Need a corrugated flexible hose for your CNC machine? You could buy one… or you could make your own using tape and ketchup bottles!

One of our tipsters stumbled upon a very interesting hack on a Russian 3D Modeling website that sells 3D models ready to be CNC machined. They have a few articles on CNC machines, and this is one of them. An ingenious way of making your own flexible hose — in this case, used as a vacuum return on the CNC machine.

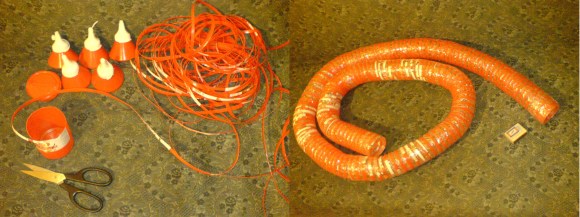
It’s pretty simple, although we would expect the labor involved quickly outweighs the cost of some cheap hose — but this is recycling so hey! You start by finding a source of cylindrical plastic containers, like ketchup bottles. You then cut a never-ending ribbon from said bottles, and then using a cylindrical template (like a can of spray paint), wrap packing tape, sticky side out, around the template. Now wrap your ribbon around the template, slightly spaced, and then cover the outside in tape as well. A one liter bottle of ketchup will make approximately a half meter of corrugated hosing. It’s not hard to continue doing this by sliding the hose off the can, and wrapping more ribbon and tape in place.

Now that’s a hack.

[Thanks Michael!]

Expanded Memory For The Teensy++ 2.0

RAM

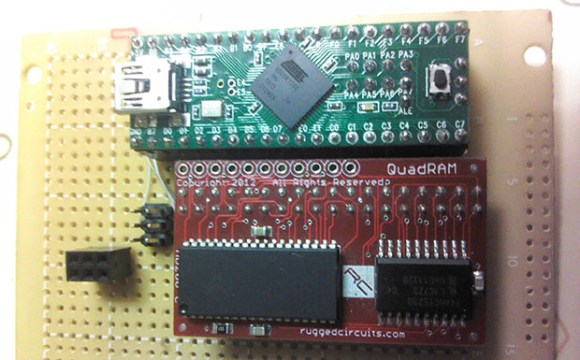
Sometimes with a microcontroller project you need to do some very RAM-hungry operations, like image and audio processing. The largish AVR chips are certainly fast enough to do these tasks, but the RAM on these chips is limited. [xxxajk] has come up with a library that allows the use of huge RAM expansions with the Teensy++ 2.0 microcontroller, making these RAM-dependant tasks easy on one of our favorite microcontroller board.

[xxajk]’s work is actually a port of XMEM2, an earlier project of his that added RAM expansion and multitasking to the Arduino Mega. Up to 255 banks of memory are available and with the supported hardware, the Teensy can address up to 512kB of RAM.

XMEM2 also features a preemptive multitasking with up to 16 tasks, the ability to pipe messages between tasks, and all the fun of malloc().

The build is fairly hardware independent, able to work with Rugged Circuits QuadRAM and MegaRAM expansions for the Arduino Mega as well as [Andy Brown]’s 512 SRAM expansion. With the right SRAM chip, etching a board at home for XMEM2 is also a possibility.

Make Your Own Smart Watch

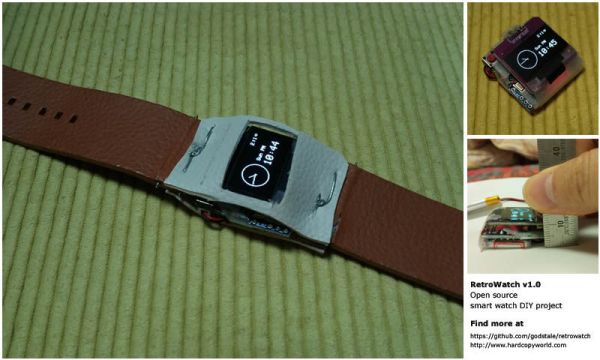
Wearables are all the rage lately. Have you been eyeing the Pebble or one of the new smart watches lately but are not sure if it’s for you? With [GodsTale’s] “Retro Watch” you can now build your own, allowing you to try out a smart watch without making a huge investment.

This smart watch uses very common and easy to obtain parts: Arduino Pro Mini, HC-06 Bluetooth module, Adafruit’s 0.96’’ OLED display, and a lithium battery. It is amazing how few parts can be used to make such a functional project. While the example packaging shown is a bit rugged around the edges, it gets the job done. Having such simple hardware allows [GodsTale] to focus on the software. One of the coolest aspects of this project is the Android app [GodsTale] provides. The app provides basic functionality, such as viewing RSS feeds and Android notifications. Check out the GitHub and a more detailed write-up for more information.

It would be great to see this project evolve in the future, it has so much potential. We would love to see a custom circuit board, or a model for a 3D printed case for this awesome smart watch. See a video of the Retro Watch in action after the break. If you thought this was cool, check out a few of these recent hacks.

Continue reading “Make Your Own Smart Watch”

40-Node Raspi Cluster

Multi-node RasPi clusters seem to be a rite of passage these days for hackers working with distributed computing. [Dave’s] 40-node cluster is the latest of the super-Pi creations, and while it’s not the biggest we’ve featured here, it may be the sleekest.

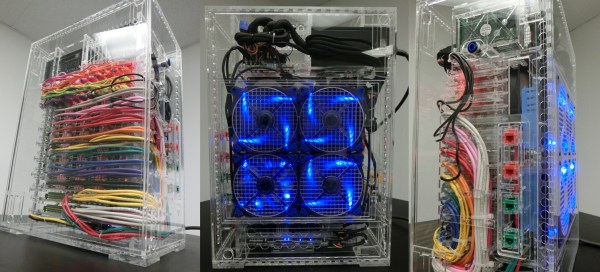
The goal of this project—aside from the obvious desire to test distributed software—was to keep the entire package below the size of a full tower desktop. [Dave’s] design packs the Pi’s in groups of 4 across ten individual cards that easily slide out for access. Each is wired (through beautiful cable management, we must say) to one of the 2 24-port switches at the bottom of the case. The build uses an ATX power supply up top that feeds into individual power for the Pi’s and everything else, including his HD array—5 1TB HD’s, expandable to 12—a wireless router, and a hefty fan assembly.

Perhaps the greatest achievement is the custom acrylic case, which [Dave] lasered out at the Dallas Makerspace (we featured it here last month). Each panel slides off with the press of a button, and the front/back panels provide convenient access to the internal network via some jacks. If you’ve ever been remotely curious about a build like this one, you should cruise over to [Dave’s] page immediately: it’s one of the most meticulously well-documented projects we’ve seen in a long time. Videos after the break.

Continue reading “40-Node Raspi Cluster”

A Pick-And-Mix FPGA Retrocomputer

Logo

Cheap FPGA boards are readily available, as are VHDL implementations of classic CPUs like the 6502, 6809, and Z80. Up until now, we haven’t seen anyone take these two parts and combine them into a complete system that turns an FPGA board into a complete 8-bit retrocomputer. Thanks to [Grant]’s work, it’s now possible to do just that (server on fire, here’s a google cache) with a $30 FPGA board and a handful of parts.

In its full configuration, the Multicomp, as [Grant] calls his project, includes either a 6502, 6809, Z80, or (in the future) a 6800 CPU. Video options include either monochrome RCA, RGB VGA, or RGB via SCART. This, along an SD card interface, a PS2 keyboard, and the ability to connect an external 128kB RAM chip (64k available) means it’s a piece of cake to build a proper and complete portable retrocomputer.

What’s extremely interesting about [Grant]’s project is the fact the data and address lines are fully exposed on the FPGA board. This means it’s possible to add whatever circuit you’d like to whatever retrocomputer you can imagine; if you want a few NES gamepads, an IDE interface, or you’d like to design your own primitive video card, it’s just a matter of designing a circuit and writing some assembly.

If you’d like to build your own, search “EP2C5T144C8N” on the usual sites, grab a few resistors and connectors, and take a look at [Grant]’s documentation and upcoming examples.

Via 6502.org forums

MacGyver Made IKEA Camera Slider

It’s not hard to drastically increase the production value in your videos by adding a camera slide to your shot — in fact, [Derek] shows us how to make a decent camera slide using parts from IKEA for less than $30.

The hack makes use of a cutting board, glider and hook accessories, a triple curtain rail, and two ceiling fixtures. The ceiling fixtures are simply used to make a mount for the curtain rail to rest on. [Derek] shows us an easy way to make the carriage with some careful drilled holes in the cutting board — he’s added a 3D printed tripod head for mounting the camera, but really you can use whatever you want.

It’s a pretty simple and easy to build rig, and the results are quite impressive — just check out the following video to see!

Continue reading “MacGyver Made IKEA Camera Slider”