PuzzleBox

Captain Hermano’s Mystery Box Is Full Of Puzzles

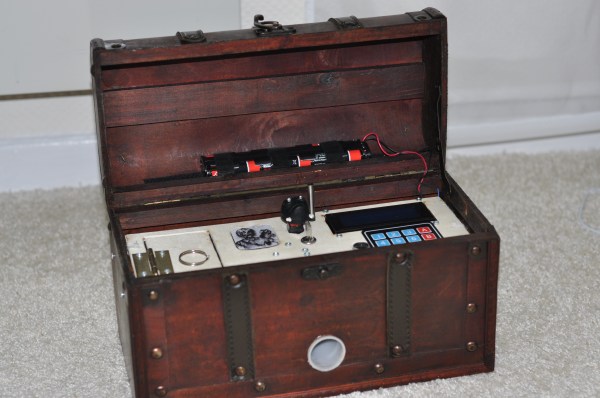
[Raffi] needed a birthday present idea but he wanted to do something extra special. He realized that a big part of gift giving is the anticipation and excitement of opening the present. In order to prolong this experience, [Raffi] built an electronic puzzle box. The box contains the final gift, but first a series of puzzles must be solved in order to open the box.

The project runs on an Arduino Mega. This is hooked up to several sensors, including a temperature sensor, GPS unit, and CO sensor. There is also an LCD screen and numeric keypad for user input and output. The project page contains a flow chart that shows all of the puzzles and their solutions. One of the more interesting puzzles requires the user to blow tobacco smoke into a tube. The CO sensor detects the smoke and unlocks the next puzzle.

Some of the puzzles require interacting with outside systems. For example, one puzzle requires the user to send an email to the fictional Captain Hermano’s email address. If the correct keyword is included in the email, the user will receive a reply with the code to enter into the box. Another puzzle requires the user to call a particular phone number and listen for another riddle. We’ve included the video demonstration below.

This isn’t the first puzzle box we’ve seen, but each one has its own special flair. This one is very well made and looks like a lot of care was put into it. We’ve seen another that uses only discrete components. We’ve seen yet another that uses Morse code. Continue reading “Captain Hermano’s Mystery Box Is Full Of Puzzles”

arduino server

Turn On Your Computer From Anywhere With An Arduino Server

Unless you live off-the-grid and have abundant free electricity, leaving your rig on while you go away on trips is hardly economic. So if you’re like [Josh Forwood] and you happen to use a remote desktop client all the time while on the road,  you might be interested in this little hack he threw together. It’s a remote Power-On-PC from anywhere device.

It’s actually incredibly simple. Just one Arduino. He’s piggybacking off of the excellent Teleduino software by [Nathan] who actually gave him a hand manipulating it for his purpose. The Arduino runs as a low-power server which allows [Josh] to access it via a secure website login. From there, he can send a WOL packet to his various computers to wake them up.

The system is working so well, he’s set it up with all his roommates’ computers as well, giving each their own login information on the Arduino’s page to allow them to access their own computer. Not a patient fellow, he also wanted a way to tell when his desktop would be ready to access…

Continue reading “Turn On Your Computer From Anywhere With An Arduino Server”

unicycle

Offset Unicycle Built Mostly From A Single Bicycle

[Lou’s] friends all said that it would be impossible to build a unicycle that had offset pedals. Moving the pedals to the front of the unicycle would throw off the balance and prevent the user from being able to ride it. [Lou] proved them wrong using mostly components from a single donor bicycle.

The donor bike gets chopped up into a much smaller version of itself. The pedals stay attached in the original location and end up being out in front of the rider. The seat is moved backwards, which is the key to this build. Having the rider’s legs out in front requires that there be a counter balance in back. Moving the seat backwards gets the job done with relative ease.

To prevent the hub from free wheeling, [Lou] lashes the sprocket directly to the wheel spokes using some baling wire. He also had to remove the derailer and shorted the chain. All of this gives the pedals a direct connection to the wheel, allowing for more control. The video does a great job explaining the build quickly and efficiently. It makes it look easy enough for anyone to try. Of course, actually riding the unicycle is a different matter. Continue reading “Offset Unicycle Built Mostly From A Single Bicycle”

Class D Amp With An H-Bridge

Class D amps are simple – just take an input, and use that to modulate a square wave with PWM. Send this PWM signal to a MOSFET or something, and you have the simplest class D amp in existence. They’re so simple, you can buy a class D amp chip for $3, but [George] thought that would be too easy. Instead, he built his own with an ATTiny and an H-bridge motor driver. No surprise, it works, but what’s interesting is what effect the code on the ATtiny can have on the quality of the audio coming out of the speaker.

The microcontroller chosen for this project was the ATtiny 461, a part we don’t see much, but still exactly what you’d expect from an ATtiny. The heavy lifting part of this build is an L298 chip found on eBay for a few dollars. This dual H-bridge is usually used for driving motors, but [George] found a home for it in the power section of an amplifier.

The ATtiny is clocked at 16 MHz, making the ADC clock run at 1 MHz. A 10-bit precision conversion takes place, and this value sets the PWM duty cycle. Timer1 in the chip is set up to run at 32 MHz, and by counting this timer up to 1023 gives this amp its PWM cycle speed of 31.25 kHz. That’s right in the neighborhood of what a class D amp should run at, and the code is only about 30 lines. It can’t get simpler than that.

[George] put up a video of this amp in operation, and despite not following the standard design of a Class D amp, it sounds pretty good. You can see that video below.

Continue reading “Class D Amp With An H-Bridge”

Robotically-Tuned Tube Radio

Dubbed the “Robot Radio” by [Brek], this clinking-&-clunking project merges three generations of hackers’ favorite technologies: robots, vacuum tubes, and microcontrollers. After the human inputs the desired radio frequency the machine chisels its way through the spectrum, trying its best to stay on target.

This build began its life as a junky old tube radio that [Brek] pulled out of a shed. The case was restored and then the hacking began. Inserted between the human and the radio, a PIC 16F628A keeps watch in both directions. On one side, the radio’s tank circuit is monitored to see what frequency the radio is currently playing. On the other, the human’s input sets a desired frequency. If the two do not match, the PIC tells a stepper motor to begin cranking a pair of gears until they do.

Another interesting feature is that as the tubes and other electronics warm up and change their values, the matching circuit will keep them in line. [Brek] shows this in the video by deliberately sabotaging the gears and seeing the robot adjust them back where they belong.

As an afterthought, the Robot Radio was supplemented with a module that adds 100khz to the signal so that the information from a nearby airport can be received.

[Brek] styled the whole machine up with some copper framing and other bits, similar to his spectacular atomic clock build we featured last month.

See the video of the radio tuning after the break.

Continue reading “Robotically-Tuned Tube Radio”

Coffee payment system

Coffee Payment System Doesn’t Void Your Warranty

[Oliver] is back with an update to his recent coffee maker hacks. His latest hack allowed him to add a coffee payment system to an off-the-shelf coffee maker without modifying the coffee maker itself. This project is an update to his previous adventures in coffee maker hacking which logged who was using up all of the coffee.

The payment system begins with an Arduino Uno clone inside of a small project enclosure. The Arduino communicates with the coffee maker via serial using the coffee maker’s service port. This port is easily available from outside the machine, so you won’t have to crack open the case and risk voiding your warranty.

The system also includes an RFID reader and a Bluetooth module. The RFID reader allows each user to have their own identification card. The user can swipe their card over the reader and the system knows how many credits are left in their account. If they have enough credit, the machine will pour a delicious cup of coffee.

The Arduino communicates to an Android phone using the Bluetooth module. [Oliver’s] Android app was built using MIT’s app inventor. It keeps track of the account credits and allows the user to add more. The system can currently keep track of up to forty accounts. [Oliver] also mentions that you can use any Bluetooth terminal program to control the system instead of a smart phone app. Continue reading “Coffee Payment System Doesn’t Void Your Warranty”

DIY Thickness Sander

DIY Thickness Sander Is Good Enough For A Guitar Shop

[Pat] is a luthier and general guy that likes to build stuff. In order to get his guitars to come out the best they can, he needed a thickness sander. For those who don’t know, thickness sander is a machine that will sand off a small amount of material from the surface of a large wood panel. There are certainly commercially available thickness sanders but [Pat] thought that they were simple enough machines so he decided to give a go at making one himself.

Since [Pat] already had access to a pretty nice wood shop, it only made sense to build the thickness sander primarily out of wood. The frame is made from standard 2×4’s. The drum is made from many disks of MDF mounted on a shaft and spun by an AC motor. You might imagine that a bunch of MDF disks mounted on a shaft would not result in a very cylindrical shape and that is exactly what happened here. So before applying the sand paper to the drum, course sandpaper was applied to a sheet of plywood and used to sand the drum round. It’s a super simple technique that resulted in a true-spinning drum. Afterward, velcro is attached to the drum and velcro-backed sandpaper is wrapped around the drum. This allows quick and effortless changing of sand paper.

thickness_sander-tn

Continue reading “DIY Thickness Sander Is Good Enough For A Guitar Shop”