Putting Lightning In Acrylic

Some folks at the i3Detroit hackerspace had an opportunity come up that would allow them to capture lightning in acrylic. They created a few Lichtenberg figures thanks to the help of a plastic tubing manufacturer, some lead sheet and a bunch of 1/2″ thick acrylic.

Lichtenberg figures are the 3D electrical trees found in paperweights the world over. They’re created through electrical discharge through an insulator, with lightning being the most impressive Lichtenberg figure anyone has ever seen. These figures can be formed in smaller objet d’art, the only necessity being a huge quantity of electrons pumped into the insulator.

This was found at Mercury Plastics’ Neo-Beam facility, a 5MeV electron accelerator that’s usually used to deliver energy for molecular cross linking in PEX tubing to enhance chemical resistance. For one day, some of the folks at i3Detroit were able to take over the line, shuffling a thousand or so acrylic parts through the machine to create Lichtenberg figures.

When the acrylic goes through the electron accelerator, they’re loaded up with a charge trapped inside. A quick mechanical shock discharges the acrylic, creating beautiful tree-like figures embedded in the plastic. There are a lot of pictures of the finished figures in a gallery, but if you want to see something really cool, a lead-shielded GoPro was also run through the electron accelerator. You can check out that video below.

Continue reading “Putting Lightning In Acrylic”

Binary Clock

Binary Clock Would Make Doc Brown Proud

[Brett] was looking for a way to improve on an old binary clock project from 1996. His original clock used green LEDs to denote between a one or a zero. If the LED was lit up, that indicated a one. The problem was that the LEDs were too dim to be able to read them accurately from afar. He’s been wanting to improve on his project using seven segment displays, but until recently it has been cost prohibitive.

[Brett] wanted his new project to use 24 seven segment displays. Three rows of eight displays. To build something like this from basic components would require the ability to switch many different LEDs for each of the seven segment displays. [Brett] instead decided to make things easier by using seven segment display modules available from Tindie. These modules each contain eight displays and are controllable via a single serial line.

The clock’s brain is an ATmega328 running Arduino. The controller keeps accurate time using a DCF77 receiver module and a DCF77 Arduino library. The clock comes with three display modes. [Brett] didn’t want and physical buttons on his beautiful new clock, so he opted to use remote control instead. The Arduino is connected to a 433MHz receiver, which came paired with a small remote. Now [Brett] can change display modes using a remote control.

A secondary monochrome LCD display is used to display debugging information. It displays the time and date in a more easily readable format, as well as time sync information, signal quality, and other useful information. The whole thing is housed in a sleek black case, giving it a professional look.

Using The Wink Hub With OpenHAB

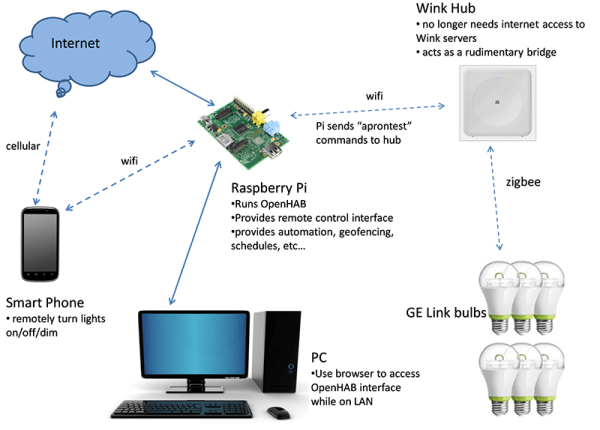
Spend enough time looking at home automation setups, and you’ll quickly find there are two competing philosophies. The first wants to put an Arduino on every light socket, with everything connected by cheap eBay radio modules. The second home automation philosophy requires astonishingly expensive hardware to talk to other expensive modules. The Arduino solution is a system that can be infinitely customizable, and the commercial solution talks to ‘the cloud’ for some strange reason. There is no middle ground. At least there wasn’t until [Eric] started poking around and looked at a few hardware solutions.

[Eric] was looking to control some GE Link bulbs through his phone, computer, or through the Internet. They’re supposed to be the best bulb on the market in terms of price and performance, but they can only be controlled with a Zigbee. This lead [Eric] to an interesting hack that gave all owners of the Wink Hub local control of their devices. From [Eric]’s research, this was the only way his lighting wasn’t dependent on ‘the cloud’.

Local control of the Wink was only possible after [Eric] read a post on rooting the Wink (and this post from a few days ago). Because the device could be rooted, and the fact that [Eric] already has a few things in his house integrated with OpenHAB, the choice on how to proceed with controlling a few Zigbee enabled lights was easy.

Once [Eric] got the light bulbs talking to the Wink, integrating them with the rest of the devices in his home was easy. The new bulbs are activated with his Arduino motion sensors, door sensors, and can be controlled via smartphone or by voice control. The Wink can also be completely disconnected from the Internet. A good idea, because the ability to turn a light on and off should not be dictated by the quality of your Internet connection.

Continue reading “Using The Wink Hub With OpenHAB”

DIY guitar mute pedal

Guitar Mute Pedal Made From Upcycled Parts

Rockin’ out on your fave guitar is pretty fun for sure but whether your on stage or jamming in your basement, it can be convenient to quickly mute those killer licks. [wozlaser] wanted a mute pedal for his guitar and instead of shelling out the tens of dollars for a commercial version, he decided to build one himself.

This pedal is heavy-duty and made out of metal. If the frame looks familiar, that is because in a prior life this was a control pedal for a sewing machine. [wozlaser] found it cheap at a thrift store. After the internals were taken out, he added a few key parts. First were the 1/4″ input and output jacks that were scavenged from an old stereo system. There is a momentary switch from a VCR and a standard guitar stomp pedal switch mounted all the way in the front of the frame. The wiring is as follows:

DIY guitar mute pedal

The wiring schematic is pretty darn simple, it just grounds and ungrounds the signal wire. As stated earlier, there are 2 switches, a momentary and a push-on/push-off switch. A normal mute pedal would only have one switch but [wozlaser] wanted something special. If you push the pedal all the way forward it will mute or unmute the signal until it is pushed again. When the pedal is in the spring-supported ‘up’ position a lever pushes on the momentary switch, a slight push on the pedal lifts the lever off of the momentary switch to mute or unmute the signal. The function of the momentary switch (mute or unmute) changes with the state of the other switch. This works exactly the same as a 3-way light switch circuit allows two switches to control one light in your house. With this setup [wozlaser] is able to not only mute and unmute his guitar but strum a chord with it off and pulse the chord on to the beat of the music or tap the pedal with some guitar feedback to make the sound cut in and out. All that only cost [wozlaser] a little time and spare parts… and there are no batteries to replace!

LED necklace

IBling Is An LED Display Necklace

Are you tired of being ignored? Do you want a fashion accessory that says, “Pay attention to me!” If so, you should check out [Al’s] recent instructable. He’s built himself a necklace that includes a display made up of 512 individual LEDs.

This project was built from mostly off-the-shelf components, making it an easy beginner project. The LED display is actually a product that you can purchase for just $25. It includes 512 LEDs aligned in a 16 x 32 grid. The module is easily controlled with a Pixel maker’s kit. This board comes with built-in functionality to control one of these LED modules and can accept input from a variety of sources including Android or PC. The unit is powered from a 2000 mAH LiPo battery.

[Al] had to re-flash the firmware of the Pixel to set it to a low power mode. This mode allows him to get about seven hours of battery life with the 2000 mAH battery. Once the hardware was tested and confirmed to work correctly, [Al] had to pretty things up a bit. Some metallic gold spray paint and rhinestones transformed the project’s cyberpunk look into something you might see in a hip hop video, or at least maybe a Weird Al hip hop video.

The Pixel comes with several Android apps to control the display via Bluetooth. [Al] can choose one of several modes. The first mode allows for pushing animated gif’s to the display. Another will allow the user to specify text to scroll on the display. The user can even specify the text using voice recognition. The final mode allows the user to specify a twitter search string. The phone will push any new tweets matching the terms to the display as scrolling text.

Faulty ESP8266s Release Smoke, Then Keep Working?

[Ray] is in a bit of a pickle. All appeared well when he began selling an ESP8266-based product, but shortly thereafter some of them got hot and let the smoke out. Not to worry, he recommends ignoring the problem since once the faulty components have vaporized the device will be fine.

The symptom lies in the onboard red power indicator LED smoking. (Probably) nothing is wrong with the LED, because upon testing the batch he discovered its current limiting resistor is sometimes a little bit low to spec. Off by a hair of, oh, call it an even 1000x.

HAD - HotESPY3Yep, the 4700 ohm resistor is sometimes replaced with a 4.7 ohm. Right across the power rail. That poor little LED is trying to dissipate half a watt on a pinhead. Like a sparrow trying to slow a sledgehammer, it does not end well. Try not to be too critical, pick ‘n place machines have rough days now and then too and everyone knows those reels look practically the same!

The good news is that the LED and resistor begin a thermal race and whoever wins escapes in the breeze. Soon as the connection cuts the heat issue disappears and power draw drops back to normal. Everything is fine unless you needed that indicator light. Behold – there are not many repairs you can make with zero tools, zero effort, and only a few seconds of your time.

[Ray] also recommends measuring and desoldering the resistor or LED if you are one of the unlucky few, or, if worst comes to worst, he has of course offered to replace the product too. He did his best to buy from authentic vendors and apologizes to the few customers affected. As far as he knows no one else has had this problem yet so he wanted to share it with the community here on Hackaday as soon as possible. Keep an eye out.

If you have never seen smoke ISO9001-certified electronics repair before, there is a short video of this particular disaster upgrade caught live on tape after the break.

Continue reading “Faulty ESP8266s Release Smoke, Then Keep Working?”

Moonpig

When Responsible Disclosure Isn’t Enough

Moonpig is a well-known greeting card company in the UK. You can use their services to send personalized greeting cards to your friends and family. [Paul] decided to do some digging around and discovered a few security vulnerabilities between the Moonpig Android app and their API.

First of all, [Paul] noticed that the system was using basic authentication. This is not ideal, but the company was at least using SSL encryption to protect the customer credentials. After decoding the authentication header, [Paul] noticed something strange. The username and password being sent with each request were not his own credentials. His customer ID was there, but the actual credentials were wrong.

[Paul] created a new account and found that the credentials were the same. By modifying the customer ID in the HTTP request of his second account, he was able to trick the website into spitting out all of the saved address information of his first account. This meant that there was essentially no authentication at all. Any user could impersonate another user. Pulling address information may not sound like a big deal, but [Paul] claims that every API request was like this. This meant that you could go as far as placing orders under other customer accounts without their consent.

[Paul] used Moonpig’s API help files to locate more interesting methods. One that stood out to him was the GetCreditCardDetails method. [Paul] gave it a shot, and sure enough the system dumped out credit card details including the last four digits of the card, expiration date, and the name associated with the card. It may not be full card numbers but this is still obviously a pretty big problem that would be fixed immediately… right?

[Paul] disclosed the vulnerability responsibly to Moonpig in August 2013. Moonpig responded by saying the problem was due to legacy code and it would be fixed promptly. A year later, [Paul] followed up with Moonpig. He was told it should be resolved before Christmas. On January 5, 2015, the vulnerability was still not resolved. [Paul] decided that enough was enough, and he might as well just publish his findings online to help press the issue. It seems to have worked. Moonpig has since disabled its API and released a statement via Twitter claiming that, “all password and payment information is and has always been safe”. That’s great and all, but it would mean a bit more if the passwords actually mattered.