Homemade Internal Combustion Engine – Sans Machine Shop

We’ve got a question for you:  If you were stuck in a basement, with nothing too much more than some copper pipe, solder, JB-Weld, and a few hand tools, do you think you could make a working 2-stroke motor? Well, [Makerj101] did just that, and the results are fan-freaking-tastic.

[Makerj101] began his journey like most of us do – with a full face-plant type failure. His first attempted at building an internal combustion engine wouldn’t run, due to a low compression ratio, and too small port sizes. So he did what most of us would do, and tore apart a small gas-power weed-whacker motor to see what he was doing wrong.

The type of engine he’s making is a 2-stroke. That makes the design much simpler as there are no mechanically controlled valves a like 4-stroke motor. The piston (along with the cylinder wall) does double duty by also directing the intake and exhaust gasses – along with a simple flap-type check valve.

For now, the ignition system is run off of mains power, but he has plans to change that – creating a self contained engine. We’re amazed that the entire build is made with such simple tools. Even the the piston is cast out of “JB Weld” epoxy putty. After seeing this, we think that the kid who took apart a clock is going to have to up his game a bit.

We’ve included all 6 parts after the break.

Continue reading “Homemade Internal Combustion Engine – Sans Machine Shop”

Muscle Wire Pen Dances To Duke Nukem

[serdef] is clearly just having a little bit of fun here. One never needs a whiteboard pen that’s syncronized by MIDI to dance along with the theme from Duke Nukem.

But if you had all of the parts on hand (a highly liquid MIDI-driven relay board that connects straight up to a soundcard, some muscle wire, tape, and a whiteboard pen, naturally) we’re pretty sure that you would. You can watch the dancing pen in a video below the break.

The project is really about documenting the properties of [serdef]’s muscle wire, and he found that it doesn’t really contract enough with a short piece to get the desired effect. So he added more wire. We’ve always meant to get around to playing with muscle wire, and we were surprised by how quickly it reacted to changing the voltage in [serdef]’s second video.

Now the dancing pen isn’t the most sophisticated muscle wire project we’ve ever seen. And that award also doesn’t go to this Nitinol-powered inchworm. Did you know that there’s muscle wire inside Microsoft’s Surface?

Continue reading “Muscle Wire Pen Dances To Duke Nukem”

Microcontroller Lectures By Bruce Land

[Bruce Land] is no stranger to Hackaday as you can see from his Hackaday.io profile, if you aren’t familiar with his work [Bruce Land] is a Senior Lecturer at Cornell University. One of the courses he teaches: Digital Systems Design Using Microcontrollers (ECE4760) was recorded in 2012 and again in 2015 and the videos are available on YouTube.

AVR to PIC32

[Bruce Land]s previous set of ECE4760 lectures (2012) used an Atmel ATmega1284 AVR Microcontroller for the laboratory portion of the course. This means the lectures are also based on the AVR and if you haven’t watched them through a few times you should do. The recently updated set of lectures is based on the Microchip PIC32, more specifically the Microstick II.

Open Curriculum

You can follow the ECE4760 rabbit hole as far as you want with all the available content provided by [Bruce Land] on his ECE4760 course webpage. You can watch the ECE4760 lectures on YouTube, try your hand at the homework assignments, and work through the labs at your own pace.

New Lectures = New Shirts

One area that [Bruce Land] is unmatched and arguably uncontested is his shirt collection, we are continuously impressed with these original works and wish they were available for purchase (wink/hint c’mon [Bruce] throw us a bone!). If you don’t know why the rest of us aren’t able to obtain the wonderful shirts [Bruce Land] wears you clearly aren’t subscribed to [Bruce Land]s YouTube channel, you should rectify that wrong and log some ECE4760 lecture hours starting with the video after the break.

Raspberry Pi Laser Beam Profiler

[Anthony] at UCLA needed to verify the shape of a laser beam. Commercial units for this, as you would expect, are expensive. But a Raspberry Pi with a Pi Noir camera easily handles the task. Not only is the use of the Pi cool but so is the task – they are using lasers to cool molecules to study quantum effects. The Pi camera without the IR filter captures a wide bandwidth making it suitable for use with non-visible lasers. [Anthony] captures the beam along two axes and plots both curves on the LCD touchscreen. That data, based on the pictures, is also available on a host PC. All this in a super compact package with a 7″ touch screen display.

One reason I find this fascinating is I did something similar 1977 at the University of Rochester Laboratory for Laser Energetics. My project was measuring the energy cross-section of a laser beam. The research goal of the Laboratory was the study of inertial confinement laser fusion. While [Anthony] uses an entire camera my project was limited to a 1 dimensional array of charge coupled devices (CCD). The output went to a Tektronix storage terminal and was printed on thermal paper for reference. He uses Python running on the target system. My work used a Z80 development system the size of a tower PC to write my program in assembly language which was then executed on a single board computer. We’ve come a long way. My code is long gone but you can get [Anthony’s] on GitHub.

Fail Of The Week – Steam Cleaner Fix Goes Bad

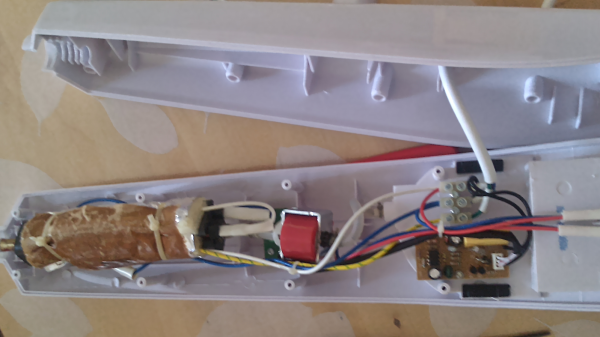
[Sven337] was gifted a steam cleaner, and seemed pretty happy because it helped clean the floor better than a regular mop. Until it fell one day, and promptly stopped working. It would produce steam for a short while and then start spitting out cold water, flooding the floor.

Like any self-respecting hacker, he rolled up his sleeves and set about trying to fix it. The most-likely suspect looked like the thermostat — it would switch off and then wouldn’t switch on again until the water temperature fell way below the target, letting out liquid water instead of steam after the first switching cycle. A replacement thermostat was ordered out via eBay.

Meanwhile, he decided to try out his hypothesis by shorting out the thermostat contacts. That’s when things went south. The heater worked, and got over-heated due to the missing thermostat. The over-temperature fuse in the heater coil blew, so [Sven337] avoided burning down his house. But now, he had to replace the fuse as well as the thermostat.

[Sven337] bundled up all the parts and put them in cold storage. The thermostat arrived after almost 2 months. When it was time to put it all together, a piece of fibreglass tubing that slides over the heater coil was missing. Without the protective sleeve, the heater coil was shorting out with the grounded heater body, blowing out the fuses in his apartment.

That’s when [Sven337] called it a day and threw out the darn steam mop — a few dollars down the drain, a few hours lost, but at least he learnt a few things. Murphy’s Law being what it is, he found the missing insulation sleeve right after he’d thrown it away.

Kate Reed: The Creative Process In Action

Kate Reed is an artist. Kate Reed also builds hand-driven wheelchair accessories that work with any wheelchair. Wait, what? These things don’t have to be separate skills. We’re living in the age of artisanal creation and Kate is a perfect example that you need to embody all skills. She’s an artist who follows a creative idea from inception through to implementation. Check out her talk on the Creative Process in Action from the Hackaday SuperConference, then jump past the break for some more details on what she’s been building and how she build her diverse set of skills.

Continue reading “Kate Reed: The Creative Process In Action”

$20 Sip-and-Puff Mouse From E-Cig And 3D Printing

At Hackaday, we think the highest form of hacking is hacking for good. Sure, it’s fun to build robots and gadgets, and universal remotes. But it is even better to create things that make people’s lives better. In that spirit, we enjoyed seeing the Assistive Tech Challenge over on Thingiverse that ended last month. The winner was [0_o] who used 3D printing and an Arduino to produce a mouth-operated mouse for under $20.

sip-sensor-from-ecigInstructions on Thingiverse can be spotty, but [0_o] did an excellent job of laying out what you need to buy and how to assemble it. One of the most interesting parts of the build is the blow sensor. [0_o] tore apart a $5 electronic cigarette and used the sensor within. The mouthpiece is moved like a joystick to actuate the cursor, and the user blows into it for the mouse clicks. Perhaps not a true sip-and-puff system but it made us wonder what other uses you might find for these sensors.

You can see a video about the mouse after the break. These kinds of projects have the power to make someone’s life better and what could be better than that?

Continue reading “$20 Sip-and-Puff Mouse From E-Cig And 3D Printing”