Panel-Mounted Breadboard Accessories

[Chuck Stephens] grew up with Radio Shack 100-in-1 electronic kits. The ones with lots of components and spring terminals that could be wired to be a radio, a burglar alarm, or whatever.[Chuck] graduated to solderless breadboard, but did miss having panel mounted components like pots and switches easily available. So he has been building his own accessory boxes.

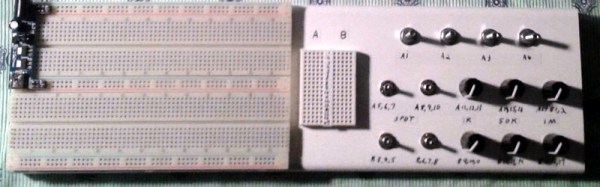
Of course, it is easy enough to just connect breadboard wires to component, but [Chuck] went further than that. Using boxes of different types (including a cigar box), he mounted the components properly and also wired them to a breadboard for easy connection.

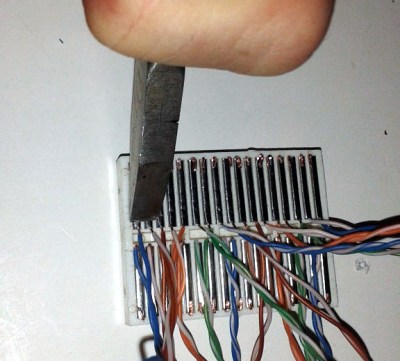
If you’ve ever tried to solder to breadboard springs (we have), you’ve found it is hard to get adhesion to the shiny metal. [Chuck] solved the problem by crimping little wire hooks to the springs. The result is a good looking and functional prototyping aid.

They do make tiny breadboard style contacts (called tie point blocks; good luck finding them) for this kind of application, but the crimp technique works on common breadboards. These are cheap and much easier to find.

Of course, these days, we are as likely to want to mount SMDs than panel mounted controls. Now if we could only figure out where to put the components. If you want something less involved, take a look at the video below.

Continue reading “Panel-Mounted Breadboard Accessories”

3D Printed Vice Holds Dev Boards Beside Breadboard

The Stickvise has been a staple of the Hackaday community for a while now. If you need something held for soldering there’s no better low-cost helping hand. But if you’re just using a breadboard and a dev board of some sort, there’s another vice on the horizon that uses similar spring clamping to hold everything in place while you build something awesome.

BreadboardVise1-cropped
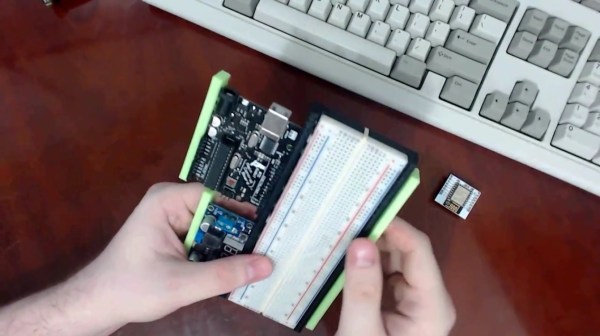
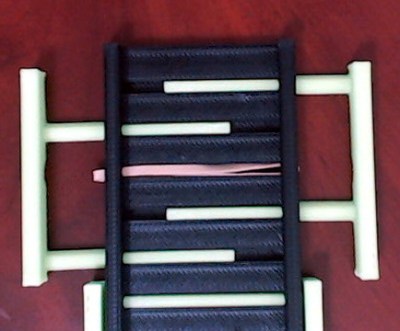
While [Pat]’s inspiration came from the aforementioned Stickvise, the new 3d-printed vice is just what you’ll need before you’re ready to do the soldering. The vice is spring-loaded using rubber bands. The base is sized to fit a standard breadboard in the center with clamping arms on either side to hold dev boards such as an Arduino. This innovative yet simple de”vice” grips boards well enough that you won’t be chasing them around your desk, knocking wires out of place, anymore.

There are some nuances to this board, so be sure to check out the video below to see it in action. As we mentioned, it uses rubber bands instead of springs to keep it simple, and it has some shapes that are easily 3d printed such as the triangular rails. If you want to 3d print your own, the files you’ll need are available on the project’s site. If you want to get even simpler, we’ve seen a few other vices around here as well.

The Stickvise is available for sale in the Hackaday Store.

Continue reading “3D Printed Vice Holds Dev Boards Beside Breadboard”

Hackaday Prize Entry: A Sixth Sense

There’s far more going on in the environment that humans have the senses to detect. Birds migrate with the help of the Earth’s magnetic field, and certain species of fish can detect electrical fields. For his Hackaday Prize entry, [Sebastian] is giving us a sixth sense. He’s building a device that allows anyone to detect the Earth’s magnetic field and find their way north for the summer.

The initial idea for [Sebastian]’s project came after his father’s inner ear was damaged. The doctor told him his brain needed to be trained to work with only one inner ear. If it works for balance, [Sebastian] wondered, why couldn’t the brain be trained to listen to an extra sensory input?

[Sebastian]’s device is an accelerometer and magnetometer, connected to a microcontroller that drives a few vibration motors. By mounting these motors around an ankle strap, [Sebastian] hopes to train his brain to listen to the magnetic fields.

So far, [Sebastian] has a device that can sense the Earth’s magnetic field and buzzes the motor closest to magnetic north. There’s still a lot of work to do, including filtering the magnetometer inputs, adding a ‘sleep’ mode, and putting Bluetooth functionality on board, but it’s already a very well-designed project.


The 2015 Hackaday Prize is sponsored by:

Junked Inspection Camera Given 15-Year Face-lift With Raspberry Pi

The nice thing with having a hacker cred is that family and friends are always on the lookout for stuff they think might be useful to you. [Craig Hollabaugh]’s son-in-law found an inspection camera and thought it would be handy for his hobby work. The MagniSight Explorer was first introduced in 2001. It is good for surface mount board work and inspection, except that its analog 480p video is quite dated by today’s standards. So [Craig] upgraded it for crystal clear 1080P/30 video and 5 megapixel images using a $35 Raspberry Pi 2 and a $26 Raspberry Pi Camera Module. After the upgrade, the unit is now a great tool for SMT rework.

There’s not a lot to the upgrade, but [Craig] gives a nice rundown in the 15 minute video of the MagniSight’s internals. He shows us the original analog camera module and its video card, which is able to do some additional processing like black and white output and reverse video (negative). As he mentions, it would be easy for him to do the same via software on the Raspberry Pi. A video camera lens takes care of magnification and two shafts coupled to it via flat belts (rubber bands?) take care of zoom and focus. A front coated mirror angled 45 degrees in front of the lens turns the optical path 90 degrees to allow the lens/camera to “look down”. After experimenting a bit to find the correct focal spot behind the lens unit for the Raspberry Pi camera, he covered the camera module with insulation tape and then just glued it to the old camera mount. After hooking it up to an HDMI monitor, the results are quite nice and he reckons he can easily work with components down to 0402 in size.

He’s got a couple of more upgrades in mind to make the system even better. He plans to replace the existing compact fluorescent lamps with a string of LED’s which will provide more uniform illumination. Plus, he can control their brightness, and selectively turn them on or off to get the optimum lighting. The other interesting upgrade would be to add stepper motors to the X-Y translation stage and automate their movement. After looking up a board file and its BoM, he may even be able to search for a part designator and move the stage to bring the part into focus.

Continue reading “Junked Inspection Camera Given 15-Year Face-lift With Raspberry Pi”

Tricking A Car Stereo To Think Your Cellphone Is A Tapedeck

When you have an older vehicle there’s not a lot of options in the stock stereo department, often a CD player and tape deck is what you get. When you want to play your tunes from your mobile what do you do? Buying an adapter, or a new head unit for that matter, isn’t any fun. So why not hack it? This isn’t just a mechanical marriage of a Bluetooth dongle and an elderly stereo. Some real work went into convincing the stereo that the BT receiver was the stock tape deck.

car-stereo-logic-analyzer
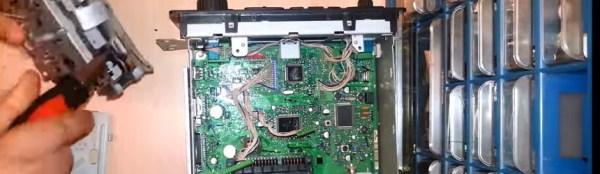
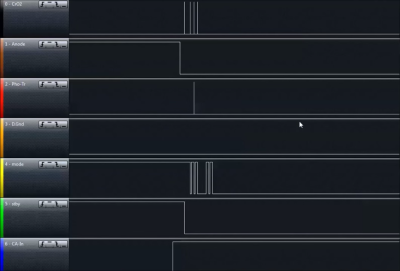
Attacking the outdated Cassette deck [kolonelkadat] knew that inside the maze of gears and leavers, most of it is moving around actuating switches to let the radio know that there is a tape inside and that it can switch to that input and play. Tricking the radio into thinking there is a tape inserted is handled by an Arduino. Using a logic analyzer [kolonelkadat] figured out what logic signals the original unit put out and replicating that in his Arduino code.

Audio is handled by the guts of a bluetooth speaker with the output redirected into the radio where the signal coming off the tape head normally would have been directed. Join us after the break for a couple of videos with all of the details.

Continue reading “Tricking A Car Stereo To Think Your Cellphone Is A Tapedeck”

Crack Open A USB Car Charger To Make It A Variable DC-DC Converter

[Boolean90] hacked a cheap USB car charger into a variable power supply. His proof of concept is to use this as a variable-speed motor controller. The best part is that nothing is being abused, the regulator inside is still running within manufacturer’s spec.

While we’ve seen similar hacks before, [Boolean90]s video is pretty cool and provides a nice insight into the components used in these cheap devices. Rather than a linear regulator, which would dissipate too much heat the device uses a common jelybean MC34063A (PDF) switching DC-DC converter which costs about 10 cents on eBay (about two dollars for twenty, shipped). Here it’s used to step the car batteries 12 volts down to 5, but can also be used in step-up and inverting configurations.

Like all switching buck converters the MC34063A uses a PWM (pulse width modulated) signal to drive an inductor and capacitor, which effectively form an LC filter. By controlling the pulse width, the output voltage can be regulated. [Afrotechmods] has a great tutorial on the basic principle. The regulation is controlled by feedback resistors. [Boolean90] simply added a variable resistor to allow the output voltage to be controlled.

Neat hack [Boolean90]! Continue reading “Crack Open A USB Car Charger To Make It A Variable DC-DC Converter”

Becoming A State Machine Design Mastermind

Imagine a robot with an all-around bump sensor. The response to the bump sensor activating depends on the previous state of the robot. If it had been going forward, a bump will send it backwards and vice versa. This robot exhibits behavior that is easy to model as a state machine. That is, the outputs of the machine (motor drive) depend not only on the inputs (the bump sensor) but also on the current state of the machine (going forward or backward).

As state machines go, that’s not an especially complicated one. Many state machines have lots of states with complex conditions. For example, consider a phone switchboard. The reaction to a phone going off hook depends on the state of the line. If the state is ringing, picking up the phone makes a connection. If the state is idle, the phone gets a dial tone. The switchboard also has to have states for timeouts, connection failures, three way calling, and more.

If you master state machines your design and debug cycles will both move along faster. Part of this is understanding and part is knowing about the tools you can choose to use. I’ll cover both below.

Continue reading “Becoming A State Machine Design Mastermind”