Hard Drive Rootkit Is Frighteningly Persistent

There are a lot of malware programs in the wild today, but luckily we have methods of detecting and removing them. Antivirus is an old standby, and if that fails you can always just reformat the hard drive and wipe it clean. That is unless the malware installs itself in your hard drive firmware. [MalwareTech] has written his own frightening proof of concept malware that does exactly this.

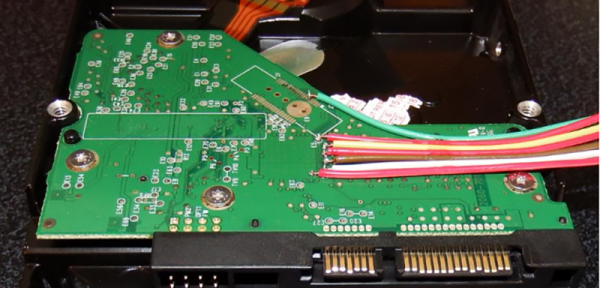
The core firmware rootkit needs to be very small in order to fit in the limited memory space on the hard drive’s memory chips. It’s only a few KB in size, but that doesn’t stop it from packing a punch. The rootkit can intercept any IO to and from the disk or the disk’s firmware. It uses this to its advantage by modifying data being sent back to the host computer. When the computer requests data from a sector on the disk, that data is first loaded into the disk’s cache. The firmware can modify the data sitting in the cache before notifying the host computer that the data is ready. This allows the firmware to trick the host system into executing arbitrary code.

[MalwareTech] uses this ability to load his own custom Windows XP bootkit called TinyXPB. All of this software is small enough to fit on the hard drive’s firmware. This means that traditional antivirus cannot detect its presence. If the owner of the system does get suspicious and completely reformats the hard drive, the malware will remain unharmed. The owner cannot even re-flash the firmware using traditional methods since the rootkit can detect this and save itself. The only way to properly re-flash the firmware would be to use an SPI programmer, which would be too technical for most users.

There are many more features and details to this project. If you are interested in malware, the PDF presentation is certainly worth a read. It goes much more in-depth into how the malware actually works and includes more details about how [MalwareTech] was able to actually reverse engineer the original firmware. If you’re worried about this malicious firmware getting out into the wild, [MalwareTech] assures us that he does not intend to release the actual code to the public.

“Giger Counter” Makes Radiation Detection Surreal

Here’s a quick question: are Geiger and Giger (as in H.R. Giger, designer of the Alien Xenomorph) pronounced the same? The answer is no. Nevertheless, the late artist has had his name mispronounced (for the record, it’s ghee-gur) by many over the years. [Steve DeGroof’s] friend posted a goofy tweet that gave him the inspiration to finally put a skeletal lid on the matter, the Giger Counter.

The innards are a Mightyohm Geiger Counter Kit. The external casing is where the true hack lies in this project, made from a 1:2 scale plastic skeleton model, flexible conduit, and dark metallic spray paint. Only the ribcage, some vertebrae, and part of the skull are used from the model. They are assembled in a delightfully inhuman fashion with some conduit wrapped around it and into the bottom of the ribcage for good measure. After some gluing and spray painting, the LED from the Geiger Counter kit is placed through a drilled hole in the skull while the board sits inside the ribcage. Getting the board in and out can be a little tricky, but it looks like the batteries can be changed without having to pull the whole board out.

Check out the video below to see the Giger Counter. If you want another hack inspired by H.R. Giger’s artistic vision, take a look at this Xenomorph suit we covered.  Or, if you can’t get enough Geiger counters, we’ve featured plenty of cool ones on this site.

Continue reading ““Giger Counter” Makes Radiation Detection Surreal”

A Mountain Of Prizes For Projects Using These Parts

Here’s your chance to bring some great stuff home from The Hackaday Prize. For the next 3 weeks we’ll be looking for the best entries using Atmel, Freescale, Microchip, and Texas Instruments parts.

Each of the four contests (yes, four running concurrently) will award the top 50 projects. That’s 200 in total being recognized. The odds are really in your favor — currently some of those lists have less than 50 projects on them — so enter yours right away! Scroll down to see the mountain of prizes that we have for this epic run.

Make Sure We Know About Your Entry

There are two things you need to do to be eligible for this pile of awesome stuff:

  1. Enter your project in the 2015 Hackaday Prize
  2. Leave a comment here with a link to your project and we’ll add it to the list

Do this by the morning of Monday, June 29th to make sure you’re in the running. We’ve been diligent about adding entries to the lists for Atmel, Freescale, Microchip, and Texas Instruments but at the rate new entries have been coming in it’s easy to miss one here or there. Don’t be bashful about asking to be added to these lists!

The prerequisite is to be using a part from one of these four manufacturers. We’ll be looking at these lists for projects using great ideas which have also been well-documented. Tells us why you’re building it, what it does, how you came up with the idea… you know, the whole story!

The Loot

Up for grabs in each of the 4 contests are:

3x Mooshimeters which is a multimeter that uses your smartphone as a wireless readout.

2x DS Logic analyzers which [Adam] reviewed a few weeks back.

15x Stickvise to hold your PCBs (and other things) in place while you work

A continuation of what we’re giving away in each of the 4 contests:

10x Bluefruit LE Sniffers to help you figure out what’s being transmitted by your BTLE devices

10x Cordwood Puzzles; grab your iron and tackle this head-scratching soldering challenge

10x TV-B-Gone is an iconic invention from [Mitch Altman]; one button turns off all TVs


The 2015 Hackaday Prize is sponsored by:

lego 3d printer

Lego Printer Prints Lego

[Gosse Adema] made his very first instructable by detailing his Lego 3D printer build. It’s Prusa i3 based, and originally started out as an A4 plotter with repurposed steppers out of an old HP printer. After upgrading to some NEMA 17 steppers, it became a full-blown 3D printer.

It turns out that NEMA 17 stepper mounting holes align perfectly with Lego, making it super easy to mount them. Check out this Lego ‘datasheet’ for some great details on measurements.

The brains of the printer are occupied by Marlin running atop a Atmega 2560, and Pronterface for the PC software. He tops it off with a Geeeteck built MK8 extruder boasting a 0.3 mm nozzle that accepts 1.75 mm filament.

As with almost any DIY 3D printer build, his first prints didn’t turn out so well. After adjusting the nozzle and filament size in the software, he started to get some good results. Be sure to check out the video below to see this Lego 3D printer in action.

Continue reading “Lego Printer Prints Lego”

These Are The Droid Controllers You’ve Been Looking For

When I was in the 4th grade our teacher announced that we had a special guest visiting us from somewhere “Far, far away…” As we piled out of the classroom and into to the courtyard, my jaw hit the floor – It was R2D2! The droid started to move around, and made all the noises like the movie. I couldn’t believe what I was seeing. R2D2 was real, and he was right in front of me! (My young mind made the conclusion that if R2D2 was real, then all of Star Wars was real.) I had to turn around to see my friends’ reactions. Unfortunately, it’s at that moment, I saw a middle-aged man, holding a RC transmitter, with antenna extended, standing in the background operating the controls. Sigh. R2 wasn’t real – it’s just a remote-controlled robot. My dreams of becoming a Jedi were forever crushed.

[Chris James] of the R2 Builders Club has been working hard to make a pair of “Stealth RC” controllers to help keep the magic of R2D2 intact.  These dual joystick, 3D printed, hand-held units can be easily hidden in the palm of your hand, or the front pockets of a loose jacket while you operate them. Loaded with features, these tiny controllers use XBee radios to talk to a receiver and custom PCB inside the droid, that in turn, can then control dozens of servos, motors, sound playback and more. Because some R2D2 builds will have dozens and dozens of functions, rather than have a button for each one, [Chris] has programmed in gesture controls in to the unit, so that two controllers and can control several dozen preprogrammed actions. [Chris] hasn’t finalized the design just yet – he still calls it a “beta” build, but so far his documentation is outstanding (PDF) – some of the best we’ve seen.

You can learn more about the R2 Builders Club and the controllers in the video after the break

Continue reading “These Are The Droid Controllers You’ve Been Looking For”

Hackaday Prize Entry: A Light Electric Utility Vehicle

[Chris] lives in South Sudan, where there are a lot of poor areas with terrible infrastructure. One of the bigger challenges for this area is getting people and materials over roads that are either bad or don’t exist. Normal vehicles aren’t built for the task, and a Hilux or Land Cruiser is much to expensive. For his Hackaday Prize entry, [Chris] is building a rugged low-cost utility vehicle platform for the developing world.

This battery-powered, four-wheel cart is made out of what [Chris] could find. The frame is made out of 50x50mm angle iron that’s welded together, with the body panels fabricated out of 1200x2400x1.2mm sheet that’s sourced locally. While [Chris] would like better wheels, the cheap Chinese motorcycle wheels are everywhere and cheap – $65, which includes the bearings, breaks, and sprockets. It even has higher ground clearance than the Land Cruiser.

[Chris] already has a prototype of his project built and it’s rolling around. You can check out a video of that below.


The 2015 Hackaday Prize is sponsored by:

Continue reading “Hackaday Prize Entry: A Light Electric Utility Vehicle”

Meet Us In Shenzhen

Hackaday Prize Worldwide is coming to Shenzhen, China at the end of next week! There’s lots to do, join us for as much of it as you can:

zero-to-productZero to Product Workshop

RSVP now for our Zero to Product workshop on Friday, June 19th. This is created and presented by [Matt Berggren] who shares his experience designing and laying out printed circuit boards professionally. A basic knowledge of electronics is all you need to get going and to lay out the dev board shown here!

Meetup and Share Your Hacks

logic-noise-booth-artHolding down an awesome booth at Maker Faire all day makes us weary. We’ll recharge our batteries on Saturday, June 20th starting at 7pm. Join us at Bionic Brew (please be kind and tell us you’re coming). As always, when we hang out we like to see, and show off, hacks. Bring something along if it’s easy to store in a pocket or backpack.

Build some Logic Noise at our SZMF Booth

Yep, we already mentioned it… we’ll be camped out at Shenzhen Maker Faire teaching people how to make music with logic chips. We’ve based the activity off of [Elliot Williams’] fantastic Logic Noise Series. Stop by, say hello and grab some stickers!


The 2015 Hackaday Prize is sponsored by: