F.A.T. GOLD San Francisco: May 21-31

Two of the ideas we keep at our core here at Hackaday: the free and open exchange of information and ideas; and “why” is the wrong question. These concepts are fully in line with the F.A.T. Lab. The Free Art and Technology Lab lives at the intersection of Open Source and Pop Culture and they’re inviting you to jump into the pool of awesome by joining them for the F.A.T. Gold Show in San Francisco May 21-31.

If you’re unfamiliar with the group, take a look at the video after the break and you’ll easily confirm that you need to check this out. We’ve enjoyed the work of F.A.T. Lab members for years now. [Brian] pointed out part of the importance of the “Open” aspect the group in this post on universal connectors for popular toy blocks. We also covered their collaboration on EyeWriter which shows how to build IR eye tracking for the disabled. The group hosts the Graffiti Research Labs (also a collaborator on EyeWriter); we built their Laser Graffiti project as part of a live Hackaday event in January of last year thanks to the open source code they published.

What will you see at this year’s show? The best work the group has to offer from the last eight years plus some debut exhibits. We wish we could be there but we’re planning to be in LA that weekend for the LayerOne conference.

Continue reading “F.A.T. GOLD San Francisco: May 21-31”

VCF East X: The Not Trashy Eighty

The lowly TRS-80 doesn’t get much love in most circles; it’s constantly overshadowed by the popularity of the Apple II or computers that had graphics that weren’t terrible. For [Mike Loewen]’s VCF exhibit, he’s turning his TRS-80 into something good with SD card disk drives and custom graphics adapters.

The -80 in question is a Model 4, the fancy all-in-one version that could run CP/M. The disk drives in this computer were replaced with half-height 5 1/4″ drives, the 200ns RAM was replaced with 100ns RAM and modified to get rid of the wait states, and a hard drive is emulated on a SD card adapter thanks to an add-on from [Ian Mavric].

[Ian] is somewhat prolific in the world of TRS-80s; he reverse engineered the original hi-res graphics board and reimplemented it with video RAM chips of a more modern vintage.

Continue reading “VCF East X: The Not Trashy Eighty”

[Mike] Illuminates Us On LED Filaments

LED filaments started showing up in light bulbs a few months back. [Mike] discovered that the strips are available in bulk from ebay and Alibaba. Always keen to work with new LED technologies, [Mike] ordered a few for experimenting and posted the results on his [mikeselectricstuff] YouTube channel. He also added the information to his website.

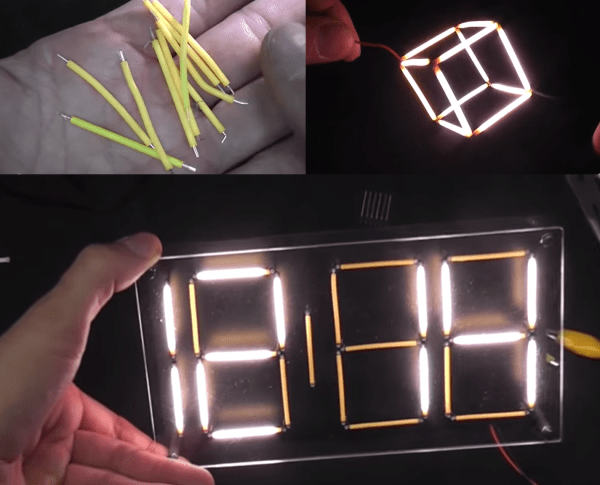
The filaments consist of 28 LEDs connected in series. The blue LEDs are covered by the typical yellow phosphors to make them glow white. It’s interesting to note that some of the filaments use a removable silicone sleeve to hold the phosphor coating, while others are coated with a resin material. The LEDs themselves are bare dies mounted to a metal strip and joined by bond wires. The entire strip can be bent, but be careful, or you’ll break the fragile bond wires.

The strips do require a fair bit of voltage to operate. The entire strip runs best at around 75 and 10~15 mA, while putting out about 1 Watt of light. [Mike] tested a strip to destruction by pumping 40 mA through it. Predictably the strip went out when the bond wires melted. The surprising part was that the strip blinked back on as the wires cooled and re-connected. The strip and wires were working as a temperature controlled switch, similar to the bimetalic strip found in old fashioned “twinkling” incandescent Christmas lights.

Not satisfied with simple tests, [Mike] went on to build a clock using the filaments as elements of a seven segment display. Inspired by numitron and minitron displays, [Mike] built a single sided PCB which held the clock circuit on the bottom and the LED filaments on top. The filaments are spaced off the board by tall wire wrap sockets, which proved to be difficult to keep from shorting out. Texas Instruments TPIC6B595 chips were used to control the LED filaments. Logically the chip functions the same as a 75LS595, which means it can be driven with a SPI bus. The open drain outputs can handle 50 volts – which makes them perfect for this application.  The clock is tremendously bright, but there is still a bit of room for improvement. [Mike] notes that the phosphor of un-powered filaments tend to glow a bit due to light absorbed from nearby illuminated filaments. He’s experimenting with color filters to reduce this effect. At full power though, [Mike] says this clock would easily be daylight readable, and we don’t doubt it!

[Mike’s] final test was a bit whimsical – he built a cube entirely from the LED filaments. The cube looks awesome, but we can’t wait to see who will move things into the 4th dimension and build a tesseract!

Continue reading “[Mike] Illuminates Us On LED Filaments”

VCF East X: Virtual Reality With PETSCII

What would happen if Oculus-quality virtual reality was created in the 80s on the Commodore PET? [Michael Hill] knows, because he created a stereoscopic video headset using a PET.

This build is an extension of [Michael]’s exhibit last year at VCF East where he displayed a video feed with PETSCII. Yes, that means displaying video with characters, not pixels.

This year, he’s doubling the number of screens, and sending everything to two iPhones in a Google Cardboard-like VR headset. Apart from the optics, the setup is pretty simple: cameras get image data, it’s sent over to a PET, and a stream of characters are sent back.

It’s impossible to film, and using it is interesting, to say the least. Video below.

Continue reading “VCF East X: Virtual Reality With PETSCII”

Paper Topo Models With Vector Cutter

If there’s a science fair coming up, this trumps just about any 2D poster. It’s a 3D topographical map of an inactive Slovakian volcano, Poľana. [Peter Vojtek] came up an easy way to generate SVG topo patterns using Ruby.

Topographical data is available through the MapQuest API. You should be able to model just about any part of the world, but areas with the greatest elevation difference are going to yield the most interesting results. The work starts by defining a rectangular area using map coordinates and deciding the number of steps (sheets of paper representing this rectangle). The data are then chopped up into tables for each slice, converted to SVG points, and a file is spit out for the blade cutting machine. Of course you could up the game and laser cut these from more substantial stock. If you have tips for laser-cutting paper without singing the edges let us know. We’ve mostly seen failure when trying that.

The red model explained in [Peter’s] writeup uses small cross-pieces to hold the slices. We like the look of the Blue model which incorporates those crosses in the elevation representation. He doesn’t explain that specifically but it should be easy to figure out — rotate the rectangle and perform the slicing a second time, right?

If you’re looking for more fun with topography we’ve always been fond of [Caroline’s] bathymetric book.

bass drum speaker mic

DIY Bass Drum Microphone Uses Woofer Cone As Diaphragm

Anyone into audio recording knows that recording drums is a serious pain. Mic setup and positioning can make or break a recording session. One particular hurdle is getting a great sound out of the bass drum. To overcome this, [Mike] has built a microphone using an 8″ woofer in an attempt to capture the low-end frequencies of his bass drum. Using a speaker as a microphone isn’t a new idea and these large diaphragm bass drum mics have taken commercial form as the DW Moon Mic and the now-discontinued Yamaha SubKick.

The project is actually quite simple. The speaker’s positive terminal is connected to Pin 2 of a 3-pin XLR microphone connector. The speaker’s negative terminal is connected to the connector’s Pin 1. [Mike] made a bracket to connect the woofer to a mic stand, which in turn was cut down to position the woofer at bass drum height. The setup is then plugged into a mixer or pre-amp just like any other regular microphone.

[Mike] has since made some changes to his mic configuration. It was putting out way too hot of a signal to the preamp so he added an attenuation circuit between the speaker and XLR connector. Next, he came across an old 10″ tom shell and decided to transplant his speaker-microphone from the open-air metal rack to the aesthetically pleasing drum shell. Check out [Mike’s] project page for some before and after audio samples.

A self powered camera, showing output video

Self Powered Camera Powers Itself

Cameras sense light to create images, and solar cells turn light into energy. Why not mash the two together and create a self-powered camera?

The Computer Vision Laboratory at Columbia built this unique camera, which harvests power from its photodiode sensors. These photodiodes also act as an array of pixels that can recover an image. The result is a black and white video camera that needs no external power supply.

The energy harvester circuit charges up a supercap that provides power to the system. The frame rate of the camera is limited by the energy that can be harvested: higher frame rates require more juice. For this reason, the team developed an algorithm that varies the frame rate based on available energy.

The MC13226V microcontroller that was used for this build features an internal 2.4 GHz radio. The group mentions wireless functionality as a possibility feature in the future, which would make for a completely untethered, battery free camera.