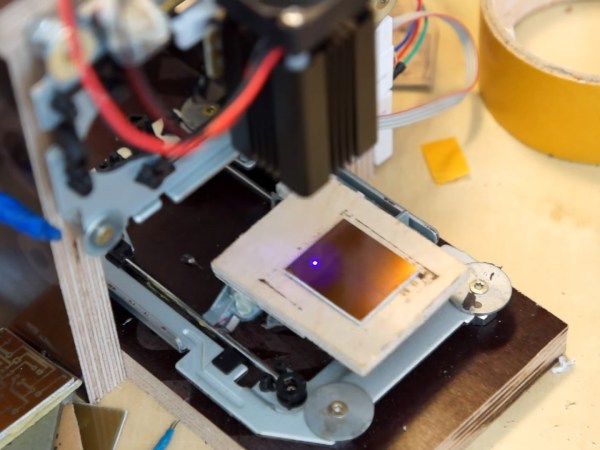
Laser PCB Exposer Built From CD-ROM Drives

[Neumi] has built a CNC Laser using CD-ROM drives as the X and Y motion platforms. The small 405nm laser can engrave light materials like wood and foam. The coolest use demonstrated in the video is exposing pre-coated photo-resist PCBs.

With $61 US Dollars (55 Euro) for the Arduino, stepper drivers, and a laser in the project, [Nuemi] got a pretty capable machine after adding a few parts from the junk bin. He wanted to avoid using existing software in order to learn the concepts behind a laser engraver. In the end, he has a working software package which can send raster scans to an Arduino mega. The mega then controls the sync between the stepper and laser firings. The code is available on GitHub.

The machine can do a 30x30mm PCB in 10 minutes. It’s not about to set a record, but it’s cool and not at all bad for the price. You can see the failed PCBs lined up in the video from the initial tuning, but the final one produced a board very equivalent to the toner transfer method. Video after the break.

Continue reading “Laser PCB Exposer Built From CD-ROM Drives”

Making Dumb Robots Evolve

Evolution is a fact of life, except in Kansas. It is the defining characteristic of life itself, but that doesn’t mean a stupid robot can’t evolve. For his entry into the Hackaday Pi Zero contest, [diemastermonkey] is doing just that: evolution for robots built around microcontrollers and a Raspberry Pi.

[diemastermonkey]’s project is a physical extension to genetic algorithms. Just like DNA and proteins have no idea what they’re actually doing, microcontrollers don’t either. Instead of randomly switching up base pairs and amino acids, [diemastermonkey]’s project makes random connections pins depending on the values of those pins.

The potential of these crappy, randomly programmed robots is only as good as the fitness function, and so far [diemastermonkey] has seen some surprising success. When putting these algorithms into a microcontroller connected to a tilting table mechanism and a PIR sensor, the robot eventually settled on a bit of code that would keep a ball in motion. You can check out the video of that below.


Raspberry_Pi_LogoSmall

The Raspberry Pi Zero contest is presented by Hackaday and Adafruit. Prizes include Raspberry Pi Zeros from Adafruit and gift cards to The Hackaday Store!
See All the Entries

Continue reading “Making Dumb Robots Evolve”

A $5 Graphics Card For Homebrew Computers

While not very popular, building a homebrew computer can be a fun and rewarding process. Most of the time, though, the video capabilities of these computers is as bare bones as it can get – running headless, connected to a terminal. While this is an accurate reproduction of the homebrew computers of the 1970s and 80s, there’s a lot to be said about a DIY computer with an HDMI-out port.

[spencer] built a Z-80-based homebrew computer a few years ago, and while connecting it to a terminal was sufficient, it was a build that could use a little more pizzazz. How did he manage to stuff a terminal in a tiny project box? With everyone’s favorite five dollar computer, the Raspberry Pi Zero.

The computer [spencer] built already had serial inputs, outputs, power, and ground rails – basically, a serial port. The Raspberry Pi also has TX and RX pins available on the 40-pin header, and with a stupidly simple board that [spencer] whipped up in KiCad, he could plug a Pi into the backplane of his homebrew computer. A few setup scripts, and a few seconds after turning this computer on [spencer] could mash a keyboard and wail away on some old school BASIC.

This isn’t a use case that is the sole domain of the Pi Zero. A Parallax Propeller chip makes for a great video terminal with inputs for PS/2 keyboards and mice. A largish AVR, with the requisite NTSC video library, also makes for a great video interface for a homebrew computer. The Pi Zero is only five dollars, though.


Raspberry_Pi_LogoSmall

The Raspberry Pi Zero contest is presented by Hackaday and Adafruit. Prizes include Raspberry Pi Zeros from Adafruit and gift cards to The Hackaday Store!
See All the Entries

Prime Numbers Are Stranger Than You Thought

If you’ve spent any time around prime numbers, you know they’re a pretty odd bunch. (Get it?) But it turns out that they’re even stranger than we knew — until recently. According to this very readable writeup of brand-new research by [Kannan Soundararajan] and [Robert Lemkein], the final digits of prime numbers repel each other.

More straightforwardly stated, if you pick any given prime number, the last digit of the next-largest prime number is disproportionately unlikely to match the final digit of your prime. Even stranger, they seem to have preferences. For instance, if your prime ends in 3, it’s more likely that the next prime will end in 9 than in 1 or 7. Whoah!

Even spookier? The finding holds up in many different bases. It was actually first noticed in base-three. The original paper is up on Arxiv, so go check it out.

This is a brand-new finding that’s been hiding under people’s noses essentially forever. The going assumption was that primes were distributed essentially randomly, and now we have empirical evidence that it’s not true. What this means for cryptology or mathematics? Nobody knows, yet. Anyone up for wild speculation? That’s what the comments section is for.

(Headline photo of researchers Kannan Soundararajan and Robert Lemke: Waheeda Khalfan)

Engineer Humanity’s Future: The 2016 Hackaday Prize

Today we are proud to launch the 2016 Hackaday Prize. Build Something That Matters and you’ll contribute positively to humanity’s future by expand the frontiers of knowledge and engineering. You’ll also score recognition of your skills, and position yourself to land one of 105 cash prizes totaling over $300,000. Choose a technology issue facing humanity today and build a project that fixes, improves, or bypasses the problem.

You have the talent, the energy, and the capacity to change the world. Make the time and make a difference.

The Hackaday Prize is a competition synonymous with creating for social change. Using your hardware, coding, scientific, design and mechanical abilities, you will make big changes in people’s lives. Every idea has impact, and a massive force of ideas creates real change. This year we have more power than ever before to recognize the engineering projects that are solving problems: One hundred finalists will get $1,000 each for their efforts. This flat prize structure encourages collaboration rather than direct competition. Team up on each others’ projects and improve your overall chances of making it into the finals.

But it doesn’t stop there. From one hundred finalists, five will rise to be named top winners. Our expert judges will carefully review each of 100 world-changing final entries, choosing a grand prize winner to receive $150,000. Second place will be awarded $25,000, with $10k, $10k, and $5k going to third, fourth, and fifth.

Continue reading “Engineer Humanity’s Future: The 2016 Hackaday Prize”

TrainLight: Transit Info At A Glance

In a world of sensory overload, sometimes it’s nice to get the information you need without a bunch of clutter. [Savage] has created an attractive and minimalist system to display the current wait times for specific trains in his San Francisco neighborhood.

trainlight-legendIt’s basically a Spark Core and a 60 LED-per-meter strip of WS2812Bs. A 1000µF cap filters the power coming in from a switching adapter and a resistor limits the level-shifted logic going to the LEDs. Eight barriers made from card stock keep the light zones from bleeding together. The sides of the square canvas panel indicate cardinal directions and are oriented to [Savage]’s southern-facing house.

The server gets prediction data every 30 seconds using the RESTbus JSON API. [Savage] added in a bit of time for walking down the stairs, putting shoes on, and walking to each stop. TrainLight receives these times over WiFi and lights the LEDs accordingly. If a section isn’t lit at all, the wait time for that line is greater than 10 minutes. Dark green means you have 5-10 minutes to get there, and pale green means 2-5 minutes. If the LEDs are yellow, you’d better put on your running shoes.

This is a fairly simple build with a focus on subtlety. Even before guests in his house understand what they’re looking at, [Savage]’s TrainLight makes for an interesting conversational piece of blinkenlights and doubles as illumination for the stairs. There’s a slightly sped-up demo after the break.

Want to make your own? [Savage] has a tutorial page and his code is up on the gits. Blinky lights are also good for telling you whether the trains are running at all.

Continue reading “TrainLight: Transit Info At A Glance”

Broken RC Car Goes Online

When the remote for your son’s RC car goes missing, what are you going to do? Throw away a perfectly good robot chassis? No, we wouldn’t either. And these days, with WiFi-enabled microcontroller boards so readily available, it’s almost easier to network the thing than it would be to re-establish radio control. So that’s just what [Stian Søreng] did.

Naturally, there’s an ESP8266 board at the heart of this hack, a WeMos D1 to be specific. [Stian] had played with cheap remote-controlled cars enough to be already familiar with the pinout of the RC IC, so he could simply hook up some GPIOs from the WeMos board to the pins and the brain transplant was complete.

On the software side, he implemented control over TCP by sending the characters “F”, “B”, “L”, or “R” to send the car forward, back, left, or right. Lowercase versions of the same letters turns that function off. He then wrote some client software in Qt that sends the right letters. He says that response time is around 150-250 ms, but that it works for his driving style — crashing. (We’d work on that.)

Anyway, it’s a fun and fairly quick project, and it re-uses something that was destined for the junk heap anyway, so it’s a strict win. The next steps are fairly open. With computer control of the car, he could do anything. What would you do next?

Thanks [Eyewind] for the tip!