Hackaday Prize Entry: A Raspberry Pi Project

There’s no piece of technology that has been more useful, more influential on the next generation of sysadmins and engineers, and more polarizing than the Raspberry Pi. For $35 (or just $5), you get a complete single board computer, capable of running Linux, and powerful enough to do useful work. For the 2016 Hackaday Prize, [Arsenijs] has created the perfect Raspberry Pi project. It’s everything you expect a Pi-powered project to be, and more.

While the Raspberry Pi, and the community surrounding the Raspberry Pi, get a lot of flak for the relatively simple approach to most projects which are effectively just casemods, critics of these projects forget the historical context of tiny personal computers. Back in the early ‘aughts, when Mini ITX motherboards were just being released, websites popped up that would feature Mini ITX casemods and nothing else. While computers stuffed into an NES, an old radio, or the AMD logo are rather banal projects today, I assure you they were just as pedestrian 15 years ago as well. Still, the creators of these Mini ITX case mods became the hardware hackers of today. It all started with simple builds, a Dremel, and some Bondo.

[Arsenijs] takes his Raspberry Pi project a bit further than a simple casemod, drawing influence from a Raspberry Pi smartphone, a Raspberry Pi security system, a Portable Raspberry Pi, and a Raspberry Pi wrist computer. These are all excellent projects in their own right, but [Arsenijs] is putting his own special twist on the project: he’s using a Raspberry Pi, and a few Raspberry Pi accessories.

While this project is first and foremost a Raspberry Pi project, [Arsenijs] isn’t limiting himself to the platform with the Broadcom chip. The team behind this Raspberry Pi project was busy porting the project to Odroid when the Banana Pi came out. This changed everything, a refactor was required, and then the Orange Pi was announced. Keeping up with technology is hard, and is a big factor in why this Raspberry Pi project hasn’t delivered yet. You can say a lot of things about the Raspberry Pi foundation, but at least their boards make a good attempt at forward compatibility.

Already [Arsenijs]’ Raspberry Pi project is one of the more popular projects on Hackaday.io, and is in the running for being one of the most popular projects in this year’s Hackaday Prize. Whether that popularity will translate into a minor win for this year’s Hackaday Prize remains to be seen, but it seems for [Arsenijs] that doesn’t matter; he’s already on the bleeding edge of Raspberry Pi projects.

The HackadayPrize2016 is Sponsored by:

Machine Tool Build Is Anything But Boring

“So just like every other great story in history, ours is going to start at the lathe.” Truer words were never spoken, and thus begins the saga of turning a bar of chrome-moly steel into a shop-built boring head.

You may have a few questions regarding [ThisOldTony]’s effort. First, unless you’re familiar with machine tooling, you may wonder what exactly a boring head is. The video below makes it plain, but the short answer is that it’s a tool to make holes. A boring head spins a boring bar with a cutting tool, and the head can be offset to spin the bar through an adjustable diameter. They’re great for making large holes of precise diameters – skip to around 25:30 to see it in action.

The other question might be: why does he spend so much time and effort building something he can just buy off the shelf? If you have to ask that question, we think you may be missing the point. [Tony] seems mainly interested in building tools; using them to make non-tool things is merely a happy accident. We totally respect that, and besides, just look at the quality of the tool he makes. We find his videos very entertaining, too – he’s got a great sense of humor and the video production quality is top-notch. Just watch out for banana peels and space-time continuum issues.

We love tools, and we really love tools that are custom made with this level of craftsmanship. For more quality toolmaking, check out this guitar-fretting jig or this belt grinder.

Continue reading “Machine Tool Build Is Anything But Boring”

A CNC You Could Pop-Rivet Together

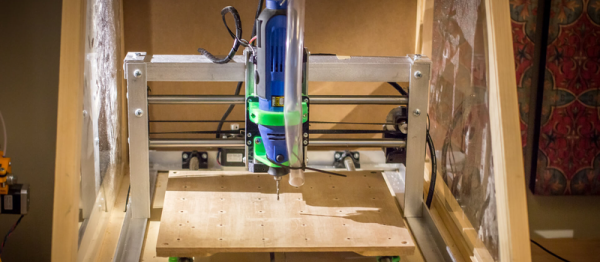
You have to be careful with CNC; it’s a slippery slope. You start off one day just trying out a 3D printer, and it’s not six months before you’re elbow deep in a discarded Xerox looking for stepper motors and precision rods. This is evident from [Dan] and his brother’s angle aluminum CNC build.

Five or six years ago they teamed up to build one of those MDF CNC routers. It was okay, but really only cut foam. So they moved on to a Rostock 3D printer. This worked much better, and for a few years it sated them. However, recently, they just weren’t getting what they needed from it. The 3D printer had taught them a lot of new things, 3D modeling, the ins of running a CNC, and a whole slew of making skills. They decided to tackle the CNC again.

The new design is simple and cheap. The frame is angle aluminum held together with screws. The motion components are all 3D printed. The spindle is just an import rotary tool. It’s a simple design, and it should serve them well for light, low precision cuts. We suspect that it’s not the last machine the pair will build. You can see it in action in the video after the break.

Continue reading “A CNC You Could Pop-Rivet Together”

Custom Engine Parts From A Backyard Foundry

Building a car engine can be a labor of love. Making everything perfect in terms of both performance and appearance is part engineering and part artistry. Setting your creation apart from the crowd is important, and what better way to make it your own than by casting your own parts from old beer cans?

[kingkongslie] has been collecting parts for a dune buggy build, apparently using the classic VW Beetle platform as a starting point. The air-cooled engine of a Bug likes to breathe, so [kingkongslie] decided to sand-cast a custom crankcase breather from aluminum.

Casting solid parts is a neat trick but hardly new; we’ve covered the techniques for casting plastic, pewter, and even soap. The complexity of this project comes from the fact that the part needs to be hollow. [kingkongslie] managed this with a core made of play sand and sodium silicate from radiator stop-leak solution hardened with a shot of carbon dioxide. Sure, it looks like a Rice Krispie treat, but a core like that will stand up to the molten aluminum while becoming weak enough to easily remove later. The whole complex mold was assembled, beer cans melted in an impromptu charcoal and hair-dryer foundry, and after one false start, a shiny new custom part emerged from the sand.

We’ve got to hand it to [kingkongslie] – this was a nice piece of work that resulted in a great looking part. But what we love about this is not only all the cool casting techniques that were demonstrated but also the minimalist approach to everything. We can all do stuff like this, and we probably should.

Continue reading “Custom Engine Parts From A Backyard Foundry”

Fail Of The Week: Arachno∙fail∙ia

Going down the list (FCC, CE, UL, etc.) we can’t think of a regulating body that will test for this failure mode. Reportedly, a $1M irrigation system was taken down by a spider. And an itsy-bitsy spider at that.

This fail turned up as a quick image post over on /r/mildlyinteresting but I wasn’t the only electronics person attracted like a moth to a flame. Our friend [Sprite_TM] popped in to answer a question about conformal coating. Seems this board was sealed in a waterproof enclosure but was obviously not conformally coated.

fotw-spider-short-relay-diagram[Sprite_TM] also helped out with some armchair-engineering to guess at what happened. It’s not hard to tell that the footprint on the board looks like a set of mechanical relays all in a line. He looked up the most likely pinout for the relay.

We’ve superimposed that pinout on the board to help illustrate the failure. High voltage comes in on the pin shown with the red trace leading away from it. On either side of that pin are the connections for the low voltage coil which switches from normally closed (the pin in the upper right that is not connected to anything) to the normally open pin (which has the wide trace leading away from it).

So there sat the high voltage pin in between the coil pins when, along came a spider. It shorted the pins and presumably all the way back to the power supply for the low voltage rail. [Fugly_Turnip] (the OP) share some additional detail about the system and this failure; in addition to this card it fried the control module as well.

Another comment on the same thread shares a different story of two boards mounted next to each other with a bug shorting a 1/4″ air gap between two boards and causing similar carnage. Have you encountered Arachno-fail-ia of your own? Let us know below.


2013-09-05-Hackaday-Fail-tips-tileFail of the Week is a Hackaday column which celebrates failure as a learning tool. Help keep the fun rolling by writing about your own failures and sending us a link to the story — or sending in links to fail write ups you find in your Internet travels.
Supplyframe Design Lab Opens Its Doors

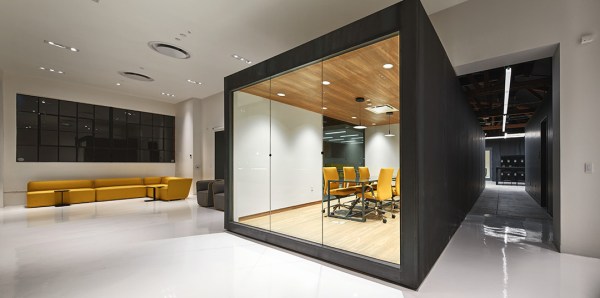
Today marks the opening of the Supplyframe Design Lab in Pasadena, California. The Design Lab bills itself as the “leading edge creative center built to foster new ideas in technology and design”. Supplyframe had the vision to acquire Hackaday a few years ago, launched the Hackaday.io Community site which now has more than 150,000 members, and established The Hackaday Prize to spark engineering projects that benefit humanity. Pay attention to the Design Lab; looking back on this day you’re going to be able to say that you remember when it all started.

The equipment enshrined in the new space is spectacular. Name your material, and there are tools to work with it. Working with electronics? Mill your prototypes on a number of OtherMills available. Custom enclosure? Take your pick of milling it on the Tormach, PolyJet printing it on the Statasys, or FDM printing with a number of different high-end 3D printers. Need design software and beefy boxes to run it on? They have that too. Working in wood? A shopbot awaits you, as do traditional tools like a tablesaw, routers, sanders, etc. It’s a wonderland for making the imaginable real. If there ever was a time to quit your job and spend three months launching that dream product, this is it. The Design Lab has a residency program.

Supplyframe is all about enabling hardware creation. This is what sites like Parts.io and Findchips.com do: provide powerful tools for hardware engineers to better use their design skills. Founding a space like the Design Lab is a natural extension of this. Providing a work area, mentorships, and funding residencies breaks down the barriers that can prevent new hardware seeing the light of day. The Design Lab solves the issues of tools, materials, and hands-on experience that plague many a new hardware company.

Residencies will start on July 1st. Each runs for three months in which residents have unfettered access to the space and its tools, as well as financial support of $2000 per month. Each resident will self-identify into the product-track (you’re on your way to market with new hardware) or the art-track (you have a calling for an ambitious project and need to make it a reality). So far the Design Lab page lists three residents; a network of low-cost air quality sensors called Scintilla, a music synthesizer based around Teensy 3 called NanoEgg, and a mixed-reality public arts initiative called Perceptoscope. The Design Lab is still accepting applications for new residencies this summer and beyond — one of these residencies will also be offered to the Grand Prize winner of the 2016 Hackaday Prize.

One lightbulb ON one OFF

Single Molecule Detects Light

Everything is getting smaller all the time. Computers used to take rooms, then desks, and now they fit in your pocket or on your wrist. Researchers that investigate light sensors have known that individual diarylethene molecules can exist in two states: one where it conducts electricity and one where it doesn’t. A visible photon causes the molecule to be electrically open and ultraviolet causes it to close. But there’s a problem.

light600Placing electrodes on the molecule interferes with the process. Depending on the kind of electrode, the switch will get stuck in the on or off position. Researchers at Peking University in Beijing determined that placing some buffering material between the molecule and the electrodes would reduce the interference enough to maintain correct operation. What’s more the switches remain operable for a year, which is unusually long for this kind of construct.

Using chemical vapor deposition and electron beam lithography, the team produced over 40 working single molecule switches. These devices could be useful in optical computing and other applications. Future work will include developing multilevel switches comprised of multiple molecules.

If you want something more macroscopic, you might try using an LED to sense light. A switch is fine, but sometimes you want to generate a signal.