The Raspberry Pi 2 Gets A Processor Upgrade

A rumor that has been swirling around the Raspberry Pi hardware community for a significant time has proven to have a basis in fact. The Raspberry Pi 2 has lost its BCM2836 32-bit processor, and gained the 64-bit BCM2837 processor from its newer sibling, the Raspberry Pi 3. It seems this switch was made weeks ago without any fanfare on the release of the Pi 2 V1.2 board revision, so we are among many news sources that were caught on the hop.

The new board is not quite a Pi 3 masquerading as a Pi 2 though. The more capable processor is clocked at a sedate 900MHz as opposed to the Pi 3’s 1.2GHz and there is no Bluetooth or WiFi on board, but the new revision will of course benefit from the extra onboard cache and the 64-bit cores.

This move almost certainly has its roots in saving the cost of BCM2836 production in the face of falling Pi 2 sales after the launch of the Pi 3. It makes sense for the Foundation to keep the Pi 2 in their range though as the board has found a home in many embedded products for which the Pi 3’s wireless capabilities and extra power consumption are not an asset.

Avid collectors of Pi boards will no doubt be running to add this one to their displays, but given that the Pi 2 sells for the same price as a Pi 3 we suspect that most Hackaday readers will go for the faster board. It is still a development worth knowing about though, should you require a faster Pi that is a little less power-hungry. The full specification for the revised board can be found on the Raspberry Pi web site.

The Pi has come a long way since the morning in 2012 when our community brought down the RS and Farnell websites trying to buy one of the first models. This BCM2837 board joins a BCM2837-powered Compute Module as well as the Pi 3. It’s worth reminding you though that there are other players to consider, earlier this year we brought you a look at the Odroid C2, and of course the infamous Apple Device.

Pi 2 header image: Multicherry [CC BY-SA 4.0], via Wikimedia Commons.

Editorial Note: We originally covered this in Sunday’s Links article but thought it warranted another, expanded mention.

Drone Vs. Airplane? Who Will Win? Science Knows.

Ignore the article, watch the video at the top of the page. The article is about some idiot, likely not even a hacker, who bought a drone somewhere and nearly rammed it into a plane. He managed this with concentrated idiocy, intention was not involved. While these idiots are working hard to get our cool toys taken away, researchers elsewhere are answering the question of exactly how much threat a drone poses to an airplane.

droneexplode_thumbAirplanes are apparently armored to withstand a strike from an 8lb bird. However, even if in a similar weight class, a drone is not constructed of the same stuff. To understand if this mattered, step one was to exactly model a DJI Phantom and then digitally launch it at various sections of a very expensive airplane.

The next step, apparently, was to put a drone into an air cannon and launch it at an aluminum sheet. The drone explodes quite dramatically. Some people have the best jobs.

The study is still ongoing, but from the little clips seen; the drone loses. Along with the rest of us.

Perhaps the larger problem to think about right now is how to establish if a “drone” has actually been involved in an incident with a passenger aircraft. It seems there are a lot of instances where that claim is dubious.

Sinclair I/O Board Completed Over 30 Years Later

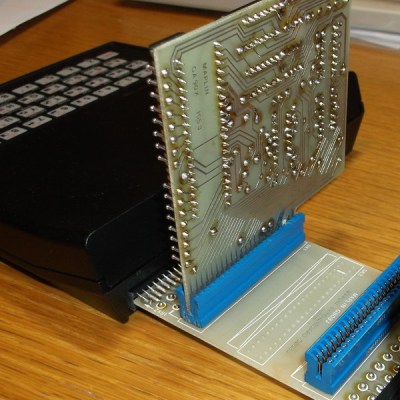
In the early 1980s when the 8-bit microcomputer boom was well under way, [Alan Faulds] was a student, and an owner of a Sinclair ZX81. He had ambitions to use it, in his words, “to control the world“, but since the Sinclair lacked an I/O port he was thwarted. He bought an expander board and a couple of I/O card PCBs from the British electronic supplier Maplin in the days when they were a mail order parts stockist rather than a chain of stores chasing Radio Shack’s vacated retail position.

Sadly for [Alan], he didn’t have the cash to buy all the parts to populate the boards, then the pressures of a final year at university intervened, and he never built those Maplin kits. They sat forgotten in their padded envelope for over three decades until a chance conversation with a friend reminded him of his unfinished student project. He sought it out, and set about recreating the board.

zx-io-thumbnailThe ZX81 had a single port: a PCB edge connector at its rear that exposed all the Z80 processor’s lines. It was notorious for unreliability, as the tiniest vibration when a peripheral was connected would crash the machine. Maplin’s expansion system featured a backplane with a series of edge connector sockets, and cards with bare PCB edge connectors. Back in the 1980s it was easy to find edge connectors of the right size with the appropriate key installed, but not these days. [Alan] had to make one himself for his build.
The I/O card with its 8255 and brace of 74 series chips was a double-sided affair with vias made through the use of little snap-off hand-soldered pins. [Alan] put his ICs in sockets, a sensible choice given that when he powered it up he found he’d put a couple of the 74 chips in the wrong positions. With that error rectified the board worked exactly as it should, giving the little ZX three I/O ports, albeit with one of them a buffered output.

We haven’t featured the little Sinclair micro as often as we should have here at Hackaday, it seems to have been overshadowed by its ZX Spectrum successor. We did show you a VGA ZX81 emulated on an mbed though, and a rather neat color video hack for its Brazilian cousin.

EMG Tutorial Lets You Listen To Your Muscles

What with wearable tech, haptic feedback, implantable devices, and prosthetic limbs, the boundary between man and machine is getting harder and harder to discern. If you’re going to hack in this space, you’re going to need to know a little about electromyography, or the technique of sensing the electrical signals which make muscles fire. This handy tutorial on using an Arduino to capture EMG signals might be just the thing.

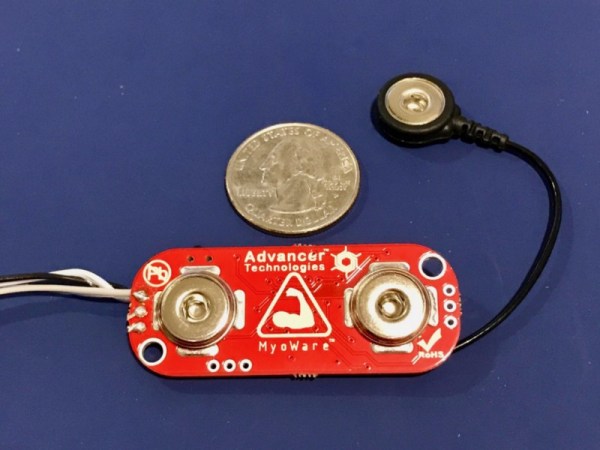
In an article written mainly as a tutorial to other physiatrists, [Dr. George Marzloff] covers some ground that will seem very basic to the seasoned hacker, but there are still valuable tidbits there. His tutorial build centers around a MyoWare Muscle Sensor and an Arduino Uno. The muscle sensor has snap connectors for three foam electrodes of the type used for electrocardiography, and outputs a rectified and integrated waveform that represents the envelope of the electrical signal traveling to a muscle. [Dr. Marzloff]’s simple sketch just reads the analog output of the sensor and lights an LED if it detects a muscle contraction, but the sky’s the limit once you have the basic EMG interface. Prosthetic limbs, wearable devices, diagnostic tools, virtual reality — the possibilities are endless.

We’ve seen a few EMG interfaces before, mainly of the homebrew type like this audio recorder recruited for EMG measurements. And be sure to check out [Bil Herd]’s in-depth discussion of digging EMG signals out of the noise.

Commodore Home – Your Smart Home For 1983

The Internet of Things is a horrific waste of time, even though no one knows exactly what it is. What would make it better? Classic Commodore gear, of course. Now you can run your smart home with a Commodore 64 and Commodore Home, the newest smart home framework from [retro.moe].

Commodore Home comes with the standard smart home features you would expect. The home lighting solution is a dot matrix printer, a few gears, and string tied to the light switch. Activate the printer, and the lights turn on and off. Brilliant. Multiple light switches can be controlled by daisy chaining printers.

Security is important in the smart home, and while the intruder alarm isn’t completely functional, future versions of Commodore Home will dial a modem, log into a BBS, and leave a message whenever an authorized person enters your home.

All of this is possible thanks to advances in UniJoystiCle technology, also from [retro.moe]. This device takes a standard ESP8266 WiFi module and turns it into a smartphone-to-joystick port bridge for the Commodore 64.

Unlike every other piece of IoT hardware being sold today, Commodore Home won’t stop working when the company behind it goes belly up; Commodore has been dead for twenty years already. You can grab all the software for Commodore Home over on the Githubs, or you can check out the video below.

Continue reading “Commodore Home – Your Smart Home For 1983”

Hackaday Links Column Banner

Hackaday Links: November 20, 2016

The Raspberry Pi 2 is getting an upgrade. No, this news isn’t as big as you would imagine. The Raspberry Pi 2 is powered by the BCM2836 SoC, an ARM Cortex-A7 that has served us well over the years. The ‘2836 is going out of production, and now the Raspberry Pi foundation is making the Pi 2 with the chip found in the Raspberry Pi 3, the BCM2837. Effectively, the Pi 2 is now a wireless-less (?) version of the Pi 3. It still costs $35, the same as the Pi 3, making it a rather dumb purchase for the home hacker. There are a lot of Pi 2s in industry, though, and they don’t need WiFi and Bluetooth throwing a wrench in the works.

So you’re using a Raspberry Pi as a media server, but you have far too many videos for a measly SD card. What’s the solution? A real server, first off, but there is another option. WDLabs released their third iteration of the PiDrive this week. It’s a (spinning) hard disk, SD card for the software, and a USB Y-cable for powering the whole thing. Also offered is a USB thumb drive providing 64 GB of storage, shipped with an SD card with the relevant software.

Mr. Trash Wheel is the greatest Baltimore resident since Edgar Allan Poe, John Waters, and Frank Zappa. Mr. Trash Wheel eats trash, ducks, kegs, and has kept Inner Harbor relatively free of gonoherpasyphilaids for the past few years. Now there’s a new trash wheel. Professor Trash Wheel will be unveiled on December 4th.

YOU MUST VOICE CONTROL ADDITIONAL PYLONS. With an ‘official’ StarCraft Protoss pylon and a Geeetech voice recognition module, [Scott] built a voice controlled lamp.

Everyone loves gigantic Nixie tubes, so here’s a Kickstarter for a gigantic Nixie clock. There are no rewards for just the tube, but here’s a manufacturer of 125mm tall Nixies.

Here’s an interesting think piece from AdvancedManufacturing.org. The STL file format is ancient and holding us all back. This much we have known since the first Makerbot, and it doesn’t help that Thingiverse is still a thing, and people don’t upload their source files. What’s the solution? 3MF and AMF file formats, apparently. OpenSCAD was not mentioned in this think piece.

MIDI Guitar Pedals

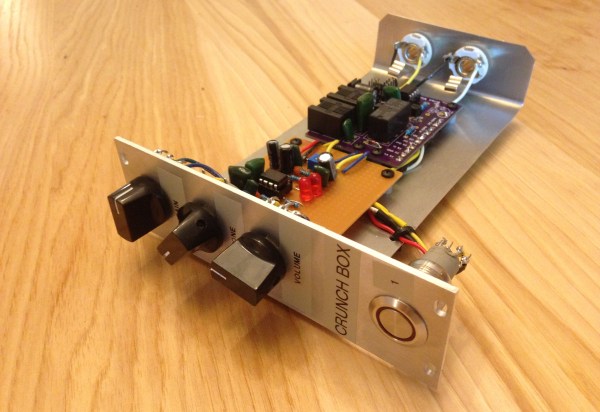
Ever since Jimi Hendrix brought guitar distortion to the forefront of rock and roll, pedals to control the distortion have been a standard piece of equipment for almost every guitarist. Now, there are individual analog pedals for each effect or even digital pedals that have banks of effects programmed in. Distortion is just one of many effects, and if you’ve built your own set of pedals for each of these, you might end up with something like [Brian]: a modular guitar pedal rack.

ae0fmjxTaking inspiration from modular synthesizers, [Brian] built a rack out of wood to house the pedal modules. The rack uses 16U rack rails as a standard, with 3U Eurorack brackets. It looks like there’s space for 16 custom-built effects pedals to fit into the rack, and [Brian] can switch them out at will with a foot switch. Everything is tied together with MIDI and is programmed in Helix. The end result looks very polished, and helped [Brian] eliminate his rat’s nest of cables that was lying around before he built his effects rack.

MIDI is an extremely useful protocol for musicians and, despite being around since the ’80s, doesn’t show any signs of slowing down. If you want to get into it yourself, there are all kinds of ways that you can explore the studio space, even if you play an instrument that doesn’t typically use MIDI.