B Battery Takes A 9V Cell

Old American radios (and we mean really old ones) took several kinds of batteries. The A battery powered the filaments (generally 1.5V at a high current draw). The B battery powered the plate (much lower current, but a higher voltage–typically 90V). In Britain these were the LT (low tension) and HT (high tension) batteries. If you want to rebuild and operate old radios, you have to come up with a way to generate that B voltage.

Most people opt to use an AC supply. You can daisy-chain a bunch of 9V batteries, but that really ruins the asthetics of the radio. [VA3NGC] had a better idea: he built a reproduction B battery from a wooden box, some brass hardware, a nixie tube power supply, and a 9V battery (which remains hidden). There’s also a handful of zener diodes, resistors, and capacitors to allow different taps depending on the voltage required.
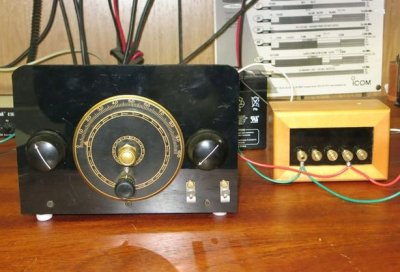
b-battery-in-useThe project looks great. The wooden box apparently was a recycle item and the brass hardware makes it look like it belongs with the old radios it powers. This is a good example of how there’s more to vintage restoration than just the electronics. Sure, the function is important, but to really enjoy the old gear, the presentation is important, too.

Not all tube radios took 90V B+, but since this battery has taps, that isn’t a problem. The old Radio Shack P-Box kit took 22.5V. Of course, if you are going to build your own battery, maybe you ought to build your own triodes, too.

Disassembly Required

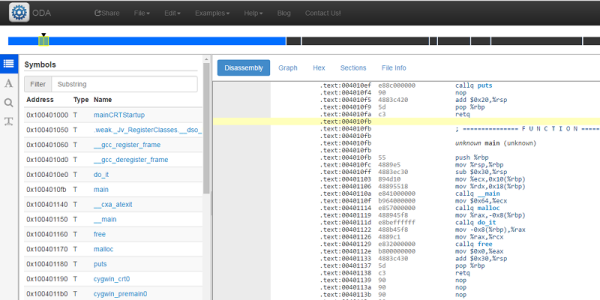
If you really want to hack software, you are going to face a time when you have to take apart someone’s machine code. If you aren’t very organized, it might even be your own — source code does get lost. If you want to impress everyone, you’ll just read through the hex code (well, the really tough old birds will read it in binary). That was hard to do even when CPUs only had a handful of instructions.

A more practical approach is to use a tool called a disassembler. This is nothing more than a program that converts numeric machine code into symbolic instructions. The devil, of course, is in the details. Real programs are messy. The disassembler can’t always figure out the difference between code and data, for example. The transition points between data and code can also be tricky.

When Not to Use

If you are coding your own program in assembly,  a disassembler isn’t usually necessary. The disassembly can’t recover things like variable names, some function names, and — of course — comments. If you use a high-level language and you want to check your compiler output, you can easily have the compiler provide assembly language output (see below).

The real value of a disassembler is when you don’t have the source code. But it isn’t easy, especially for anything nontrivial. Be prepared to do a lot of detective work in most cases.

Continue reading “Disassembly Required”

Cat Vs. Human Escalates With Armor-Plated Feeder

Wars generally increase innovation as the opposing sides try to kill each other in ever more efficient ways. Even the soft war waged daily between felines and their human servants results in innovation, to wit we offer this armor-plated automated cat feeder.

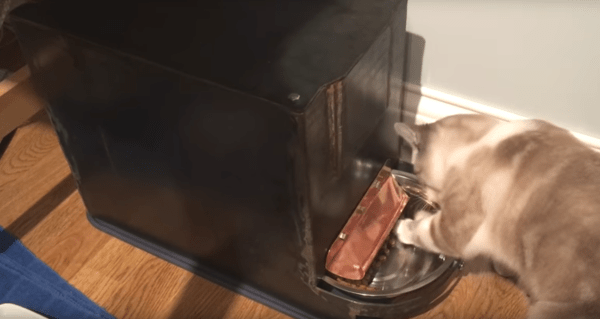
The conflict between [Sprocket H.G. Shopcat] and her human [Quinn Dunki] began with a thoughtfully provided automatic food dispenser. Like human vending machine customers who witness a just-purchased bag of Cheesy Poofs dangling on the end of the dispense auger, [Sprocket] learned that the feeder would dispense a few fishy nuggets when nudged. [Quinn] embarked on an iterative design process to control [Sprocket]’s off-schedule snacking. Fastening the feeder firmly to the floor, and adding obstructions to prevent her from pawing up the dispense chute — nothing seemed to stop the clever feline’s raids. [Quinn] then pulled out all the stops and whipped up a [Sprocket]-safe enclosure for the feeder from 1/8″ plate steel and copper. This seems to have put the cat back on the straight and narrow, and it doesn’t look half bad either.

All kidding aside, [Quinn]’s approach to this problem is pretty instructive. Careful observations informed several cycles of reasonable modifications until it became clear that only the most extreme solution would work. There’ve been tons of cat feeders here before, from the simple to the complex, but we think all would fall prey to the clever [Sprocket] without a little up-armoring.

Continue reading “Cat Vs. Human Escalates With Armor-Plated Feeder”

Halogen Lamp Abused For Desoldering

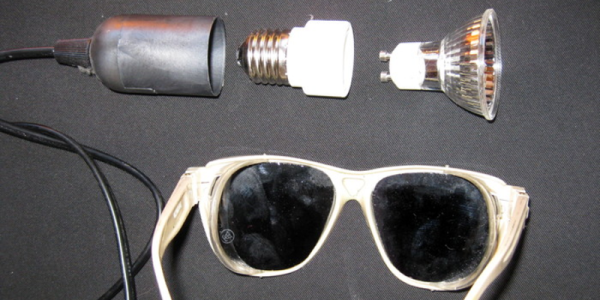
[Moony] thought that it was unconscionable that IR soldering stations sell for a few hundred Euros. After all, they’re nothing more than a glorified halogen lightbulb with a fancy IR-pass filter on them. Professional versions use 100 W 12 V DC bulbs, though, and that’s a lot of current. [Moony] tried with a plain-old 100 W halogen lightbulb. Perhaps unsurprisingly, it worked just fine. Holding the reflector-backed halogen spotlight bulb close to circuit boards allows one to pull BGAs and other ornery chips off after a few minutes. Voila.

[Moony] reasons that the IR filter is a waste anyway, since the luminous efficiency of halogen lights is so low: around 3.5%. And that means 96.5% heat! But there’s still a lot of light streaming out into a very small area, so if you’re going to look at the board as you de-solder, you’re really going to need a pair of welding goggles. Without, you’ll have a very hard time seeing your work at best, and might actually do long-term damage to your retinas.

So the next time you’re feeling jealous of those rework factory workers with their fancy IR soldering stations, head on down to the hardware store, pick up a gooseneck lamp, a 100 W halogen spotlight, and some welding goggles. And maybe a fire brick. You really don’t want your desk going up in flames.

We love make-do hacks, but we love doing it right, too. Just watch [Bil Herd] extol the virtues of a real IR desoldering station. And then giggle as you do the same thing with a few-dollar halogen bulb.

Continue reading “Halogen Lamp Abused For Desoldering”

Get On 10 GHz For 3 Euros

A frequent complaint you will hear about amateur radio is that it is a chequebook pursuit. Of course you can work the incredible DX if you spend $20k on a high-end radio, big antenna, and associated components. The reality is though that because it’s such a multi-faceted world there are many ways into it of which the operator with the shiny rig is taking only one.

On the commonly used HF and VHF bands at the lower end of the radio spectrum you will definitely find chequebook amateurs of the type described in the previous paragraph. But as you ascend into the microwave bands there are no shiny new radios on the market, so even the well-heeled licensee must plow their own furrow and build their own station.

You might think that this would remain a chequebook operation of a different type, as exotic microwave devices are not always cheap. But in fact these bands have a long history of extremely inexpensive construction, in which skilled design and construction as well as clever re-use of components from satellite TV systems and Doppler radar modules play a part. And it is a project following this path that is our subject today, for [Peter Knol, PA1SDB] has repurposed a modern Doppler radar module as a transmitter for the 10GHz or 3cm amateur band (Google Translate version of Dutch original). The best bit about [Peter]’s project is the price: these modules can be had for only three Euros.

Years ago a Doppler module would have used a Gunn diode in a waveguide cavity and small horn, usually with an adjacent mixer diode for receiving. Its modern equivalent uses a transistor oscillator on a PCB, with a dielectric resonator and a set of patch antennas. There is also a simple receiver on board, but since [Peter] is using a converted ten-Euro satellite LNB for that task, it is redundant.

He takes us through the process of adjusting the module’s frequency before showing us how to mount it at the prime focus of a parabolic antenna. FM modulation comes via a very old-fashioned transformer in the power feed. He then looks at fitting an SMA connector and using it for more advanced antenna set-ups, before experimenting with the attenuating properties of different substances. All in all this is a fascinating read if you are interested in simple microwave construction.

The result is not the most accomplished 10 GHz station in the world, but it performs adequately for its extremely low price given that he’s logged a 32 km contact with it.

Though we cover our fair share of amateur radio stories here at Hackaday it’s fair to say we haven’t seen many in the microwave bands. If however you think we’ve been remiss in this area, may we point you to our recent coverage of a microwave radio receiver made from diamond?

Via Southgate ARC.

Repairing Flex Circuits By Accident

A while ago, [drygol] was asked to repair a few old Amiga keyboards. The key switches worked fine, but in the past decade or two, the flexible PCB ribbon connector has been mistreated, and was in an unworkable, nonfunctional state. The fragile traces underneath the green epoxy coating were giving way, but [drygol] found a few cool ways to repair these flex cables.

The end of this keyboard cable was beyond repair, but the Commodore engineers were gracious enough to leave a bit of slack in this keyboard connector. After cutting off the most damaged section, [drygol] had a strip of plastic, a few copper traces, and a green coating that had to be removed. The first attempt to remove this green covering used methanol, but that didn’t work. The next chemical attempt was with an epoxy solvent that contained nasty chemicals. This was applied to the end of the flex cable, with the remainder of the cable masked off by Kapton. It worked remarkably well.

In removing the Kapton masking tape, [drygol] discovered this green film sticks better to Kapton than it does to copper and plastic. A mechanical solution was found, allowing these keyboard cables to be easily repaired.

Of course, this was only half of the problems with these flexible circuits. Over the years, a few cracks appeared in the traces. To repair these broken traces, [drygol] turned to silver glue and a few laminations of Kapton to make this keyboard cable whole again. It worked, and the ancient keyboard was returned to service. Great work, and a fantastic observation for anyone with one of these keyboards sitting around: just grab a roll of Kapton to repair these circuits. It can’t get any easier than that.

IKEA Table 3D Printer

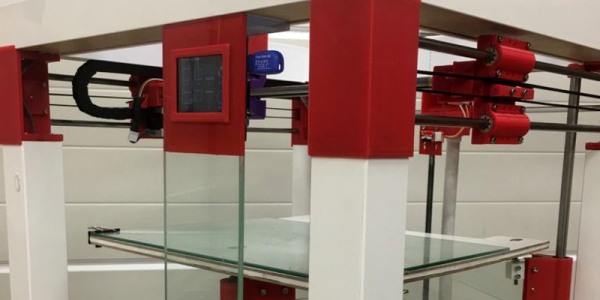
In this Instructable, [Wayne Mason-Drust] shares the step by step guide on how to make a cool, good-looking, 3D printer based on the Ikea LACK table. From an Ikea lantern weather station to a fully printed CNC based on an Ikea table, it’s almost safe to say that a 3D printer Ikea hack was overdue.

The idea to use a Ikea table as a base for a 3D printer first came to [Wayne] as he used this table to support other 3D printer he had working in his business. He realized that, even after five years of use, the table showed no signs of wear or distortion. So he decided to start to work on a 3D printer based on this precise table, the one that used to hold the printer.

[Wayne] stacked two together and named it Printtable (pun intended?). This open source, cartesian rep-rap 3D printer looks pretty slick. With a build area of 340mm X 320mm and 300mm on the Z axis and a price tag for the parts starting as low as $395, seems like a pretty decent 3D printer. With some work sourcing the parts, maybe it can be even lower.

Or we can just wait until Ikea starts selling them.

Continue reading “IKEA Table 3D Printer”