Laser Exposing PCBs With A Blu-Ray Laser

For those of us whose introduction to PCB making came decades ago and who share fond memories of permanent markers and crêpe paper sticky tape, the array of techniques available to PCB artists of today seem nothing short of magical. Toner transfer and peroxide etchant mixtures might seem run-of-the-mill to many readers, but even they are streets ahead of their predecessors from times past.

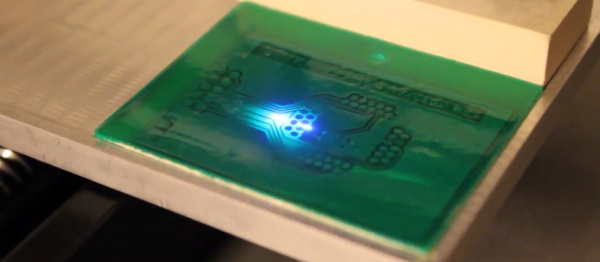
Photographic exposure of  etch-resist coating has traditionally been performed with a UV lamp through a sheet of acetate film, but there is no reason why that should be the only way it can be performed. There have been plenty of projects using lasers or LEDs to draw a PCB design onto the coating as a raster, and a rather nice example from [Terje Io] using a Blu-Ray laser diode is the subject of the video below the break.

The diode is mounted on a gantry with a THK KR33 linear actuator that he tells us was unsuitable for his CNC mill due to backlash. This gives a claimed 1200 dpi resolution, over a 100 mm x 160 mm exposure area. Software is provided in a GitHub repository, taking a PNG image exported through a PDF printer. And since it’s got a UV laser, it can be used in a second pass to process UV-responsive soldermask film. ([Terje] cheats and uses a separate CNC mill to drill out the holes.) The result looks great.

Continue reading “Laser Exposing PCBs With A Blu-Ray Laser”

Behind The Scenes At A Professional Fireworks Show

Have you ever wondered what goes on behind the scenes at a big fireworks show? Last year [Kenneth] was asked to help manually ignite a fireworks show, and this consisted of him running down a row of shells with a road flare, lighting each one in turn. He apparently did so well that this year worked another show, this one with a more complicated setup.

The show [Kenneth] helped run consisted of 950 three-inch shells, wired in series into small groups, plus another 150 in 25-shell clusters used for the finale. The fireworks were organized in racks consisting of five three-inch diameter tubes of HDPE secured together by 2x4s. Each tube held a shell, and each shell came pre-wired with both a match fuse and electrically-triggered squib. Each squib or series of squibs connects to 45-channel breakouts, which connect to a control board.

Even after the show was completed, [Kenneth] had work to do, walking around and looking in each tube to see if there are any unfired shells. The dual wiring is so the shell can be fired with a flare if the squib is a dud. In this show they found six shells, and [Kenneth] was tasked with setting off those last shells with a road flare—otherwise they’d have to use a licensed and placarded vehicle just to transport a few shells.

For more fireworks goodness checkout this beautiful Arduino fireworks controller and this network-controlled fireworks launcher.

Continue reading “Behind The Scenes At A Professional Fireworks Show”

Badge From Diamond Age Comes To DEF CON

We’re huge fans of [Neal Stephenson’s] work and are usually looking to assign some of his vision to the gear that pops up in the real world. But there’s no stretching or squinting necessary with this one. [Kerry Scharfglass] has built a functioning Drummer’s Badge from the foundational Sci-Fi novel The Diamond Age.

The badge is called Sympetrum, which is a genus of dragonfly. In explaining what the badge is and does, [Kerry] instructs you to go and read the book first and we couldn’t agree more. This isn’t recommended reading; if you’re a geek you need to read this book.

The dragonfly badges are from a portion of the book that gets pretty weird, but the gist is that rod-logic (machines build from microscopic carbon nanotubes) is so pervasive that at all times you’re covered in mites that are actually machines. At a party, one of the characters notices everyone is wearing dragonfly pins that begin to pulse with the music and synchronize with each other. They’re actually indicators of what the mites within the wearers’ bodies are doing — synchronizing people with other people.

This badge is a working recreation of that, presumably without the billions of mites controlling people (but who knows, it is DEF CON). At the center of the badge is an STM32 driving ten APA102 modules. Interactivity is based on IR signaling. The badge will cycle random color animations when alone. But each badge also projects clock sync and metadata over infrared, so put some of them in the same room and they’ll tend to synchronize.

Simple, beautiful, and a great geeky backstory. This example of Badgelife proves that hardware badges don’t need to be packed with features, or have a huge BOM cost. If done well, you can do an awful lot with just a little hardware and strong dose of inspiration. It also makes hand-assembly a lot more approachable, which is what you can see in the images above. Thanks [Kerry] for giving us an early look at this badge, can’t wait to see them at the CON.


We’ll be looking for this and all other #Badgelife offerings at DEF CON 25. Join us for a Hackaday meetup on Sunday morning as we once again do Breakfast at DEF CON

Fidget Spinners Put The ‘S’ In STEAM Education

Centrifuges are vital to the study of medicine, chemistry, and biology. They’re vital tools to separate the wheat from the chaff figuratively, and DNA from saliva literally. Now, they’re fidget spinners. [Matlek] designed a fidget spinner that also functions as a simple lab centrifuge.

The centrifuge was designed in Fusion 360, and was apparently as easy as drawing a few circles and hitting copy and paste. Interestingly, this fidget spinner was designed to be completely 3D printable, including the bearings. The bearing is a standard 608 though, so if you want to get some real performance out of this centrispinner, off-the-shelf bearings are always an option. The design of this fidget spinner holds 2 mL and 1.5 mL vials, but if your lab has 500 μL tubes on hand, there are handy 3D printable adapters.

Still think using a toy to do Real Science™ is dumb? Contain your rage, because a few months ago a few folks at Stanford devised a way to build a centrifuge out of paper. This paperfuge can — at least theoretically — save lives where real commercial centrifuges or even electricity aren’t available. Fidget spinners save humanity once again.

Hackaday Prize Entry: Open Narrowband RF Transceiver

We have so many options when we wish to add wireless control to our devices, as technology has delivered a stream of inexpensive devices and breakout boards for our experimentation. A few dollars will secure you all your wireless needs, it seems almost whatever your chosen frequency or protocol. There is a problem with this boundless availability though, they can often be rather opaque and leave their users only with what their onboard firmware chooses to present.

The Open Narrowband RF Transceiver from [Samuel Žák] promises deliver something more useful to the experimenter: an RF transceiver for the 868 or 915MHz allocations with full control over all transmission parameters. Transmission characteristics such as frequency, bandwidth, and deviation can be adjusted, and the modulation and encoding schemes can also be brought under full control. Where a conventional module might simply offer on-off keying or frequency shift keying, this module can be programmed to deliver any modulation scheme its chipset is capable of. Spread-spectrum? No problem!

Onboard, the device uses the TI CC1120 transceiver chip, paired with the CC1190 front end and range extender. Overseeing it all is an ST Microelectronics STM32F051 microcontroller, which as you might expect is fully accessible to programmers. Interfaces are either USB, through an FTDI serial chip, or directly via a serial port.

There are a host of transceiver chips on the market which just beg to be exploited, so it is very good indeed to see a board like this one. It’s worth noting though that the CC1120 has a much wider frequency band than that of the CC1190, and with a different front end and PA circuitry, this could cover other allocations including some amateur bands.

Fabricate Your Own Tabletop Gaming Props

Delve into the mysterious world of tabletop roleplaying games. Warhammer Fantasy Roleplay, Shadowrun, Pathfinder, Ars Magica, Vampire, whatever gets your dice rollin’ — metaphorically in the case of a diceless system. This might very well be your daddy’s D&D. If you’re not a gamer, you’re certainly familiar with the concept. People sit around a table pretending to have an epic adventure, often adding a random element with the help of dice. A map is often displayed on the table, sized for figures that show the various heroes and villains.

As a person with access to a variety of CNC machines I find myself wanting to create things to make gameplay more fun. I want to build a scale castle and have a siege. I want to conduct a ship-to-ship battle with wooden ships built to scale. But I also think smaller. What is something I could make that would help us every day? Say, a box for dice. Not every project needs to be the dragon’s lair.

It turns out a lot of other folks have been thinking about the same thing.

Continue reading “Fabricate Your Own Tabletop Gaming Props”

A 3D Scanner That Archimedes Could Get Behind

3D-scanning seems like a straightforward process — put the subject inside a motion control gantry, bounce light off the surface, measure the reflections, and do some math to reconstruct the shape in three dimensions. But traditional 3D-scanning isn’t good for subjects with complex topologies and lots of nooks and crannies that light can’t get to. Which is why volumetric 3D-scanning could become an important tool someday.

As the name implies, volumetric scanning relies on measuring the change in volume of a medium as an object is moved through it. In the case of [Kfir Aberman] and [Oren Katzir]’s “dip scanning” method, the medium is a tank of water whose level is measured to a high precision with a float sensor. The object to be scanned is dipped slowly into the water by a robot as data is gathered. The robot removes the object, changes the orientation, and dips again. Dipping is repeated until enough data has been collected to run through a transformation algorithm that can reconstruct the shape of the object. Anywhere the water can reach can be scanned, and the video below shows how good the results can be with enough data. Full details are available in the PDF of their paper.

While optical 3D-scanning with the standard turntable and laser configuration will probably be around for a while, dip scanning seems like a powerful method for getting topological data using really simple equipment.

[wpvideo xx88I1SN]

Thanks to [bmsleight] for the tip.