Weatherproof Pi Looks Up So You Don’t Have To

Skywatching is a fascinating hobby, but does have the rather large drawback of needing to be outside staring at the sky for extended periods of time. Then there’s the weather to contend with, even if you’ve got yourself a nice blanket and it isn’t miserably cold, there might be nothing to see if cloud cover or light pollution is blocking your view.

Highly scientific testing procedure.

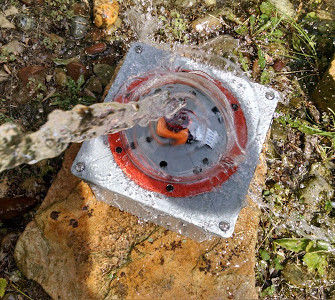
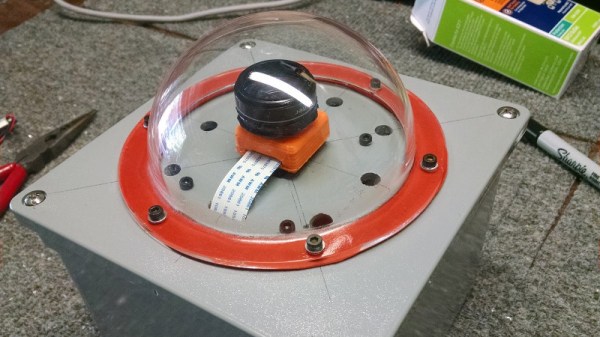
To address these issues, [Jason Bowling] decided to put a Raspberry Pi in a weatherproof enclosure and use it as a low-cost sky monitoring device. His setup uses the No-IR camera coupled with a cheap wide-angle lens designed for use with smartphone camera. The whole setup is protected from the elements by a clear acrylic dome intended for a security camera, and a generous helping of gasket material. Some experiments convinced [Jason] to add a light pollution filter to the mix, which helped improve image contrast in his less than ideal viewing area.

The software side is fairly straightforward: 10 second exposures are taken all night long, which can then be stitched together with ffmpeg into a timelapse video. [Jason] was concerned that the constant writing of images to the Pi’s SD card would cause a premature failure, so he set it up to write to a server in the house over SSHFS. Adding a USB flash drive would have accomplished the same thing, but as he wanted to do the image processing on a more powerful machine anyway this saved the trouble of having to retrieve the storage device every morning.

This isn’t the first time [Jason] has used a Pi to peer up into the heavens, and while his previous attempts might not be up to par with commercial offerings, they definitely are very impressive considering the cost of the hardware.

Continue reading “Weatherproof Pi Looks Up So You Don’t Have To”

Home Server Has AMD CPU And IKEA Case

Readers who took part in the glory days of custom PC building will no doubt remember the stress of having to pick a case for their carefully-curated build. You may have wanted to lower the total cost a bit by getting a cheap case, but then you’d be stuck looking at some econo-box day in and day out. Plus, how do you post pictures online to boast about your latest build if there are no transparent windows and a lighting kit?

While some may have spent more time choosing their lighted case fans than their optical drive, [Miroslav Prašil] was surely not one of them. When he decided to build a new NAS for his home network, [Miroslav] decided he wanted to put all his money into the device’s internals, and house his build in a wooden storage crate from IKEA. While the low cost was certainly a major factor in the decision, it turns out the crate actually offers a decent amount of room for hardware components. As an added bonus, it doesn’t look completely terrible sitting out in the living room.

In a detailed series of posts on his blog, [Miroslav] walks us through the entire process of building what he has come to call the “NAScrate”. Wanting gigabit Ethernet and a real SATA controller, [Miroslav] went for the ASRock C70M1, a Mini-ITX board with integrated dual-core AMD processor. While not exactly a powerhouse, it will certainly wipe the floor with the fruit-inspired single board computers that so often dominate these types of builds.

To get his clearances worked out, [Miroslav] rendered the entire build in OnShape, which gave him enough confidence in his design to move on to actual construction. The build involves several 3D printed parts, most notably some clever hard drive mounting brackets which allow the drives to be stacked into a space-saving arrangement while still leaving room for airflow between them.

[Miroslav] deftly avoids any religious debates by leaving off his particular choice for software and operating system on his newly constructed NAS, but he does mention that something like FreeNAS would be a logical choice.

While this may be the first wooden one we’ve covered so far, home servers in general are a favorite project for hackers, from budget-friendly scratch builds all the way up to re-purposed enterprise hardware.

3D Printed Helical Satcom Feed

With the advent of cheap software defined radios made popular by the RTL-SDR project a few years back, satellite communications are now within the budget of even the most modest hacker. For $20 USD you can get a USB SDR module that is more than capable of receiving signals from any number of geosynchronous satellites, but you’ll need something a little more robust than rabbit ears to pick up a signal broadcast from over 22,000 miles away.

Building a satellite-capable antenna isn’t necessarily difficult, but does involve a fair bit of arcane black magic and mathematics to do properly; something that can scare away those new to the hobby. But by using a 3D printed mandrel, [Tysonpower] has come up with a feed you can build and mount on a standard dish without having to take a crash course in antenna theory. [Tysonpower] reports the feed has a center frequency 1550 MHz, and works well for reception of Inmarsat, AERO and HRPT signals.

The channel in the 3D printed core of the feed ensures that the inserted wire is of the correct length and in the perfect position for optimal reception. All you need to do is print the core, wrap it with wire, and then solder the end to a connector on a ground-plane that’s nothing more than a sheet of aluminum. [Tysonpower] was even kind enough to model up a mount that will allow you to bolt this feed to a standard satellite dish.

We’ve previously covered using RTL-SDR to receive Inmarsat transmissions, and hardware for the Outernet project, both of which would be great applications for an antenna like this.

Continue reading “3D Printed Helical Satcom Feed”

Blast From The Past With Space Station PROM Reader

The Ursa Major Space Station SST282 is a dinosaur of a digital reverb.  Okay, so maybe 1978 isn’t ancient yet, but it is getting to the point where one has to worry about the possibility of component failure.  At least that’s what [Obsoletetechnology] thought when they created a backup of its memory contents.

As can be seen from some of Hackaday’s previous articles, a part does not have to be an older one to fail.  However, there is no such thing as being too paranoid when it comes to older parts reaching their lifetime.  Especially when there is valuable memory involved.  Each bit of PROM memory is locked by a fuse on its location grid to store permanent data.  To be able to read this and collect the respective data, a Raspberry Pi 3 PROM reader was created.

The SST282 uses 3 TTL-level 74xx series Schottky PROM memories on board that hold RAM lookup tables.  In the case that these failed, all of the subsequent information would be lost since there are no surviving memory dumps online.  Fortunately we are interested only in gathering their contents, so the PROM reader schematic is fairly rudimentary.  The chip’s address and data buses connect to a Pi’s GPIO header, and the only other thing to note is a 74LS541 TTL level shifter that converts the Pi’s 3.3V output to the PROM’s 5V TTL level.

Continue reading “Blast From The Past With Space Station PROM Reader”

Linux Fu: System Administration Made Easier

Linux can have a somewhat split personality. If you use it as a desktop OS, it has a lot of GUI tools, although sometimes you still need to access the command line. If you use it as a headless server, though, you probably ought to know your way around the command line pretty well. This is especially true if you don’t want to litter up your hard drive (and CPU) with X servers and other peculiarities of the graphical user interface.

Personally, I like the command line, but I am realistic enough to know that not everyone shares that feeling. I’ll also admit that for some tasks — especially those you don’t do very often — it is nice to have some helpful buttons and menus. There are several administration tools that you might be interested in using to handle administration tasks on your Linux machines. I’m going to look at two of them you might want to experiment with that both use a Web browser to provide their interface.

Continue reading “Linux Fu: System Administration Made Easier”

Live Streams And Hack Chat From The Hackaday Superconference

Want to experience the Hackaday Superconference from the comfort of your own workshop? Just follow us on YouTube or on Facebook as two days of live streaming talks begin this Saturday morning.

This weekend is the Hackaday Superconference, the greatest hardware conference on Earth. While the Superconference is the most amazing gatherings of engineers and engineering enthusiasts, we realize that not everyone can make it out to our ultimate hardware conference. This year, we’re doing something special for everyone who can’t make it out — we’re opening up live streams and live chat to those who can’t attend. This is your chance to take part in the Superconference, even if you’re thousands of miles away.

You are invited to the chat room for the event. Join the Superconference chat right now and be part of the culture of the Hacker Village that springs to life during Supercon.

3D-Printed Robot Golem Only A Tiny Bit Creepy

ASPIR, the Autonomous Support and Positive Inspiration Robot is an goblin-sized robot, designed by [John Choi], aims to split the difference between smaller hobbyist robots and more robust but pricy full-sized humanoids only a research institute could afford. By contrast, [John] estimates it cost a relatively meager $2,500 to create such a homunculus.

The robot consists of 33 servos of various types moving the limb, controlled by an Arduino Mega with a servo control shield seated on it. The chassis uses 5 kg of filament and took 300 hours to print, and it has a skeleton made up of aluminum hex rods. Spring-loaded RC shocks help reinforce the shoulders. There are some nice touches, like 3D-printed hands with living hinge fingers, each digit actuated by a metal-gear micro servo. It stores its power bricks in its shins. For sensors it includes a chest-mounted webcam and a laser distance sensor.

The main design feature is the Android smartphone serving as its brains, and also — at least cosmetically — its eyes. Those eyes… might be just a teensy bit too Chucky for our taste. (Nice work, [John]!)