World Create Day: Get Together And Hack On April 22nd

Venture away from your workbench and see what others have been building this year. It’s time for Hackaday World Create Day when hackers all over the world get together to work on projects.

On April 22nd, join the creative minds in your area for a few hours of build time. It’s an opportunity to inspire and be inspired by others. There’s no better way to make those leaps forward on a project than to share your work with others. This pollination of ideas is what sparks creativity, and it’s a great excuse to meet new people.

Find a meetup near you right now. Don’t see one in your area? Become a host, it’s easy and we’ll help!

What’s It Like at a World Create Day Meetup?

When the Hackaday community gets together it’s always a fun time. Each meetup on April 22nd will be unique. These are organized locally and given life by those who show up. Bring an open mind and something you’re excited about and you’ll be right at home.

We’re sending out stickers like this one, along with other swag, to meetups that sign up early. Do it now!

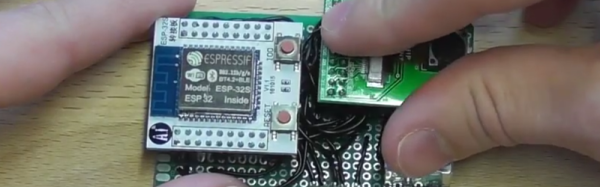
For instance, if I were Brian Benchoff I might bring along my 3D printed WiFi antenna and a few different WiFi devices to see if anyone wanted to do some distance measurements and signal strength characterization. I myself have been working on an art project that uses computer vision and replacement display for my exercise machine so I’ll bring one of those. After a few hours of hacking, it’s customary to go around the room and have people give a very brief explanation of their work.

World Create Day is the perfect place to put together you Hackaday Prize Team. As the ideas fly, keep in mind the power of one idea to change the world. Consider picking a challenge, brainstorming an idea, and entering it in the Hackaday Prize.

Pics or It Didn’t Happen

Don’t let the great ideas live for only one day. Make sure you tell the story of your World Create Day. Post your pictures and descriptions on social media with hashtag #WorldCreateDay during the event. Pictures, project links, and a brief summary should be added on your meetup’s Hackaday.io event page. We want to cover as many of these as possible on Hackaday, so don’t be bashful about telling everyone what people at your meetup were working on — finished project or pencil drawing, we want to hear it!

Ask Hackaday: How Does This Air Particle Sensor Work?

The hardware coming out of [Dr. Peter Jansen]’s lab is the craziest stuff you can imagine. He’s built a CT scanner out of plywood, and an MRI machine out of many, many turns of enamel wire. Perhaps his best-known build is his Tricorder – a real, all-sensing device with permission from the estate of [Gene Roddenberry] to use the name. [Peter]’s tricorder was one of the finalists for the first Hackaday Prize, but that doesn’t mean he’s stopped working on it. Sensors are always getting better, and by sometime in the 23rd century, he’ll be able to fit a neutrino detector inside a tiny hand-held device.

One of the new sensors [Peter] is working with is the MAX30105 air particle sensor. The marketing materials for this chip say it’s designed for smoke detectors and fire alarms, but this is really one of the smallest dust and particle sensors on the market. If you want a handheld device that detects dust, this should be the chip you’re looking at.

Unfortunately, Maxim is being very, very tight-lipped about how this particle sensor works. There is a way to get access to raw particle counts and the underlying algorithms, and Maxim is more than willing to sell those algorithms through a third-party distributor. That’s simply not how we do things around here, so [Peter] is looking for someone with a fancy particle sensor to collect a few hours of data so he can build a driver for this chip.

Here’s what we know about the MAX30105 air particle sensor. There are three LEDs inside this chip (red, IR, and green), and an optical sensor underneath a piece of glass. The chip drives the LEDs, light reflects off smoke particles, and enters the optical sensor. From there, magic algorithms turn this into a number corresponding to a particle count. [Peter]’s hackaday.io log for this project has tons of data, math, and statistics on the data that comes out of this sensor. He’s also built a test rig to compare this sensor with other particle sensors (the DSM501A and Sharp sensors). The data from the Maxim sensor looks good, but it’s not good enough for a Tricorder. This is where you, o reader of Hackaday, come in.

[Peter] is looking for someone with access to a fancy particle sensor to collect a few hours worth of data with this Maxim sensor in a test rig. Once that’s done, a few statistical tests should be enough to verify the work done so far and build a driver for this sensor. Then, [Peter] will be able to play around with this sensor and hopefully make a very cheap but very accurate air particle sensor that should be hanging on the wall of your shop.

A Huge Infra-Red Touch Board

We’re all used to touch pads on our laptops, and to touch screens. It’s an expectation now that a new device with a screen will be touch-enabled.

For very large surfaces though, touch is still something of an expensive luxury. If you’re a hardware hacker, unless you are lucky enough to score an exceptional cast-off, the occasional glimpse of a Microsoft PixelSense or an interactive whiteboard in a well-equipped educational establishment will be the best you’re likely to get.

[Adellar Irankunda] may have the answer for your large touch board needs if you aren’t well-heeled, he’s made one using the interesting approach of surrounding the touch area with an array of infra-red LEDs and photo transistors. By studying the illumination of the phototransistors by different LEDs in the array, he can calculate the position of anything such as a pointing finger that enters the space. It’s an old technique that you might have found on some of the earlier touch screen CRT monitors.

His hardware is built on twelve breadboards mounted in a square, upon which sit 144 LED/phototransistor pairs managed through a pile of 4051 CMOS multiplexers by a brace of Arduino Nanos. If you fancy one yourself he’s provided all the code, though the complex array of breadboards to assemble are probably not for the faint-hearted. You can see it in action in a video we’ve posted below the break.

Continue reading “A Huge Infra-Red Touch Board”

Trademarking Makerspace (Again)

A British company has filed a trademark application for the word ‘MakerSpace’. While we’ve seen companies attempt to latch on to popular Maker phrases before, Gratnells Limited, the company in question, is a manufacturer of plastic containers, carts, and other various storage solutions. These products apparently provide a space to store all the stuff you make. Something along those lines.

This isn’t the first time we’ve seen someone try to glom onto the immense amount of marketing Make: has put into the term ‘makerspace’. In 2015, UnternehmerTUM MakerSpaceGmbH, an obviously German tech accelerator based in Munich, filed an application to trademark the word ‘Makerspace’. A few days later, we got word this makerspace wasn’t trying to enforce anything, they were just trying to keep the rug from being pulled out from under them. It was a defensive trademark, if something like that could ever exist (and it can’t under US trademark law). Swift and efficient German bureaucracy prevailed, and the trademark was rejected.

The trademark in question here covers goods including, ‘metal hardware and building materials’, ‘trolleys, trolleys with trays’, ‘guide rails of non-metallic materials’, and ‘lids for containers’, among other storage-related items. While this is far outside the usual meaning for a ‘makerspace’ – a building or club with a whole bunch of tools – if this trademark is approved, there is always the possibility of overzealous solicitors.

Fortunately, Gratnells released a statement today saying they would not defend or continue this trademark. This is in light of the recent, limited reaction to the trademark application. The word Makerspace is safe again another day.

Thanks [Tom] for the tip.

Introduction To TensorFlow

I had great fun writing neural network software in the 90s, and I have been anxious to try creating some using TensorFlow.

Google’s machine intelligence framework is the new hotness right now. And when TensorFlow became installable on the Raspberry Pi, working with it became very easy to do. In a short time I made a neural network that counts in binary. So I thought I’d pass on what I’ve learned so far. Hopefully this makes it easier for anyone else who wants to try it, or for anyone who just wants some insight into neural networks.

Continue reading “Introduction To TensorFlow”

A Tiny Bench Power Supply

One of the more popular projects for beginners in electronics is a power supply. Yes, you can always go to Amazon and buy a nice power supply, but unfortunately, we haven’t set up our Amazon affiliate links yet. Instead, we’ll have to go with the next best thing and check out [Tron900]’s mini bench power supply build. It’s extremely capable and cute as a button.

The design goals for this project were to build a small and compact unit using mostly salvaged and recycled components, with all through-hole circuitry. The best guide you’ll ever find for a DIY power supply is one of [Dave Jones]’ earlier video series going over the construction of an adjustable power supply based on an LT3080. [Tron] didn’t have this regulator on hand and wanted to base his design around an op-amp instead. After rummaging through his parts, he found what he was looking for: a TIP3055 power transistor, a neat enclosure that could double as a heatsink and an AD680 voltage reference.

The design of this power supply was simulated in SIMETRIX, and after a few revisions [Tron] had a circuit that worked reasonably well. The circuit was populated on a piece of perfboard, a fantastic front panel was constructed, and one of those ubiquitous volt/ammeter panels added.

This is just a one-off project, but the results are fantastic. This is a very small, very capable power supply that does everything [Tron] needs. It’s accurate enough, at least when measured with a fancy benchtop HP meter, and looks adorable. What more could you want in a benchtop power supply?

ESP32 WiFi Hits 10km With A Little Help

[Jeija] was playing with some ESP32s and in true hacker fashion, he wondered how far he could pull them apart and still get data flowing. His video answer to that question covers the Friis equation and has a lot of good examples of using the equation, decibels, and even a practical example that covers about 10km. You can see the video below.

Of course, to get that kind of range you need a directional antenna. To avoid violating regulations that control transmit power, he’s using the antenna on the receiving end. That also means he had to hack the ESP32 WiFi stack to make the device listen only on one side. The hack involves putting the device in promiscuous mode and only monitoring the signals being sent. You can find the code involved on GitHub (complete with a rickrolling application).

Continue reading “ESP32 WiFi Hits 10km With A Little Help”