Start Tracking Satellites With This Low-Cost Azimuth-Elevation Positioner

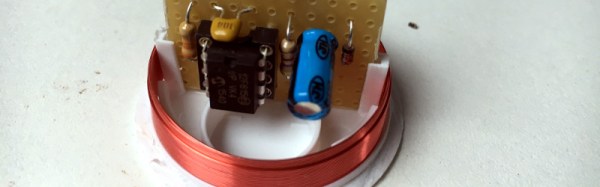
Tracking satellites and the ISS is pretty easy. All you really need is an SDR dongle or a handheld transceiver, a simple homebrew antenna, and a clear view of the sky. Point the antenna at the passing satellite and you’re ready to listen, or if you’re a licensed amateur, talk. But the tedious bit is the pointing. Standing in a field or on top of a tall building waving an antenna around gets tiring, and unless you’re looking for a good arm workout, limits the size of your antenna. Which is where this two-axis antenna positioner could come in handy.

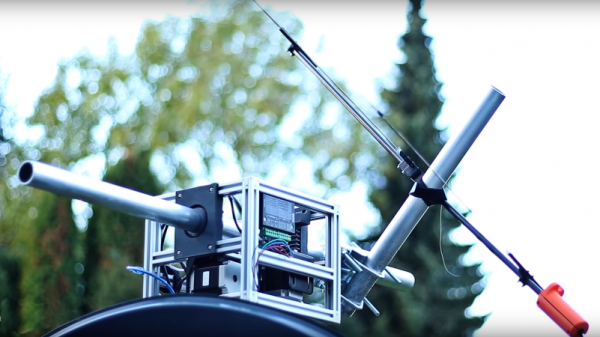
While not quite up to the job it was originally intended for — positioning a 1.2-meter dish antenna — [Manuel] did manage to create a pretty capable azimuth-elevation positioner for lightweight antennas. What’s more, he did it on the cheap — only about €150. His design seemed like it was going in the right direction, with a sturdy aluminum extrusion frame and NEMA23 steppers. But the 3D-printed parts turned out to be the Achille’s heel. At the 1:40 mark in the video below (in German with English subtitles), the hefty dish antenna is putting way too much torque on the bearings, delaminating the bearing mount. But with a slender carbon-fiber Yagi, the positioner shines. The Arduino running the motion control talks GS232, so it can get tracking data directly from the web to control the antenna in real time.

Here’s hoping [Manuel] solves some of the mechanical issues with his build. Maybe he can check out this hefty dish positioner for weather satellite tracking for inspiration.

Continue reading “Start Tracking Satellites With This Low-Cost Azimuth-Elevation Positioner”

Tindie’s Cyber Monday Deals

The holiday season is upon us, so you know what that means. It’s time to consume! Whether that means large quantities of carbohydrates or consumer electronics, ’tis the season to buy, buy, buy.

Hundreds of Tindie items are on sale right now, and everyone will find something unique, cutting edge, and sold by the people who designed it. Tindie is artisanal electronics with a cute robot dog mascot. It can’t get any better than that.

These discounts are offered by the great DIY hardware creators themselves, the ones who are making cool stuff that you want. What’s that, you say? It’s neither Black Friday nor Cyber Monday right now? It doesn’t matter, this sale started on Black Friday and will last until at least Mail Order Tuesday.

What’s cool on Tindie? Everything! There are button breakouts for old-school brick Game Boys, space chicken stickers from the guy that built the ESP8266 Deauther, a tiny digital audio player, track ocean vessels with the dAISy AIS receiver, or learn to solder with this blinky fire engine kit.

If you’re looking for even more deals, the Hackaday Store is blowing out everything. It’s a literal fire sale after I suggested deep frying the bird this year.

Finally, A Fidget Spinner We Can Love

We’ve been frankly mystified at the popularity of fidget spinners. After all, we can flip an ink pen around just fine. However, [MakersBox] just sold us on what he calls the geek spinner. The fact that the spinner is actually a PCB and has parts on it, would probably have been cool enough. However, the spinner also has a persistence of vision LED set up and can display 12 characters of text as it spins. Because the board is simple and uses through hole components, it would be a great project for a budding young hacker. You can see a video below.

The instructions are geared towards someone attempting their first project, too. If you know how to solder and insert a DIP IC, you might find you’ll skim them, but it is pretty straightforward. The 8 LEDs on one side operate from an ATTiny CPU, which you can program with an Arduino. The spinner has a hall effect sensor and a magnet to figure out the index position of the spin — crucial for displaying text.

Although the board attempts to balance the components, the battery side is apparently a little heavy. The suggestion is to add some weight using some hardware or solder to that side. Speaking of solder, the bearing in the center solders to the PCB. That’s going to take a lot of heat, so maybe you can finally use Dad’s soldering gun that has been gathering dust under your bench.

We liked the polar graph provided to help you set up the code for your own messages. The text implies there is a picture of one of these graphs filled out, but we think he forgot to include that picture. However, it is clear enough how to use it, and it would make it very easy to make your own text or any design that the spinner could produce.

This isn’t the first POV spinner, by the way. [MakersBox] has a nice set of acknowledgments for projects he’s seen or borrowed from, but the other one he mentions uses surface mount. Granted, surface mount isn’t a problem for most people these days, but starting out, it might be nice to stick with a through-hole design. If you want a more useful spinner, you can always make some music.

Continue reading “Finally, A Fidget Spinner We Can Love”

Making An Arduino Shield PCB With Fritzing

[Allan Schwartz] decided to document his experience using Fritzing to design, fabricate, and test a custom Arduino shield PCB, and his step-by-step documentation makes the workflow very clear. Anyone who is curious or has been looking for an opportunity to get started will find [Allan]’s process useful to follow. The PCB in question has two shift registers, eight LEDs, eight buttons, and fits onto an Arduino; it’s just complex enough to demonstrate useful design features and methods while remaining accessible.

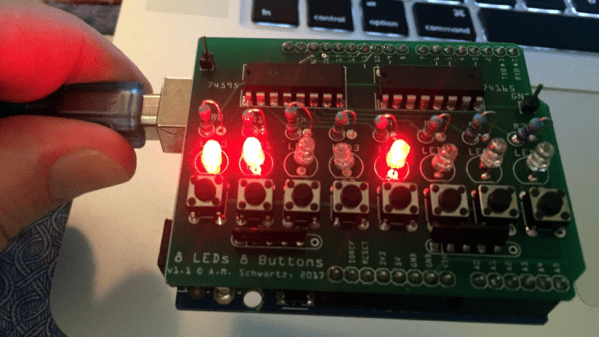
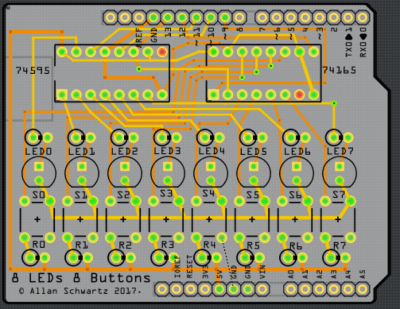
[Allan] starts with a basic breadboard design, draws a schematic, prototypes the circuit, then designs the PCB and orders it online, followed by assembly and testing. [Allan] had previously taught himself to use Eagle and etched his own PCBs via the toner transfer method, but decided to use Fritzing instead this time around and found it helpful and easy to use.

About a year ago we saw Fritzing put through its paces for PCB design, and at the time found that it didn’t impress much from an engineering perspective. Regardless, as a hobbyist [Allan] found real value in using Fritzing for his project from beginning to end; he documented both the process and his observations in order to help others, and that’s wonderful.

Mission Impossible: Infiltrating Furby

Long before things “went viral” there was always a few “must have” toys each year that were in high demand. Cabbage Patch Kids, Transformers, or Teddy Ruxpin would cause virtual hysteria in parents trying to score a toy for a holiday gift. In 1998, that toy was a Furby — a sort of talking robot pet. You can still buy Furby, and as you might expect a modern one — a Furby Connect — is Internet-enabled and much smarter than previous versions. While the Furby has always been a target for good hacking, anything Internet-enabled can be a target for malicious hacking, as well. [Context Information Security] decided to see if they could take control of your kid’s robotic pet.

Thet Furby Connect’s path to the Internet is via BLE to a companion phone device. The phone, in turn, talks back to Hasbro’s (the toy’s maker) Amazon Web Service servers. The company sends out new songs, games, and dances. Because BLE is slow, the transfers occur in the background during normal toy operation.

Continue reading “Mission Impossible: Infiltrating Furby”

Is Your Wireless Charger Working?

It’s that time of year at which the Christmas lights are coming out of storage, isn’t it. Some modern seasonal rituals: untangling half a mile of fairy lights, and replacing a pile of CR2032 cells in LED candles.

[RobBest] had a solution to the latter, owning a set of nifty rechargeable LED candles that came with their own wireless charger. Sadly the charger wasn’t working quite as intended, as the indicator light to show when it had finished its cycle was always on. How could he indicate that the induction system was in operation?

His answer was to take a non-functioning candle and strip it down to expose its induction pick-up coil. He could have simply hooked it up to an LED for a quick result, but since the device in question was a candle it made sense to give it a candle effect. A PIC microcontroller was therefore pressed into service to drive the LED with its PWM output, giving a pleasing flickering effect.

You don’t have to own a set of electronic candles to have a go at wireless charging. Instead you could try a trip to IKEA.

Continuity Tester Uses The ATtiny85’s Comparator

There’s an inside joke among cyclists – the number of bikes you need is “n+1”, where “n” is your current number of bikes. The same probably also applies to the number of tools and equipment a hacker needs on their workbench. Enough is never enough. Although [David Johnson-Davies] has a couple of multimeters lying around, he still felt the urge to build a stand-alone continuity tester and has posted details for a super-simple ATtiny85 based Continuity Tester on his blog. For a device this simple, he set himself some tall design goals. Using the ATtiny85 and a few SMD discretes, he built a handy tester that met all of his requirements and then some.

The ATtiny85’s Analog Comparator function is perfectly suited for such a tester. One input of the comparator is biased such that there is a 51 ohm resistor between the input and ground. The output of the comparator toggles when the resistance between the other input and ground is either higher or lower than 51 ohms. Enabling internal pullup resistors in the ATtiny85 not only takes care of proper biasing of the comparator pins, but also helps reduce current consumption when the ATtiny85 is put to sleep. The test current is limited to 100 μA, making the tester suitable for use in sensitive electronics. And enabling the sleep function after 60 seconds of inactivity reduces standby current to just about 1 μA, so there is no need for a power switch. [David] reckons the CR927 button cell ought to last pretty long.

For those interested in building this handy tester, [David] has shared the Eagle CAD files as well as the ATtiny85 code on his Github repository or you could just order out some boards from OSHpark.