The Internet Of Claw Machines

Remote administration of machines is a very useful tool for all manner of commercial, industrial, and home applications. Now, it’s available for claw machines, too – thanks to [Code Your Venture Free].

The project uses an ESP32 board that includes a battery case on the back for a standard 18650 lithium battery that makes getting small battery powered projects off the ground much easier. You can find them at Banggood and AliExpress, but we’re not 100% sure that they’re kosher because they’re branded WeMos, but don’t show up on WeMos’ website or their official online retail store. Anyway, it’s a cute idea to strap a LiPo cell to the back like that. Let us know in the comments if you know more.

Back to the claw! An off-the-shelf thumbstick is then connected to the ESP32 which is programmed to send packets over the network to control the claw machine, which is wired up with its own network-connected microcontroller. It’s all wrapped up in the usual 3D printed case.

The one problem that the project doesn’t solve is delivery – how does the remote player, whether on the local network or online, collect their prize? We can only assume some cutting-edge form of drone delivery is the solution. It’s not the first remote claw machine we’ve seen, either. Video after the break.

Continue reading “The Internet Of Claw Machines”

Accessing Blockchain On ESP8266 Using The NodeMCU Board

Blockchains claim to be public, distributed, effectively immutable ledgers. Unfortunately, they also tend to get a little bit huge – presently the Bitcoin blockchain is 194GB and Ethereum weighs in at 444GB. That poses quite an inconvenience for me, as I was looking at making some fun ‘Ethereum blockchain aware’ gadgets and that’s several orders of magnitude too much data to deal with on a microcontroller, not to mention the bandwidth cost if using 3G.

Having imagined a thin device that I could integrate into my mobile phone cover (or perhaps… a wallet?) dealing with the whole blockchain was clearly not a possibility. I could use a VPS or router to efficiently download the necessary data and respond to queries, but even that seemed like a lot of overhead, so I investigated available APIs.

As it turns out, several blockchain explorers offer APIs that do what I want. My efforts get an ESP8266 involved with the blockchain began with two of the available APIs: Ethplorer and Etherscan.

Continue reading “Accessing Blockchain On ESP8266 Using The NodeMCU Board”

Scotty Allen Builds A USB Drive From An IPhone

What happens when you come across a mysterious, partially populated circuit board in the Huaqiangbei electronics market in Shenzhen? If you’re [Scotty Allen], the only answer is to make your own USB drive from iPhone parts.

[Scotty] made a name for himself through his YouTube channel Strange Parts where he built his own iPhone from scratch, added a headphone jack to an iPhone, and other various exploits involving hot air in Shenzhen. This latest build is no different. It begins with a random PCB [Scotty] found at the electronics market. It has a USB port on one end, it has pads for an iPhone memory chip, and it has an IC that looks like a USB to Flash converter.

The build involved finding a few broken iPhones, desoldering and reballing their Flash chips, and when those didn’t work, finding the correct Flash chips for this tiny little USB adapter board. Here, [Scotty] ran into trouble. The first Flash chip didn’t have the right pins, there was blue smoke, and the toolchain for initializing the USB to Flash IC was a mess.

In the end, [Scotty] managed to create a USB Flash drive after five or six visits to the electronics market, two stencils to reball Flash chips, and finding the OEM software for the USB to Flash chip on this very special PCB. That, itself, required Windows (the horror!), and finding the right version of the software.

Is this technically building a Flash drive purely from disposed iPhone components? We’d quibble. But is it a cool build, regardless? Absolutely. And the real story here is how quickly [Scotty] could iterate on his engineering. When the greatest electronics market is right around the corner, you can do anything with a microscope and a hot air gun.

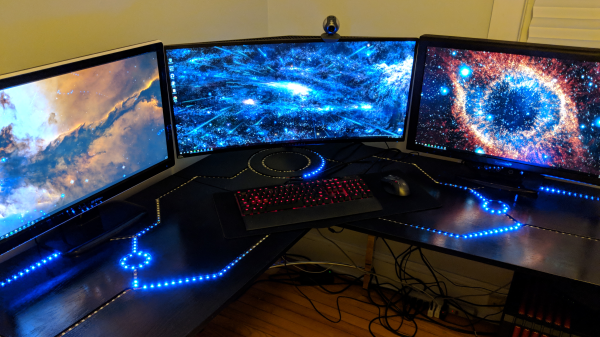
Tron Inspired LED Desk Lighting

Reddit user [barbarisch] thought his computer desk was a bit boring, so he came up with a cool project to spice it up: A Tron-inspired computer desk with embedded LED strips!

[Barbarisch] took a basic desk and replaced the tops with ¾” oak plywood. The LED routes were planned out on the computer first and then marked out on the plywood. Using straightedges, [barbarisch] carefully used a router to create the straight grooves and then he created a jig for doing the circles. A bit of trimming and sanding and the three pieces of the desk match up.

After painting the desk, it was time to take a crack at the LEDs. Originally, [barbarisch] thought about 3D printing some diffusers to cover the individual WS2812B lights, but it wasn’t coming out to his liking, so diffusers have been put on the back-burner for now. Holes were drilled in the desk so that connections could be made between the different parts of the grooves and soldering was done between bits of the strips when turning corners. The whole thing’s being controlled by a Raspberry Pi and a Fadecandy USB controller for RGB strips. [Barbarisch] modified a Pi case so that the Fadecandy board would fit as well as printing out a bracket to mount the hardware under the desk.

A fun project to update that boring computer desk and to help you out, the python code which communicates with the Fadecandy server has been put up on GitHub. From the Reddit discussion, it looks like [barbarisch] might have found a solution for diffusing the LEDs! If it’s an LED desk you’re interested in, though, we’ve seen interactive LED tables and Mega LED desks before!

Continue reading “Tron Inspired LED Desk Lighting”