A 3D Printed Blooming Rose For (Next) Valentines Day

Inspiration runs on its own schedule: great ideas don’t always arrive in a timely manner. Such was the case with [Daren Schwenke]’s notion for creating a 3D-printed blooming rose for his valentine, a plan which came about on February 13. Inspired by [Jiří Praus]’s animated wireframe tulip, [Daren] figured he could make a rose from clear printed petals colored by RGB LEDs. 24 hours seemed tight but sufficient, so he diligently set to work, but – after a valiant effort – finally had to extend the schedule. It’s now more than a month later, and tweaks to the design continue, but the result is nothing short of spectacular.

We first saw a discussion of the idea over on Hack Chat, and followed as it evolved into a project on hackaday.io. There, you can read the full details of the trials and tribulations that had to be endured to make this project happen. From a printer that wouldn’t boot, through testing PLA, TPU, and nylon filament, trying a number of different approaches for springs and hinges to operate the petals, and wiring the delicate DotStar LEDs with magnet wire, you can get a really good sense of the amount of experimentation it takes to complete a project like this. If you know anyone who still thinks 3D printing is as easy as clicking a button, send them over to read the logs on this project.

An early try at forming PLA petals

What finally materialized is a terrific combination of common hacker technologies. The petals are printed flat in nylon, then formed over a hot incandescent chandelier bulb. The stem and leaves are also printed, but the side stem has a piece of magnet wire embedded in the print as a capacitive touch sensor; when the leaf is touched, the rose blossom opens or closes. Magnet wire for the LEDs and a connecting rod for the mechanics run through the main stem to the base, where a 9g servo is responsible for controlling the bloom. The whole thing is controlled, naturally, with an Arduino. To move the project along a little more quickly, [Daren] enlisted the help of another Hack Chat denizen, [Morning.Star], who did an amazing job on the software without any access to the actual hardware.

Be sure to check out the video of the rose in action, after the break.

Continue reading “A 3D Printed Blooming Rose For (Next) Valentines Day”

EBay Modules And Custom PCBs Make A Plug And Play Ham Transceiver

Many of us have fond memories of our introduction to electronics through the “200-in-1” sets that Radio Shack once sold, or even the more recent “Snap Circuits”-style kits. Most of eventually us move beyond these kits to design our circuits; still, there’s something to be said for modular designs. This complete amateur radio transceiver is a great example of that kind of plug and play construction.

The rig is the brainchild of [jmhrvy1947], who set out to build a complete transceiver using mostly eBay-sourced modules. Some custom PCBs are used, but those are simple boards that can be etched and drilled easily. The transceiver is only for continuous-wave (CW) use, which would normally mean you’d need to know Morse, but thanks to some clever modifications to open-source apps like Quisk and FLDigi, Morse can be received and sent directly from the desktop. That will no doubt raise some hackles, but we think it’s a great way to learn code. The rig is QRP, or low power, transmitting only 100 mW with the small power amp shown. Adding eBay modules can jack that up to a full 100 Watts, which also requires adding a 12-volt power supply, switchable low-pass filters, a buck-boost converter, and some bandpass filters for band selection. It ends up looking very experimental, but it works well enough to make contacts.

We really like the approach here, and the fact that the rig can be built in stages. That makes it a perfect project for our $50 Ham series, which just kicked off. Perhaps we’ll be seeing it again soon.

Continue reading “EBay Modules And Custom PCBs Make A Plug And Play Ham Transceiver”

Hackaday Links Column Banner

Hackaday Links: March 17, 2019

There’s now an official Raspberry Pi keyboard and mouse. The mouse is a mouse clad in pink and white plastic, but the Pi keyboard has some stuff going for it. It’s small, which is what you want for a Pi keyboard, and it has a built-in USB hub. Even Apple got that idea right with the first iMac keyboard. The keyboard and mouse combo are available for £22.00

A new Raspberry Pi keyboard and a commemorative 50p coin from the Royal Mint featuring the works of Stephen Hawking? Wow, Britain is tearing up the headlines recently.

Just because, here’s a Power Wheels Barbie Jeep with a 55 HP motor. Interesting things to note here is how simple this build actually is. If you look at some of the Power Wheels Racing cars, they have actual diffs on the rear axle. This build gets a ton of points for the suspension, though. Somewhere out there on the Internet, there is the concept of the perfect Power Wheels conversion. There might be a drive shaft instead of a drive chain, there might be an electrical system, and someone might have figured out how someone over the age of 12 can fit comfortably in a Power Wheels Jeep. No one has done it yet.

AI is taking away our free speech! Free speech, as you’re all aware, applies to all speech in all forms, in all venues. Except you specifically can’t yell fire in a movie theater, that’s the one exception. Now AI researchers are treading on your right to free speech, an affront to the Gadsden flag flying over our compound and the ‘no step on snek’ patch on our tactical balaclava, with a Chrome plugin. This plugin filter’s ‘toxic’ comments with AI, but there’s an unintended consequence: people want need to read what I have to say, and this will filter it out! The good news is that it doesn’t work on Hackaday because our commenting system is terrible.

This week was the 30th anniversary of the World Wide Web, first proposed on March 11, 1989 by Tim Berners-Lee. The web, and to a greater extent, the Internet, is the single most impactful invention of the last five hundred years; your overly simplistic view of world history can trace modern western hegemony and the reconnaissance to Gutenberg’s invention of the printing press, and so it will be true with the Internet. Tim’s NeXT cube, in a case behind glass at CERN, will be viewed with the same reverence as Gutenberg’s first printing press (if it had survived, but you get where I’m going with this). Five hundred years from now, the major historical artifact from the 20th century will be a NeXT cube, that was, coincidentally, made by Steve Jobs. If you want to get your hands on a NEXT cube, be prepared to pony up, but Adafruit has a great authorial for running Openstep on a virtual machine. If you want the real experience, you can pick up a NeXT keyboard and mouse relatively cheaply.

Sometimes you need an RCL box, so here’s one on Kickstarter. Yeah, it’s kind of expensive. Have you ever bought every value of inductor?

Vintage Atari Becomes Modern Keyboard

The modern keyboard enthusiast is blessed with innumerable choices when it comes to typing hardware. There are keyboards designed specifically for gaming, fast typing, ergonomics, and all manner of other criteria. [iot4c] undertook their own build for no other reason than nostalgia – which sounds plenty fun to us.

An Arduino Leonardo is pressed into service for this hack. With its USB HID capabilities, it’s perfectly suited for custom keyboard builds. It’s built into a working Atari 65XE computer, and connected to the keyboard matrix. The Keypad and Keyboard libraries are pressed into service to turn keypresses on the 80s keyboard into easily digseted USB data.

There’s plenty of room inside the computer for the added hardware, with the USB cable neatly sneaked out the rear. [iot4c] notes that everything still works and the added hardware does not cause any problems, as long as it’s not used as a computer and a keyboard at the same time.

It’s possible to do a similar hack on the Commodore 64, too. If you’re doing tricky keyboard builds yourself, you know where to send ’em.

Custom Calculator Rolls D20 So You Don’t Have To

There are a number of sticking points that can keep new players away from complex tabletop games such as Dungeons & Dragons. Some people are intimidated by the math involved, and of course others just can’t find enough friends who are willing to sit down and play D&D with them in 2019. While this gadget created by [Caleb Everett] won’t help you get more open minded friends, it will take some of the mental gymnastics out of adding up dice rolls.

In its current form the device saves you from the hassle of not only having to roll various combinations of physical dice, but adding up all the faces after the fact as well. In the future [Caleb] plans on adding more advanced software features which will allow for tricks not possible with real dice, such as increasing the likelihood of rolling numbers which haven’t been seen in awhile. Now that the hardware is put together, he’s free to dig into the software side of things and really get creative.

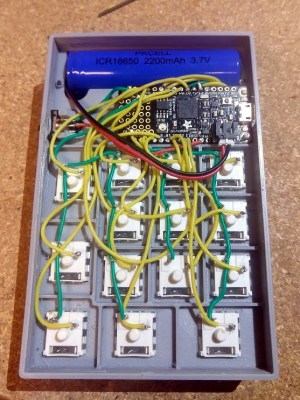
Inside the 3D printed case of his calculator there’s a Adafruit Feather M0 Express, a 128 x 32 OLED display, and a 2200 mAh lithium ion battery that lets him go mobile. The keys, which are Cherry MX clones, are wired directly to the digital pins of the Feather board as [Caleb] found that easier to wrap his head around than doing a matrix. This ended up working out as he had enough pins, but does stifle future expansion a bit.

Even if you aren’t into the sort of tabletop gaming which would benefit from an automatic dice roller and tabulator, we think [Caleb] has come up with a very neat form factor for similar pocket sized gadgets. It reminds us of the Handlink from Quantum Leap; before the prop department swapped it out for a jumble of gummy bears later on in the series, anyway. Since he’s shared the link to the OnShape project, you can even tweak the design a bit without having to suffer through modifying the STLs.

Many of the electronic dice we’ve seen in the past have tried to emulate the size and appearance of traditional dice, so it’s interesting to see this approach which goes in the opposite direction entirely. Critics might say that at some point you’d be better off just using a software application for your smartphone, but we’re not in the business of complaining when people produce interesting pieces of hardware.

Making A 1940s Radio Digital With Nixies

Classix Philly One Oh Seven Nine is your home for Philly soul right at the top of the dial. That phrase, ‘top of the dial’ doesn’t mean much these days because we all have radios with a digital display and seek buttons. There was a time when radios actually had dials, but [glasslinger] is in a class all by himself. He’s adding a digital display to a 1940s radio, and he’s doing it with Nixie tubes.

The circuitry for the digital display for this AM radio requires getting the frequency the radio is tuned to. This is done by counting the oscillator frequency, then subtracting the IF. [glasslinger] is doing this with an Arduino (hey, it’s a legitimate engineering choice) and a 4040 12-bit binary counter as a pre-scaler. The Arduino does the math and then drives a few 74141 Nixie drivers, which then display the frequency of the receiver in beautiful glass tubes. Add in a single neon bulb for the thousands digit, and you have a four-digit display that will tell you the frequency you’re tuned to on an old AM radio.

The rest of the build consists of fixing up an old radio and gluing the veneer down again with modern glues that will last another seventy years. The finished cabinet was sanded, a bezel for the display was added, and since [glasslinger] has the equipment, he made a new, long neon tube to light up with the volume of the radio. And you thought a cat’s eye detector was cool.

This build is a tour de force, and something that is so incredibly modern but at the same time built on vintage technology. If you’ve got an hour and a half, we highly recommend checking out the build video below.

Continue reading “Making A 1940s Radio Digital With Nixies”

Building A Magnetic Loop Antenna

Antennas come in many shapes and sizes, with a variety of characteristics making them more or less suitable for various applications. The average hacker with only a middling exposure to RF may be familiar with trace antennas, yagis and dipoles, but there’s a whole load more out there. [Eric Sorensen] is going down the path less travelled, undertaking the build of a self-tuning magnetic loop antenna. 

[Eric]’s build is designed to operate at 100W on the 20 meter band, and this influences the specifications of the antenna. Particularly critical in the magnetic loop design is the voltage across the tuning capacitor; in this design, it comes out at approximately 4 kilovolts. This necessitates the careful choice of parts that can handle these voltages. In this case, a vacuum variable capacitor is used, rated to a peak current of 57 amps and a peak voltage of 5 kilovolts.

The magnetic loop design leads to antenna which is tuned to a very narrow frequency range, giving good selectivity. However, it also requires retuning quite often in order to stay on-band. [Eric] is implementing a self-tuning system to solve this, with a controller using a motor to actuate the tuning capacitor to maintain the antenna at its proper operating point.

If you’re unfamiliar with magnetic loop builds, [Eric]’s project serves as a great introduction to both the electrical and mechanical considerations inherent in such a design. We’ve seen even more obscure designs though – like these antennas applied with advanced spray techniques.