IoT Safe Keeps Latchkey Kids’ Phones On Lockdown

Phones are pretty great. Used as telephones, they can save us from bad situations and let us communicate while roaming freely, for the most part. Used as computers, they often become time-sucking black holes that can twist our sense of self and reality. Assuming they pick up when you call, phones are arguably a good thing for kids to have, especially since you can hardly find a payphone these days. But how do you teach kids to use them responsibly, so they can still become functioning adults and move out someday? [Jaychouu] believes the answer is inside of a specialized lockbox.

This slick-looking box has a solenoid lock inside that can be unlocked via a keypad, or remotely via the OBLOQ IoT module. [Jaychouu] added a few features that drive it out of Arduino lockbox territory. To prevent latchkey children from cheating the system and putting rocks (or nothing at all) in the box, there’s a digital weight sensor and an ultrasonic sensor that validate the credentials of the contents and compare them with known values.

Want a basic lockbox to keep your phone out of reach while you work? Here’s one with a countdown timer.

Continue reading “IoT Safe Keeps Latchkey Kids’ Phones On Lockdown”

Intelligent Control For That Cheap Diesel Heater

If you own a caravan or a boat, you’ll know that keeping it warm can present something of a struggle. Open-flame gas heaters carry a risk of carbon monoxide poisoning, while solid fuel stoves are heavy and require safe flues. The prospect of a diesel heater then is enticing, bringing as they use a safer fuel and allow for easy external exhaust. Unfortunately they’ve been something of an expensive option, but the arrival of cheap imported heaters in recent years has made them an attractive choice. [Ray Jones] has improved upon their sometimes basic control electronics with the Afterburner, an intelligent controller that packs both ESP32 and HC-05 modules to both enhance the feature set and the connectivity of the devices.

The full list of capabilities is somewhat exhaustive but has a few stand-outs such as the ability to connect 1-wire temperature sensors to the system. It’s not compatible with all the heaters on the market, but there is a comprehensive guide to those models with which it can work. Meanwhile, all the code and other resources are available on GitLab should you wish to try it for yourself.

Diesel is something of a dirty word in 2019, but maybe biodiesel will save devices like this one.

Thanks [Bob] for the tip!

Larger-Than-Life Game Of Operation Is The Future Of Healthcare

It’s hard to beat the warm memories of Hasbro’s Operation, a game that boils down the fine art of surgery to removing farcically named plastic bones and organs. Just in case you can’t conjure up the memory, the game board looks just like this huge version of it, but normally  sits flat on the table and is no larger than… well, a board game. Players take turns using a tethered tweezer to remove butterflies from your stomach without touching the metal sides of the incision area. If the tweezers touch the metal, a buzzer goes off and the player loses a turn.

Of course, we now live in the future and robots do our difficult surgeries while the talented doctor looks on from a video console. So, [Ben] and [Jonathan] built themselves an oversized upright version of the game that includes a CNC-wielding surgery robot.

Delightfully, the controls are designed like a coin-op arcade machine and the three-axis CNC machine they’ve built is a new take on the claw machine. It has a gantry that moves left and right, a head that moves up and down along that gantry rail, and an actuator that moves in to snatch those pesky organs. Limit switches cut the power to the motors if the axis moves too far.

In true robosurgery fashion, there’s a webcam that goes along for the ride to give the surgeon a close-up look. Just stay away from those edges! There’s a button on the tip of the actuator that sets off the alarm if you miss the hole and hit the surface of the board, thereby ending your turn. Each organ is made of foam, faced with a piece of sheet metal, and hung from a hook made of coat hanger wire. That sheet metal allows the gripper to use an electromagnet to pick each piece up.

The project is called Sergio and you can see it demonstrated in the video below. We first met these hackers last fall at Maker Faire New York when they were showing off a giant Connect Four game where you play against the computer. It’s nice to hear they’ll be exhibiting Sergio at Philadelphia Maker Faire two weeks from now.

Continue reading “Larger-Than-Life Game Of Operation Is The Future Of Healthcare”

Can You Read Me The Time?

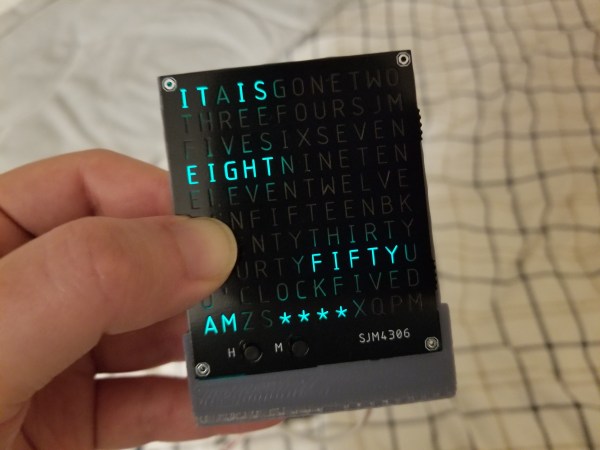
If you’re like the average clock user, you’ve probably gotten annoyed at reading analog clocks before. Typically, the solution is just to use a digital timepiece, but [sjm4306] has opted to make a small word clock that you can carry with you wherever you go to remind you of the time in the English language.

Unlike a similar project made by [Gordan Williams], which uses an 8 x 8 LED matrix with an inkjet printed overlay, this small word clock uses a 3D-printed light box to achieve its letter matrix. In fact, they were inspired by all of the existing DIY word clock designs using anything from off-the-shelf LED arrays, transparency masks and WS2812s.

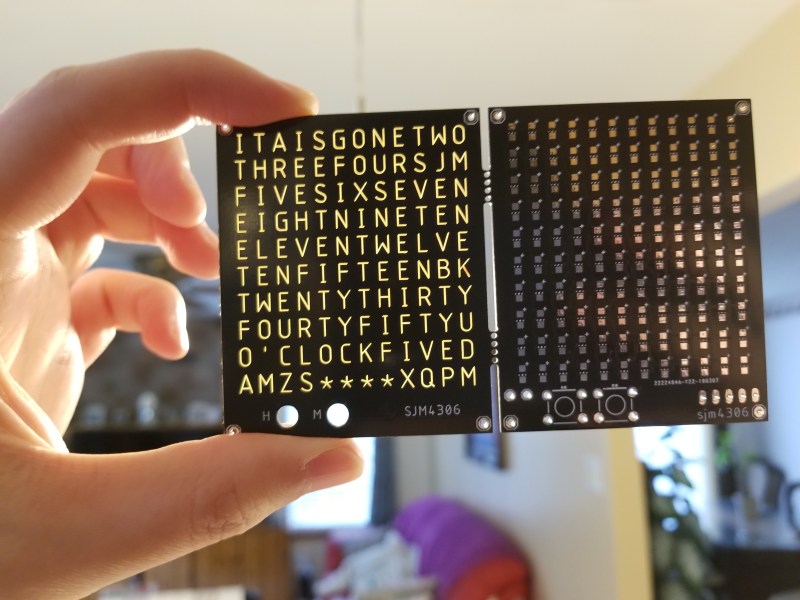
The design uses a home-brewed PCB design that runs off 5 V via USB. The design places the letters on the top stop and restricts layers to keep the solder mask and copper from obstructing the light. The bottom side uses the same design principle with a square shape that overlaps the letter. In order to block light between adjacent letters, the 3D-printed light box comes into play.

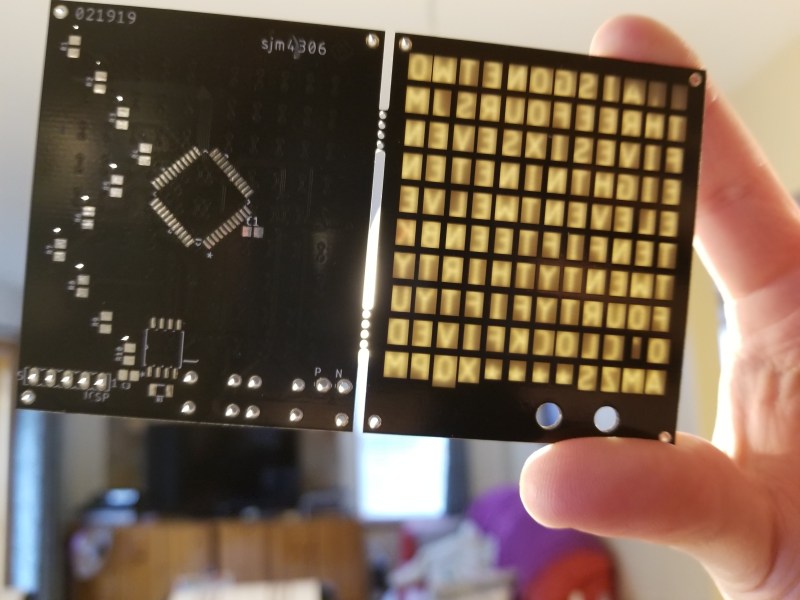
One design challenge for the letter matrix was fitting all possible minutes into the array. Rather than making a larger array of letters, [sjm4306] had the clock describe the time down to five-minute intervals then add asterisks for the full time. It’s a pretty understandable solution for keeping the design simple, and the letters all fit onto the design so well!

Using a pin map assigned to the I/O for the rows and columns of the array, the software toggles the states of the pins as a switch statement. For scanning the matrix, the software uses an interrupt that draws the current column of LEDs and updates the display image before incrementing to the next column. By skipping or not skipping cycles, this allows the display to look brighter or dimmer.

The time tracking is fairly simple, using a DS1302 serial real time clock chip – it even charges a super capacitor to keep time after power is removed!

To tackle the light scattered internally in the PCB’s FR4 material, a separator is used to contain the light. As a low-cost solution, while there is still some amount of light diffused, it’s definitely better than without the separator.

Almost all of the files used for building the small word clock are available on [sjm4306]’s project page, including the software and design files. It hopefully won’t be too long before we start seeing more of these low-cost word clock designs!

Continue reading “Can You Read Me The Time?”

[Mr. Carlson] Fixes A Fridge

A dead refrigerator is an occurrence determined to frustrate any homeowner. First there’s the discovery of hundreds of dollars in spoiled food, and then the cost of a repair call and the delay of the inevitable wait for parts. It’s clear to see why a hacker like [Mr. Carlson] would seek another way.

Now, normally a fridge repair video would by unlikely fodder for a Hackaday article. After all, there’s generally not much to a fridge, and even with the newer microprocessor-controlled units, diagnosis and repair are usually at the board-level. But [Mr. Carlson] has had this fridge since 2007, and he’s got some history with it. An earlier failure was caused by the incandescent interior lights welding relay contacts closed thanks to huge inrush currents when starting the cold filaments. That left the light on all the time, heating the interior. His fix was a custom solid-state relay using zero-crossing opto-isolators to turn the bulbs on or off only when the AC power was at a minimum.

That repair kept things going for years, but when the latest issue occurred, [Mr. Carlson] took a different tack. He assumed that a board that has been powered 24-7 for the last twelve years is likely to have a bad capacitor or two. He replaced all the caps, threw in a few new relays to be on the safe side, and powered the fridge back up. It whirred back to life, ready for another decade or so of service.

Kudos to [Mr. Carlson] for his great repair tips and his refusal to surrender. The same thing happened when his solder sucker started to give up the ghost and he fixed it by adding a variable-frequency drive.

Continue reading “[Mr. Carlson] Fixes A Fridge”

OpenLeg – The Open Source Robot Leg

There’s an old saying about standing on the shoulders of giants, but how about doing so with an open source leg? Well, your robots might do so at least, thanks to OpenLeg, a new open source project for building robot legs. Created by [Joey Byrnes], this started out as a senior project for a course at the University of Illinois. The idea is to create a robot leg that others can use to build four-legged robots that can amble around the neighborhood, much like those built by Boston Dynamics. Continue reading “OpenLeg – The Open Source Robot Leg”

Custom Game Pad Can Reprogram Itself

In the heat of the moment, gamers live and die by the speed and user-friendliness of their input mechanisms. If you’re team PC, you have two controllers to worry about. Lots of times, players will choose a separate gaming keyboard over the all-purpose 104-banger type.

When [John Silvia]’s beloved Fang game pad went to that LAN party in the sky, he saw the opportunity to create a custom replacement exactly as he wanted it. Also, he couldn’t find one with his desired layout. Mechanical switches were a must, and he went with those Cherry MX-like Gaterons we keep seeing lately.

This 37-key game pad, which [John] named Eyetooth in homage to the Fang, has a couple of standout features. For one, any key can be reprogrammed key directly from the keypad itself, thanks to built-in macro commands. It’s keyboard-ception!

One of the macros toggles an optional auto-repeat feature. [John] says this is not for cheating, though you could totally use it for that if you were so inclined. He is physically unable to spam keys fast enough to satisfy some single-player games, so he designed this as a workaround. The auto-repeat’s frequency is adjustable in 5-millisecond increments using the up /down macros. There’s a lot more information about the macros on the project’s GitHub.

Eyetooth runs on an Arduino Pro Micro, so you can either use [John]’s code or something like QMK firmware. This baby is so open source that [John] even has a hot tip for getting quality grippy feet on the cheap: go to the dollar store and look for rubber heel grippers meant to keep feet from sliding around inside shoes.

If [John] finds himself doing a lot of reprogramming, adding a screen with a layout map could help him keep track of the key assignments.