Building A Faux Retro Portable Computer

The modern laptop has its origins in the mid to late 1980s, when shrinking computer hardware and improvements to battery technology finally made mobile computing practical. But before the now iconic clamshell form factor became the standard, there was a market for so-called “portable” computers. These machines often resembled pieces of luggage with keyboards attached, and even at their peak, they were nowhere near as practical as today’s ultra-thin notebook computers. But for the more nostalgic among us, these vintage portables do have a special sort of charm about them.

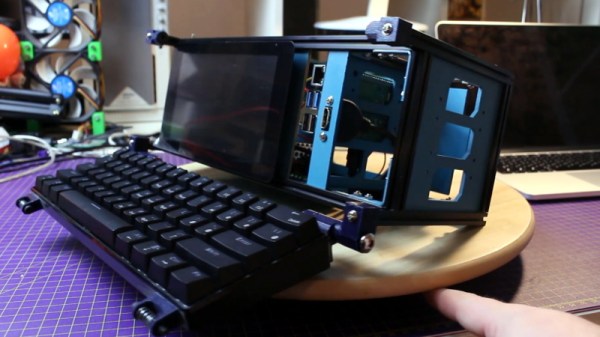
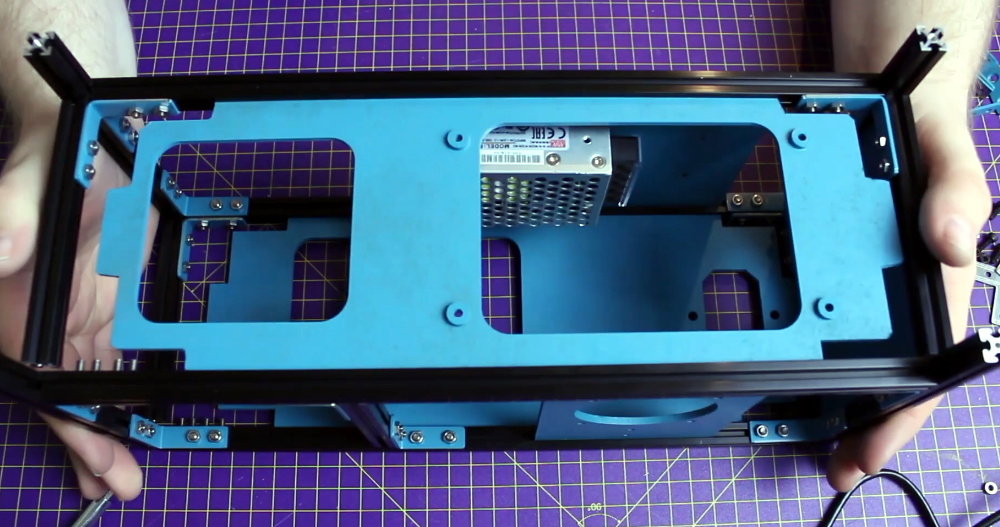
Looking to recapture some of that magic with modern components, [davedarko] has started working on his own Raspberry Pi portable computer. Just like those machines of yore, his build is designed to be a self-contained computing experience that you can lug around, but not exactly something you’d be popping open on the train. Its extruded aluminum frame holds the display, power supply, and audio hardware, with plenty of room to spare for additional hardware should he decide to pack in a couple hard drives or something more exotic.

The skeletal frame has plenty of room for activities.

We particularly like the 3D printed hinge and lock mechanism he designed that holds the keyboard closed against the front of the frame. Sufficiently old experienced readers will recall this particular feature being a defining characteristic of portables such as the Osborne 1 and Compaq Portable, and it’s great to see it included here. All it needs now is a leather handle on the side to complete the look.

[davedarko] still has some work ahead of him, as ultimately he’d like to completely enclose his computer’s frame with laser cut panels. But the build is certainly progressing nicely, and frankly, it’s already at the point where we’d have no problem pulling it out at the next hackerspace meetup. Between builds like this and the growing collection of cyberdecks we’ve covered recently, it looks as though 1980s design aesthetic is alive and well within the hacker community.

Continue reading “Building A Faux Retro Portable Computer”

Almond: Open Personal Assistant From Stanford

The current state of virtual personal assistants — Alexa, Cortana, Google, and Siri — leaves something to be desired. The speech recognition is mostly pretty good. However, customization options are very limited. Beyond that, many people are worried about the privacy of their data when using one of these assistants. Stanford Open Virtual Assistant Lab has rolled out Almond, which is open and is reported to have better privacy features.

Like most other virtual assistants, Almond has skills that determine what it can do. You can use Almond in a browser, on a Google phone, or as a command line application. It all lives on GitHub, so if you don’t like something you are free to fix it.

Continue reading “Almond: Open Personal Assistant From Stanford”

Hackaday Links Column Banner

Hackaday Links: December 1, 2019

We can recall a book from our youth that cataloged some of the most interesting airplanes in the world. One particularly interesting beast was dubbed “The Super Guppy”, a hilariously distended cargo plane purpose-built for ferrying Saturn rocket sections around the US in the 1960s. We though the Guppies were long gone, victims like so many other fascinating machines of the demise of the Apollo program. It turns out we were only 4/5 right about that, since one of the original five Super Guppies is still in service, and was spotted hauling an Orion capsule from Florida to Ohio for vacuum testing. The almost 60-year-old plane, a highly modified C-97 Stratofreighter, still has a big enough fan-base to attract 1500 people to brave the Ohio cold and watch it land.

The news this week was filled with reports from Texas of a massive chemical plant explosion that forced the evacuation of 50,000 people from their homes the day before Thanksgiving. The explosion and ensuing fire at the TPC Group petrochemical plant were spectacular; thankfully, there were no deaths and only two injuries reported from the incident. The tie-in to the hacker community lies in what this plant made: butadiene, or synthetic rubber. The plant produced about 16% of the North American market’s supply of butadiene, which we know from previous coverage is one of the polymers in acrylonitrile butadiene styrene, or ABS. It remains to be seen if this will put a crimp in ABS printer filament supplies, or any of the hundreds of products that butadiene is in, including automotive tires and hoses.

Remember when “Cyber Monday” became a thing? We sure do; in the USA, it was supposed to be the first workday back from the Thanksgiving break which would afford those lacking a fast Internet connection at home the opportunity to do online shopping on company time. The idea seems so year 2000 now, but the name stuck, and all kinds of sales and bargains are now competing for your virtual attention and cyber dollars. That includes Tindie, of course, where the Cyber Monday Sale is running through December 6. There’s tons to chose from, including products that got started as Hackaday.io projects and certified open-source hardware products. Be sure to check out the Tindie Twitter feed and blog for extra discount codes, too.

Speaking of gift-giving, we got an interesting tip about a product we never knew we needed. Called “WorkBench”, it’s a modular development system that takes care of an oft-neglected side of prototyping: the physical and mechanical layout. Too often we just start with a breadboard on the bench, and while that’ll do for lots of smaller projects, as the build keeps growing and the breadboards keep coming, things can get out of hand. WorkBench aims to tidy things up by providing a basal platen onto which breadboards, microcontrollers, perfboards, or just about anything else can be snapped. Handles make the whole thing portable, and a clear acrylic cover protects your hard work.

We love to hear stories about citizen science, especially when the amateurs scoop the professionals. Astronomy seems to be a hotbed for this brand of discovery, usually as a lone astronomer peering into the night sky to see a comet or asteroid nobody has seen before. Catching a glitching pulsar in the act is an entirely different level of discovery, though. Back in February, Steve Olney detected a 2.5 parts-per-million increase in the 89-millisecond period of emissions for the Vela pulsar using his RTL-SDR-based observatory. Steve has some fascinating information about pulsars and his observatory on his website. Color us impressed that he was able to pull off this observation without the benefit of millions of dollars in equipment and a giant parabolic dish antenna.

A STM32F4 Based Arduino In The Feather Form Factor

[minh7a6] loves the Adafruit Feather, but sees some room for improvement.

First is the matter of 5V tolerance. While just about everything is available in a 3.3v range these days, sometimes it’s just nice not to have to care. The main controller on the Feather is plenty powerful, but its intolerant pins just wouldn’t do so it was swapped for a chip from the ever popular STM32F4 line.

Then he wanted better energy efficiency when running from battery. In order to achieve this he switched from a linear regulator to a buck-boost converter. He also felt that the need for a separate SWD adapter for debugging seemed unnecessary, so he built a Black Magic Probe right in.

He’s just now finishing up the Arduino IDE support for the board, which is pretty cool. There’s no intention to produce this souped up Feather, but all the files are available for anyone interested.

Creating Easy Glass Circuit Boards At Home

This tip for creating glass substrate circuit boards at home might hew a bit closer to arts and crafts than the traditional Hackaday post, but the final results of the method demonstrated by [Heliox] in her recent video are simply too gorgeous to ignore. The video is in French, but between YouTube’s attempted automatic translation and the formidable mental powers of our beloved readers, we don’t think it will be too hard for you to follow along after the break.

The short version is that [Heliox] loads her Silhouette Cameo, a computer-controlled cutting machine generally used for paper and vinyl, with a thin sheet of copper adhered to a backing sheet to give it some mechanical strength. With the cutting pressure of the Cameo dialed back, the circuit is cut out of the copper but not the sheet underneath, and the excess can be carefully peeled away.

Using transfer paper, [Heliox] then lifts the copper traces off the sheet and sticks them down to a cut piece of glass. Once it’s been smoothed out and pushed down, she pulls the transfer paper off and the copper is left behind.

From there, it’s just a matter of soldering on the SMD components. To make it a little safer to handle she wet sands the edges of the glass to round them off, but it’s still glass, so we wouldn’t recommend this construction for anything heavy duty. While it might not be the ideal choice for your next build, it certainly does looks fantastic when mounted in a stand and blinking away like [Heliox] shows off at the end.

Ironically, when compared to some of the other methods of making professional looking PCBs at home that we’ve seen over the years, this one might actually be one of the easiest. Who knew?

Continue reading “Creating Easy Glass Circuit Boards At Home”

Turning A Bad Bench Supply Into A Better Bench Supply

‘Tis the season for dropping hints on what new doodads would make a hacker happy, and we have to admit to doing a little virtual window shopping ourselves. And as a decent bench power supply is on our list, it was no surprise to see videos reviews that the hive mind thinks will help us make a choice pop up in our feed. It’s a magical time to be alive.

What did surprise us was this video on a mashup of two power supplies, both of which we’ve been eyeing, with the result being one nicely hacked programmable bench PSU. It comes to us courtesy of [jeffescortlx], who suffered with one of those no-name, low-end 30V-5A bench supplies that has significant lag when changing the settings, to the point that it’s difficult to use, not to mention dangerous for sensitive components.

So he got a hold of a Riden RD6006 programmable buck converter, which is something like those ubiquitous DPS power supply modules we’ve seen so much of, only on steroids. The Riden takes up to 70V input and turns it into a 0-60V output at up to 6 amps, at constant current or constant voltage. It also just happens to (almost) fit as a replacement for the faceplate of the dodgy old supply. A few SMD resistors simulate the original front panel pots being pegged so that the supply outputs maximum voltage and current, and a little finagling with the case and fan was needed to fit everything up, but the finished product actually looks really good, and fixes all the problems of the original.

We love this hack, and may well cobble this together for our bench.

Continue reading “Turning A Bad Bench Supply Into A Better Bench Supply”

Manual Mesh Bed Levelling For 3D Printers

In 3D printing, we often talk about leveling the print bed, although that’s not an accurate term. A bed that is level in our terms presents a flat surface that is parallel to the path of the print head, but within reason we care little about that. Instead we care more about it being parallel to the path of the head than it being perfectly flat. If we had a perfectly flat bed — say a sheet of glass — you’d think it might be pretty easy, but for some other materials it could be convex or concave or even have ripples all over the place. [Teaching Tech] shows you how to manually “level” the bed using a mesh but without using an automatic sensor. You can see the technique in the video below.

When you use adjustments to level the bed, you are tramming it, but only the very pedantic use that term for fine adjustment. But no amount of adjusting bed springs will get rid of bulges and ripples. A common solution is to use a sensor to measure the distance to the bed and form a mesh correction. Then, as the printer head moves in the XY plane, the software will adjust the Z-axis to rise over bumps and go down if there is a concave portion of the bed. What [Teaching Tech] is doing, however, is a manual mapping. You won’t need to add a sensor to your printer to take advantage of the method. 

Continue reading “Manual Mesh Bed Levelling For 3D Printers”