An Affordable Home Made Vacuum Chamber

The term “vacuum” means many different things depending whether you are working on space equipment, scientific instruments, or even internal combustion engines. In our sphere it is so often used as a means to draw bubbles out of resin castings, for which it is a relatively easily achievable partial vacuum. It’s something [Fab] is using, in a vacuum chamber made from Plexiglass.

A simple Plexiglass box would collapse under the air pressure on its own, so to mitigate that it’s made from a piece of tube, and with an internal frame of aluminium extrusion with 3D printed joints to strengthen it from the inside. A pressure sensor allows regulation of the pump that drives the vacuum, and connections are made to the chamber using pneumatic hose connectors. It’s not immediately clear how it is sealed, whether there are nay gaskets or other sealant, or whether air pressure pushing the parts together provides enough of a seal.

We’ve featured a lot of vacuum chambers made for this purpose over the years, and we’d be interested to know what vacuum pump is being used here. If  you’re curious too and want to build your own, perhaps you could try a fridge compressor.

Faux Vintage Radio Gets AirPlay Upgrade

There’s plenty of vintage-styled hardware out these days, with quality and functionality being mixed at best. [Huan] found such a device in the form of an attractively-styled Bluetooth speaker. Deciding he could improve on the capabilities while retaining a stock look, he got down to hacking.

The aim of the project was to keep the original volume knob, buttons and screen, while replacing the internals with something a bit more capable. A Raspberry Pi Zero was sourced as the brains of the operation, with the Google Voice AIY hardware used as the sound output after early attempts with a discrete amplifier faced hum issues. An Arduino Pro Micro was pressed into service to read the volume encoder along with the buttons and drive the charlieplexed LED screen. Shairport Sync was then installed on the Pi Zero to enable Airplay functionality.

It’s a basic hack that nonetheless gives [Huan] an attractive AirPlay speaker, along with plenty of useful experience working with Arduinos and Raspberry Pis. We’ve seen similar hacks before, too. If you’re working on your own stereo resurrection at home, be sure to drop us a line!

Hantek 3-in-1 Instrument Reviewed

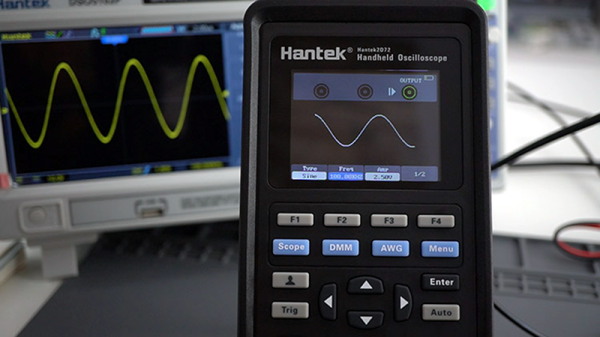
What kid doesn’t want a Swiss Army knife? Maybe that was the idea behind Hantek’s 3-in-1 instrument that [Rui Santos] reviewed in a recent blog post. You can also watch the video version, below. The instrument is a combination oscilloscope, multimeter, and signal generator. The device is pretty inexpensive and comes in 40 MHz and 70 MHz versions. You can also get versions that drop the function generator if you want to save a little bit more.

The multimeter does 4000 counts and has the usual scales along with capacitance measurements. Rechargeable batteries make it portable, and the signal generator is capable up to 25 MHz. The scope is dual channel, but the sampling drops in half (125 megasamples per second) when using both channels.

The 2.8 inch color screen isn’t as big as your bench scope, but it’s good for a portable device. The review also mentions that there are few buttons so many operations require a lot of menu navigation, but — again — that’s a function of being small. Overall, [Rui] seemed to like the meter well enough. We’ve spent more on a good digital meter, so if this can do that function plus also give you a reasonable scope and signal generator, it seems like a fair deal.

This reminded us of a very polished version of the EM125 we took a look at a few years ago, although that didn’t have a color screen, a second channel, or a signal generator. Of course, signal generators are cheap enough if you want to keep it separate.

Continue reading “Hantek 3-in-1 Instrument Reviewed”

Hackaday Links Column Banner

Hackaday Links: June 28, 2020

You can imagine how stressful life is for high-power CEOs of billion-dollar companies in these trying times; one is tempted to shed a tear for them as they jet around the world and plan their next big move. But now someone has gone and upset the applecart by coming up with a way to track executive private jets as they travel across North America. This may sound trivial, but then you realize that hedge fund managers pay big money for the exact same data in order to get an idea of who is meeting with whom and possibly get an idea of upcoming mergers and acquisitions. It’s also not easy, as the elites go to great lengths to guard their privacy. Luckily, the OpenSky Network lists all ADS-B traffic its web of ground stations receives, unlike other flight monitoring sites which weed out “sensitive” traffic. Python programs scrape the OpenSky API and cross-reference plane registrations with the FAA database to see which company jets are doing what. There are plenty of trips to Aspen and Jackson Hole to filter out, but with everyone and his little brother fancying themselves a day trader lately, it’s another tool in the toolbox.

We got a nice note from Michelle Thompson this week thanking us for mentioning the GNU Radio Conference in last week’s Links article, and in particular for mentioning the virtual CTF challenge that they’re planning. It turns out that Michelle is deeply involved in designing the virtual CTF challenge, after having worked on the IRL challenges at previous conferences. She shared a few details of how the conference team made the decision to go forward with the virtual challenge, inspired in part by the success of the Hack-A-Sat qualifying rounds, which were also held remotely. It sounds like the GNU Radio CTF challenge will be pretty amazing, with IQ files being distributed to participants in lieu of actually setting up receivers. We wish Michelle and the other challenge coordinators the best of luck with the virtual con, and we really hope a Hackaday reader wins.

Amateur radio is often derided as a hobby, earning the epithet “Discord for Boomers” according to my son. There’s more than a grain of truth to that, but there are actually plenty of examples where a ham radio operator has been able to make a big difference in an emergency. Case in point is this story from the Western Massachusetts ARRL. Alden Jones (KC1JWR) was hiking along a section of the Appalachian Trail in southern Vermont last week when he suddenly got light-headed and collapsed. A passing hiker who happened to be an emergency medical technician rendered aid and attempt to contact 911 on his cell phone, but coverage was spotty and the dispatcher couldn’t hear him. So Alden, by this point feeling a little better, pulled out his handy talkie and made an emergency call to the local repeater. Luckily the Western Massachusetts Traffic Net was just about to start, so they went into emergency mode and coordinated the response. One of the hams even went to the rescue staging area and rigged up a quick antenna to improve the signal so that rescuers could finally get a helicopter to give Alden a ride to the hospital. He’s fine now, and hats off to everyone who pitched in on the eight-hour rescue effort.

And finally, there are obviously a lot of details to be worked out before anyone is going to set foot on the Moon again. We’ve got Top People™ working on all the big questions, of course, but apparently NASA needs a little help figuring out how and where the next men and first women on the Moon are going to do their business. The Lunar Loo Challenge seeks innovative designs for toilets that can be used in both microgravity and on the lunar surface. There is $35,000 in prize money for entrants in the Technical division; NASA is also accepting entries in a Junior division, which could prove to be highly entertaining.

Mini Library For Kids Gets Blinky Lights And Solar Upgrade

Reading is big in Québec, and [pepelepoisson]’s young children have access to a free mini library nook that had seen better days and was in dire need of maintenance and refurbishing. In the process of repairing and repainting the little outdoor book nook, he took the opportunity to install a few experimental upgrades (link in French, English translation here.)

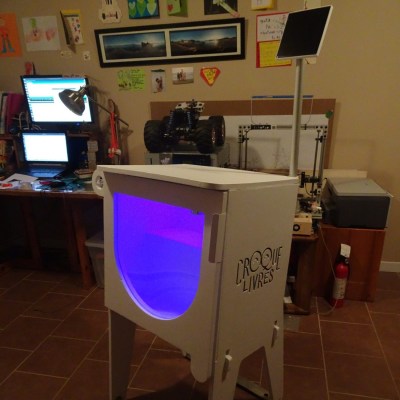
The mini library pods are called Croque-Livres, part of a program of free little book nooks for children across Québec (the name is a bit tricky to translate into English, but think of it as “snack shack, but for books” because books are things to be happily devoured.)

After sanding and repairs and a few coats of new paint, the Croque-Livres was enhanced with a strip of WS2812B LEDs, rechargeable battery with solar panel, magnet and reed switch as door sensor, and a 3.3 V Arduino to drive it all. [pepelepoisson]’s GitHub repository for the project contains the code and CAD files for the 3D printed pieces.

The WS2812B LED strip technically requires 5 V, but as [pepelepoisson] found in his earlier project Stecchino, the LED strip works fine when driven directly from a 3.7 V lithium-polymer cell. It’s not until around 3 V that it starts to get unreliable, so a single 3.7 V cell powers everything nicely.

When the door is opened, the LED strip lights up with a brief animation, then displays the battery voltage as a bar graph. After that, the number of times the door as been opened is shown on the LED strip in binary. It’s highly visual, interactive, and there’s even a small cheat sheet explaining how binary works for anyone interested in translating the light pattern into a number. How well does it all hold up? So far so good, but it’s an experiment that doesn’t interfere at all with the operation of the little box, so it’s all good fun.

Reproduction 1960s Computer Trainer Really Pushes Our Buttons

If you were selling computers in the early 1960s you faced a few problems, chief among them was convincing people to buy the fantastically expensive machines. But you also needed to develop an engineering force to build and maintain said machines. And in a world where most of the electrical engineers had cut their teeth on analog circuits built with vacuum tubes, that was no easy feat.

To ease the transition and develop some talent, Digital Equipment Corporation went all out with devices like the DEC H-500 Computer Lab, which retrocomputing wizard [Michael Gardi] is currently building a reproduction of. DEC’s idea was to provide a selection of logic gates, flip flops, and other elements of digital electronics that could be hooked together into more complicated circuits. We can practically see the young engineers in their white short-sleeve shirts and skinny ties laboring over the H-500 in a lab somewhere.

[Mike] is fortunate enough to have have access to an original H-500, but he wants anyone to be able to build one. His project page and the Instructables post go into great detail on how he made everything from the front panel to the banana plug jacks; almost everything in the build aside from the wood frame is custom 3D printed to mimic the original as much as possible. But the pièce de résistance is those delicious, butterscotch-colored DEC rocker switches. Taking some cues from custom switches he had previously built, he used reed switches and magnets to outfit the 3D printed rockers and make them look and feel like the originals. We can’t wait for the full PDP build.

Hats off to [Mike] for another stunning reproduction from the early years of the computer age. Be sure to check out his MiniVac 601 trainer, the Digi-Comp 1 mechanical computer, and the paperclip computer. If you’d like to pick [Mike’s] brain about this or any of his other incredible projects, he’ll be joining us for a Hack Chat in August.

Thanks to [Granzeier] for the tip!

Calcuino Is An Arduino Calculator

All by itself, a calculator based on an Arduino isn’t necessarily very novel. However, [Danko Bertović] of Volos Projects has a nice board that, of course, looks like a calculator. There are 16 keys and an LED display. But it seems to us the real value would be using this as a base for other projects.

As an inexpensive development board, it’s handy to have a simple processor with a keyboard and a display. There’s some extra I/O pins and the first example in the video below shows using the setup as a simple organ, for example. We’d love to see an option to replace the LED with an LCD and maybe even some different CPU options, as well.

The board is essentially an Arduino with a standard USB to serial chip and a MAX7219 display driver. Of course, you could breadboard up all of these things, but it wouldn’t be as neat looking. One unusual thing about the keyboard is that it is not multiplexed. Each button has a label that indicates what Arduino pin it connects with. So key 6 connects to pin 6 and pin A2 connects to the key marked =/A2.

With the availability of inexpensive PC boards, we’re seeing many nice designs out there that would be easy to repurpose for other things. For example, we thought this board would easily run the Kim Uno, with some modifications to the I/O routines. Might even be able to work out a clone of an even older computer to fit on the board.

Continue reading “Calcuino Is An Arduino Calculator”