How Science Adapted To The Aftermath Of Cold War Nuke Tests

Current global events have demonstrated that we do not live in the most stable of times. Still, most of us 90’s kids are probably glad that we did not have to endure the political shakiness of the Cold War era when people were living in constant fear of nuclear Armageddon. Nuclear weapons tests were common during this period as the United States and the Soviet Union invested heavily to increase the quality and quantity of their warheads in the race for nuclear supremacy.

Even though the political situation stabilized after the fall of the Soviet Union, the consequences of the vast amount of nuclear tests conducted back then are still noticeable today. Besides the devastating effects on human health and the environment, this period also leaves some implications for science which are not always negative.

Continue reading “How Science Adapted To The Aftermath Of Cold War Nuke Tests”

DIYing A VR Headset For Cheap

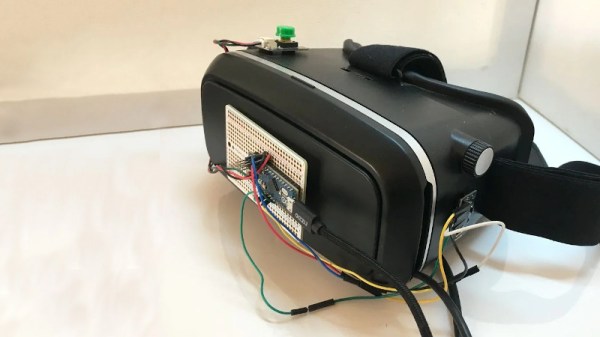
VR has been developing rapidly over the past decade, but headsets and associated equipment remain expensive. Without a killer app, the technology has yet to become ubiquitous in homes around the world. Wanting to experiment without a huge investment, [jamesvdberg] whipped up a low-cost headset for under $100 USD.

The build relies on Google-Cardboard-style optics, which are typically designed to work with a smartphone as the display. Instead, an 800×480 display intended for use with the Raspberry Pi is installed, hooked up over HDMI. An MPU6050 IMU is then installed to monitor the headset’s movements, hooked up to an Arduino Micro that passes this information to the attached PC. The rest of the build simply consists of cable management and power supply to all the hardware. It’s important to get this right, so that one doesn’t get tangled up by the umbilical when playing.

While it won’t outperform a commercial unit, the device nevertheless offers stereoscopic VR at a low cost. For a very cheap and accessible VR experience that’s compatible with the PC, it’s hard to beat. Others have done similar work too. Video after the break.

Continue reading “DIYing A VR Headset For Cheap”

Fusion For STM32: Development Board With Debugging And Programming Via WiFi

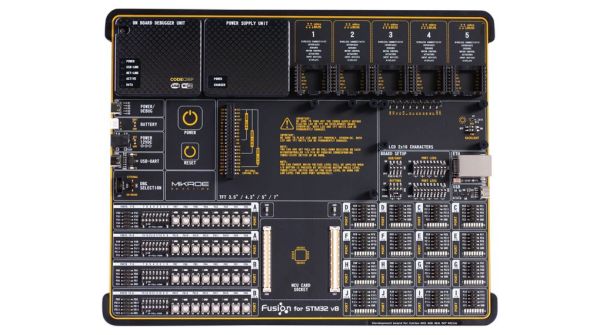
Clearly profiling itself as the Lamborghini or Ferrari of the STM32 development board world, MikroElektronika’s current (8th) revision of their Fusion development board was released last year with support for not only flashing but also debugging the attached STM32 MCU via the onboard WiFi module. The Serbian company’s pricing for the bare board without MCU modules or any other peripherals appears to be around 300 USD/Euro. Additional MCU boards cost between $28 – $60 each.

As the official product page explains, the board is combined with the CodeGrip software to manage the board either via USB-C (driver-free) – which also allows one to configure the WiFi option – and via WiFi. Peripheral boards are added via the 5 onboard MikroBUS expansion slots, either with existing boards, or custom MikroBUS boards. The power supply is also onboard, powered via USB, a barrel jack connector, or an external battery.

The use of WiFi to connect to the board would allow for it to be easily managed and debugged when it’s in a less convenient location than one’s desk, which would seem like a major boon.

Obviously it’s not a cheap board, and the MCU cards each cost about as much as a Nucleo or Discovery board from ST would cost, making it hard to justify purchasing it for anything but a professional environment. However, the tantalizing thing here is probably that so much of the design details are available, from the expansion bus to the pin-out and schematic of the MCU cards (STM32F767ZG version).

The MCU cards use the Hirose FX10A-168S-SV and FX10A-168P-SV(71) connectors, all readily available. This opens the possibility of developing compatible MCU cards. An MCU card template project can for example be found here.

Credit Card Chip Used To Make Crystal Radio

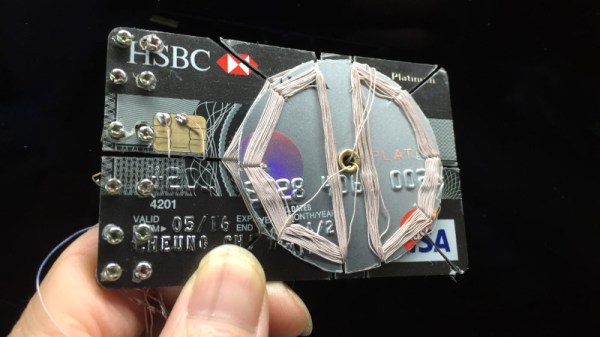
Perhaps the simplest radio one can build is the crystal radio. Using a diode as a detector, the design generally uses less than 10 components and no battery, getting its power to run from the radio signal itself. [Billy Cheung] decided to build a crystal radio using a rather unconventional detector – the smart chip in a common credit card.

This is possible because the smart chip on many credit cards contains a diode. It’s then a simple matter of hooking up the right pads on the credit card to the rest of a crystal radio circuit, and you’re all set. Of course, [Billy] goes the whole hog, building the entire radio on a single credit card. Other cards are cut up to create bobbins for winding coils to form a variable inductor, used to tune the radio. Doing this allows for a much cleaner, thinner design, rather than using a variable capacitor which is comparatively hard to find. Turning the dial allows stations to be tuned in, and with a high impedance earbud hooked up, you’re listening to AM radio. Oh, and don’t forget an antenna!

[Billy] breaks down the details for anyone wishing to replicate the feat, going so far as to wind the coils in real time in his Youtube video. Cutting templates and other details are available on Github. While it’s not going to be the most replicated hack, as it requires the destruction of a credit card to achieve, we love the ingenuity. And, if society does collapse, we’ll all have a great source of diodes when the ATMs have all become useless. Video after the break.

[Thanks to Zane Atkins for the tip!]

Continue reading “Credit Card Chip Used To Make Crystal Radio”

Python Is All You’ll Ever Need In This Linux Distro

Choosing the perfect Linux distribution that satisfies your personal needs and likings can be an impossible task, and oftentimes requires a hint of Stockholm syndrome as compromise. In extreme cases, you might end up just rolling your own distro. But while frustration is always a great incentive for change, for [Josh Moore] it was rather curiosity and playful interest that led him to create snakeware, a Linux distribution where the entire user space not only runs on Python, but is Python.

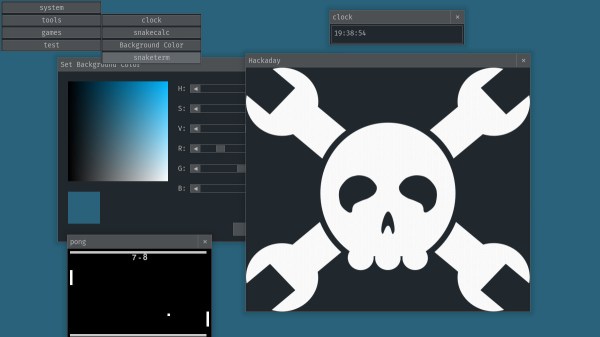
Imagine you would boot your Linux system, and instead of the shell of your choice, you would be greeted by an interactive Python interpreter, and everything you do on the system will be within the realms of that interpreter — that’s the gist of snakeware. Now, this might sound rather limiting at first, but keep in mind we’re talking about Python here, a language known for its versatility, with an abundance of packages that get things done quick and easy, which is exactly what [Josh] is aiming for. To get an idea of that, snakeware also includes snakewm, a graphical user interface written with pygame that bundles a couple of simple applications as demonstration, including a terminal to execute Python one-liners.

Note that this is merely a proof of concept at this stage, but [Josh] is inviting everyone to contribute and extend his creation. If you want to give it a go without building the entire system, the GitHub repository has a prebuilt image to run in QEMU, and the window manager will run as regular Python application on your normal system, too. To get just a quick glimpse of it, check the demo video after the break.

Sure, die-hard Linux enthusiasts will hardly accept a distribution without their favorite shell and preferable language, but hey, at least it gets by without systemd. And while snakeware probably won’t compete with more established distributions in the near future, it’s certainly an interesting concept that embraces thinking outside the box and trying something different. It would definitely fit well on a business card.

Continue reading “Python Is All You’ll Ever Need In This Linux Distro”

The Easiest Way To Put Your Doorbell On The Internet

Thanks to low-cost WiFi enabled microcontrollers such as the ESP8266 and ESP32, it’s never been a better time to roll your own smart home system. But that doesn’t mean it isn’t daunting for new players. If you’re looking for an easy first project, putting your old school doorbell on the Internet of Things is a great start, but even here there’s some debate about how to proceed.

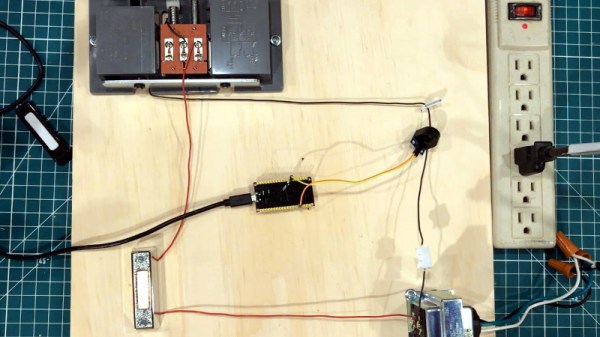
Most people stumble when they get to the point where they have to connect their low-voltage microcontroller up to the relatively beefy transformer that drives a standard doorbell. We’ve seen a number of clever methods to make this connection safely, but this tip from [AnotherMaker] is probably the easiest and safest way you’re likely to come across.

His solution only requires an inductive current sensor, which can be had for less than $1 from the usual overseas suppliers. One leg of the doorbell circuit is passed through the center of this sensor, and the sensor itself is connected up to your microcontroller of choice (here, and ESP32). The rest is software, which [AnotherMaker] explains in the video after the break. With the addition of a little debounce code, your microcontroller can reliably determine when somebody is out there jabbing the bell button; what you do with this information after that is up to you.

If you’re worried this method is too easy you could always try it with an optocoupler, or maybe convert the low-voltage AC to something your microcontroller can handle.

Continue reading “The Easiest Way To Put Your Doorbell On The Internet”

Cast Metal From Prints To Solidify Childhood Memories

As far as the hacker’s toolbox goes, the 3D printer is way up there in terms of utility. Sure, it takes time to learn the ins and outs of designing, slicing, and extruding, but after that, the world is pretty much your additive oyster. Follow those design dreams, or use it to replace the things that break. The icing on the cake? You can chase those dreams into other materials, because 3D prints can be used to cast metal.

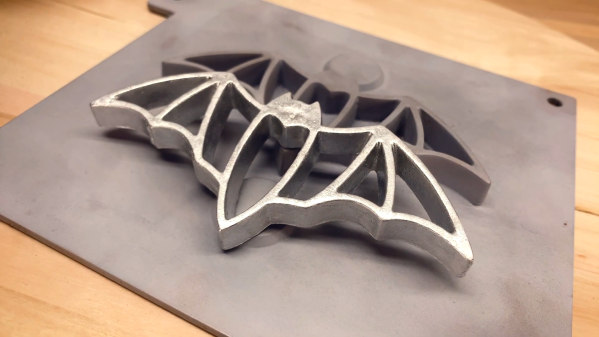
[RetroTech Journal] wanted to fry up some rosette cookies, a Scandinavian delight from his youth that look a lot like fancy, personal funnel cakes. They’re made with special aluminium irons that shape the dough while it fries, as opposed to the jumbled chaos that is funnel cake.

Rosette irons come in a few traditional shapes, but once you get tired of those, it’s up to you to cast them in aluminium. And how would you go about doing that? By creating a firmly-packed sand mold using a mounted 3D print.

In the endlessly entertaining video after the break, [RetroTech Journal] takes you through the entire process from CAD to cookies. It has everything you could possibly want: LEGO stop-motion, claymation, a little bit of cooking, and a whole lot of knowledge. We can’t wait to see what comes next.

We’ve seen quite a few sand casting projects over the years, but this lathe is among the most useful.

Continue reading “Cast Metal From Prints To Solidify Childhood Memories”