A Great Resource For The Would-Be Pinball Machine Builder

Those of us beyond a certain age will very likely have some fond memories of many an hour spent and pocket money devoured feeding the local arcade pinball machine. At one time they seemed to be pretty much everywhere, but sadly, these days they seem to have largely fallen out of favour and are becoming more of speciality to be specifically sought out. Apart from a few random ones turning up — there’s a fun Frankenstein-themed machine in the Mary Shelley Museum in Bath, England — a trip to a local amusement arcade is often pretty disappointing, with modern arcade machines just not quite scratching that itch anymore, if you ask us. So what’s an old-school hacker to do, but learn how to build a machine from scratch, just the way we want it? A great resource for this is the excellent Pinball Makers site, which shows quite a few different platforms to build upon and a whole ton of resources and guides to help you along the way.

Continue reading “A Great Resource For The Would-Be Pinball Machine Builder”

Arduino And Git: Two Views

You can’t do much development without running into Git, the version control management system. Part of that is because so much code lives on GitHub which uses Git, although you don’t need to know anything about that if all you want to do is download code. [Dr. Torq] has a good primer on using Git with the Arduino IDE, if you need to get your toes wet.

You might think if you develop by yourself you don’t need something like Git. However, using a version control system is a great convenience, especially if you use it correctly. There’s a bug out in the field? What version of the firmware? You can immediately get a copy of the source code at that point in time using Git. A feature is broken? It is very easy to see exactly what changed. So even if you don’t work in a team, there are advantages to having source code under control.

Continue reading “Arduino And Git: Two Views”

Motorcycle Voltage Regulator Uses MOSFETs

For how common motorcycles are, the designs and parts used in them tend to vary much more wildly than in cars and trucks. Sometimes this is to the rider’s advantage, like Honda experimenting with airbags or automatic transmissions. Sometimes it’s a little more questionable, like certain American brands holding on to pushrod engine designs from the ’40s. And sometimes it’s just annoying, like the use of cheap voltage regulators that fail often and perform poorly. [fvfilippetti] was tired of dealing with this on his motorcycle, so he built a custom voltage regulator using MOSFETs instead.

Unlike a modern car alternator, which can generate usable voltage even at idle, smaller or older motorcycle alternators often can’t. Instead they rely on a simpler but less reliable regulator that is typically no more than a series of diodes, but which can only deliver energy to the electrical system while the motor is running at higher speeds. Hoping to improve on this design, [fvfilippetti] designed a switched regulator from scratch out of MOSFETs with some interesting design considerations. It is capable of taking an input voltage between 20V and 250V, and improves the ability of the motorcycle to use modern, higher-power lights and to charge devices like phones as well.

In the video below, an LED was added in the circuit to give a visual indication that the regulator is operating properly. It’s certainly a welcome build for anyone who has ever dealt with rectifier- or diode-style regulators on older bikes before. Vehicle alternators are interesting beasts in their own right, too, and they can be used for much more than running your motorcycle’s electrical system.

Continue reading “Motorcycle Voltage Regulator Uses MOSFETs”

ITman496 in his ATV, using the trashcan lifter to lift a trashcan up in the air. The lifter is a contraption mounted to the front of his ATV, welded together with square tubing

Equipping An ATV With A Trashcan Lifter

[ITman496] is one of us hackers working his way around health problems, in his case, a back injury. He is eager to solve various difficulties he has to deal with, and in case of the video he made, it was about moving a large trashcan through ice-covered roads on his property. Not willing to risk his health any further and dissatisfied with the flimsy solutions for sale requiring him to do the heavy lifting, still, he designed and built a winch-powered trashcan lifter mechanism – not entirely unlike a forklift. He mounted it to his ATV, tested it, improved upon it, filming his progress along the way – and then made a video detailing the entire build for us!

Having sketched the concept on his phone, he modeled and tested it in SketchUp, then cut and welded the parts, describing a welding alignment trick along the way – using 3D-printed joints to hold the two parts-to-be-welded together for tack welds, ensuring nigh-perfect alignment. Initial testing was a success! From there, he describes a good few surprising but in retrospect expected ease-of-use improvements that didn’t crop up during simulations, like adding chamfers to the scoop, so that he doesn’t have to angle his ATV super precisely to pick the trashcan up. In the end, having used it for about a month now, he tells us it’s been working extremely well for his purposes!

Not all such garbage cans need to be taken out, thankfully – some of them go voluntarily, and you can even get smaller ones that catch stuff you throw from across the room. We’ve covered the adventures of [ITman496] before, learning lessons from a failed robot build in 2016., and adopting an ultralight plane in 2018!

Continue reading “Equipping An ATV With A Trashcan Lifter”

A small PCB with an OLED screen showing a Dinosaur Game

Hackaday Prize 2022: RunTinyRun Is A Fully Solar-Powered, Portable Dinosaur Game

Fully solar-powered handheld gadgets have so far mostly been limited to ultra-low power devices like clocks, thermometers and calculators. Anything more complicated than that will generally have a battery and some means to charge it. An entirely solar-powered video game console is surely out of reach. Or is it? As [ridoluc] shows, such a device is actually possible: the RunTinyRun gets all its power directly from the Sun.

To be fair, it’s not really a full-fledged game console. In fact it doesn’t even come close to the original Game Boy. But RunTinyRun is a portable video game with an OLED display that’s completely powered by a solar panel strapped to its back. It will run indefinitely if you’re playing outside on a sunny day, and if not, letting it charge for a minute or two should enable thirty seconds of play time.

The game it runs is a clone of Google’s Dinosaur Game, where you time your button presses to make a T-Rex jump over cacti. As you might expect, the game runs on an extremely minimalist hardware platform: the main CPU is an ATtiny10 six-pin micro with just 1 kB of flash. The game is entirely written in hand-crafted assembly, and takes up a mere 780 bytes. A 0.1 farad supercap powers the whole system, and is charged by a 25 x 30 mm2 solar cell through a boost converter.

RunTinyRun is a beautiful example of systems design within strict constraints on power, code size and board area. If you’re looking for a more capable, though slightly less elegant portable gaming console, have a look at this solar-powered Game Boy.
A Dinosaur Game implementation running on a breadboard setup

Building A Swiss Army Lab With Software Defined Instrumentation

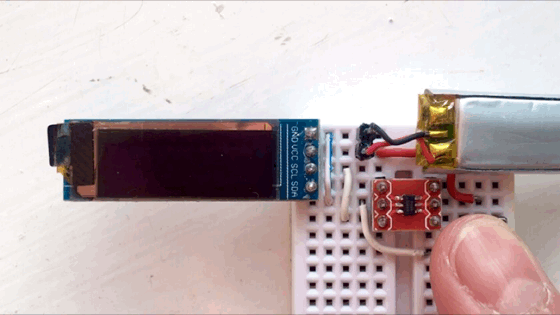
It’s a fair bet that anyone regularly reading Hackaday has a voltmeter within arm’s reach, and there’s a good chance an oscilloscope isn’t far behind. But beyond that, things get a little murky. We’re sure some of you have access to a proper lab full of high-end test gear, even if only during business hours, but most of us have to make do with the essentials due to cost and space constraints.

The ideal solution is a magical little box that could be whatever piece of instrumentation you needed at the time: some days it’s an oscilloscope, while others it’s a spectrum analyzer, or perhaps even a generic data logger. To simplify things the device wouldn’t have a physical display or controls of its own, instead, you could plug it into your computer and control it through software. This would not only make the unit smaller and cheaper, but allow for custom user interfaces to be created that precisely match what the user is trying to accomplish.

Wishful thinking? Not quite. As guest host Ben Nizette explained during the Software Defined Instrumentation Hack Chat, the dream of replacing a rack of test equipment with a cheap pocket-sized unit is much closer to reality than you may realize. While software defined instruments might not be suitable for all applications, the argument could be made that any capability the average student or hobbyist is likely to need or desire could be met by hardware that’s already on the market.

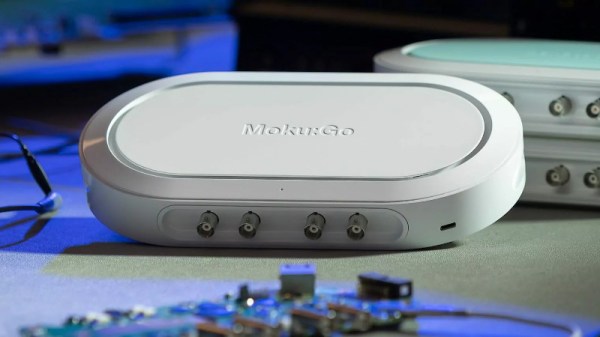
Ben is the Product Manager at Liquid Instruments, the company that produces the Moku line of multi-instruments. Specifically, he’s responsible for the Moku:Go, an entry-level device that’s specifically geared for the education and maker markets. The slim device doesn’t cost much more than a basic digital oscilloscope, but thanks to the magic of software defined instrumentation (SDi), it can stand in for eleven instruments — all more than performant enough for their target users.

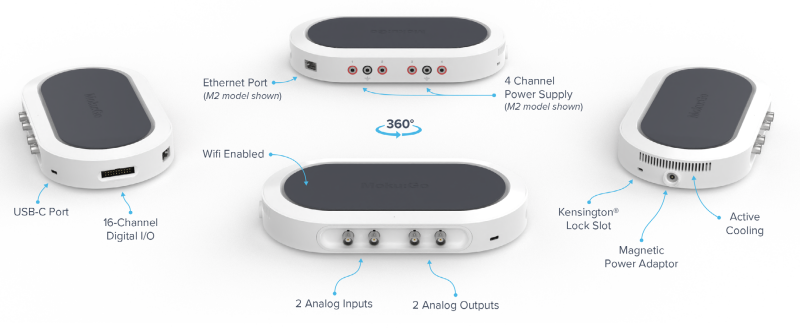
So what’s the catch? As you might expect, that’s the first thing folks in the Chat wanted to know. According to Ben, the biggest drawback is that all of your instrumentation has to share the same analog front-end. To remain affordable, that means everything the unit can do is bound by the same fundamental “Speed Limit” — which on the Moku:Go is 30 MHz. Even on the company’s higher-end professional models, the maximum bandwidth is measured in hundreds of megahertz.

Additionally, SDI has traditionally been limited to the speed of the computer it was attached to. But the Moku hardware manages to sidestep this particular gotcha by running the software side of things on an internal FPGA. The downside is that some of the device’s functions, such as the data logger, can’t actually live stream the data to the connected computer. Users will have to wait until the measurements are complete before they  pull the results off, though Ben says there’s enough internal memory to store months worth of high-resolution data.

Of course, as soon as this community hears there’s an FPGA on board, they want to know if they can get their hands on it. To that end, Ben says the Moku:Go will be supported by their “Cloud Compile” service in June. Already available for the Moku:Pro, the browser-based application allows you to upload your HDL to the Liquid Instruments servers so it can be built and optimized. This gives power users complete access to the Moku hardware so they can build and deploy their own custom features and tools that precisely match their needs without a separate development kit. Understanding that obsolescence is always a problem with a cloud solution, Ben says they’re also working with Xilinx to allow users to do builds on their own computers while still implementing the proprietary “secret sauce” that makes it a Moku.

It’s hard not to get excited about the promise of software defined instrumentation, especially with companies like Liquid Instruments and Red Pitaya bringing the cost of the hardware down to the point where students and hackers can afford it. We’d like to thank Ben Nizette for taking the time to talk with the community about what he’s been working on, especially given the considerable time difference between the Hackaday Command Center and Liquid’s Australian headquarters. Anyone who’s willing to jump online and chat about FPGAs and phasemeters before the sun comes up is AOK in our book.


The Hack Chat is a weekly online chat session hosted by leading experts from all corners of the hardware hacking universe. It’s a great way for hackers connect in a fun and informal way, but if you can’t make it live, these overview posts as well as the transcripts posted to Hackaday.io make sure you don’t miss out.

Hackaday Podcast 166: Engraving With The Sun, Explosive Welding, Juggling Chainsaws, And Torturing Wago Connectors

Join Hackaday Editor-in-Chief Elliot Williams and Staff Writer Dan Maloney as they dive into the last week of Hackaday articles. If you love things that go boom, you won’t want to miss the discussion about explosive welding. Ever use the sun to burn something with a magnifying glass? Now you can CNC that, if you dare. We’ll take a quick trip through the darkroom and look at analog-digital photography as well as a tactical enlarger you can build, watch someone do terrible things to Wago and Wago-adjacent connectors, and talk about how suborbital chainsaws can be leveraged into a mass storage medium. Not enough for you? Then don’t miss our bafflement at one corporation’s attitude toward 3D printing, the secret sauce of resin casting, and our rundown of the 2022 Sci-Fi Contest winners.


Direct download!

Check out the links below if you want to follow along, and as always, tell us what you think about this episode in the comments below!

Continue reading “Hackaday Podcast 166: Engraving With The Sun, Explosive Welding, Juggling Chainsaws, And Torturing Wago Connectors”