HP-200LX Runs Website Like It’s The 90s

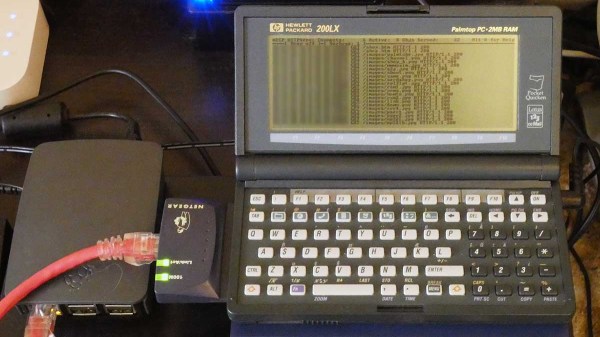
The HP-200LX palmtop was a fascinating machine for its time, and [Terrence Vergauwen] proves that its time is not yet over, given that one is responsible for serving up the website for Palmtop Tube, a website and YouTube channel dedicated to vintage palmtops.

All by itself a HP-200LX doesn’t have quite what it takes to act as a modern web server, but it doesn’t take much to provide the missing pieces. A PCMCIA network adapter provides an Ethernet connection, and a NAS contains the website content while networking and web server software run locally. Steady power comes from a wall adapter, but two rechargeable AA cells in the 200LX itself act as a mini-UPS, providing backup power in case of outages.

The HP-200LX was a breakthrough product that came just at the right time, preceding other true palm top computers like the IBM PC 110. In the early 90s, it was unimaginable that one could have a fully functional MS-DOS based machine in one’s pocket, let alone one that could last weeks on a couple of AA cells. It didn’t have some proprietary OS and weird ports, and that kind of functionality is part of why, roughly 30 years later, one is able to competently serve up web traffic.

A video overview of the machine and how it all works is in the video embedded below. And if you’re more interested in what an HP-200LX looks like on the inside? This video is all about taking apart and repairing a 200LX.

Continue reading “HP-200LX Runs Website Like It’s The 90s”

A Receive Antenna Switcher With An Espressif Brain

It’s not uncommon for a radio enthusiast to have multiple antennas for the same radio, so as you might expect it’s also entirely usual to have a bunch of coaxial cables dangling down for fumbling around the back of the rig to swap over.  If that describes your radio experience than you might be interested in the antenna switcher built by [g3gg0], which uses solid-state RF switches controlled by an ESP32 module.

At its heart is the MXD8625C RF switch, a tiny device designed for cellular phone applications that delivers only a fraction of a dB insertion loss and somehow negates the need for any blocking capacitors. It’s controlled by a GPIO line, and he’s hooked up a brace of them to allow the distribution of three antennas to a couple of radios with the handy option of switching in a preamplifier if required. Of even more interest we note that the device is suitable for transmitter switching too, with a maximum 36.5 dBm throughput that we calculate to be about 4.5 W. This board is fairly obviously for receive use, but perhaps the chip is of interest to anyone considering a transceiver project. Meanwhile the software is a relatively simple web-based control linking on-screen controls to GPIOs.

If you are interested in solid state RF switches, it’s always worth remembering that at lower frequencies they can be very simple indeed.

One Solution, Many Problems

You might think you’re lucky when one of your problems has multiple solutions, and you get to pick and choose, but you’re even luckier when one solution has many problems! This week I stumbled on an old solution in a new place. The project was a fantastic old MIDI guitar build, the Tryndelka by [Aleksandr Goltsov]. And the old solution? Switch matrix diodes.

You see, [Aleksandr] is making an electric guitar where the strings are pulled up to a certain voltage and then make contact with metal frets. Each fret is cut into six pieces, so that the strings can be read out individually, and the microcontroller scans each string in succession to test if it’s pressed down or not. Done, right? Wrong! The problem comes when two or more strings are pressed at once — the electrical path from the string you want will travel through the closed switch on a string that you’re not scanning. The solution is a ton of diodes.

I learned this problem the hard way in wiring up a MAME cabinet, at about 3 A.M. the night before we were going to bring it to Shmoocon. We finally got the whole USB/button code working, so we played some celebratory rounds of Street Fighter. We eventually noticed that hitting one button, or even moving the joystick in a particular direction, would block some of the other buttons from working, or change their function entirely. Quick Internet search later, and we were hand soldering 64 diodes until dawn. Good times!

But the fact that switch matrices need diodes, and exactly why, is forevermore burned in my brain. It’s fun to see it pop up in all sorts of contexts, from DIY keyboards to MIDI guitars, to Charliplexing. (It’s the “D” in LED!) It’s one of the classics — a solution to many problems.

TurtleAuth DIY Security Token Gets (Re)designed For Durable, Everyday Use

[Samuel]’s first foray into making DIY hardware authentication tokens was a great success, but he soon realized that a device intended for everyday carry and use has a few different problems to solve, compared to a PCB that lives and works on a workbench. This led to TurtleAuth 2.1, redesigned for everyday use and lucky for us all, he goes into detail on all the challenges and solutions he faced.

When we covered the original TurtleAuth DIY security token, everything worked fantastically. However, the PCB layout had a few issues that became apparent after a year or so of daily use. Rather than 3D print an enclosure and call it done, [Samuel] decided to try a different idea and craft an enclosure from the PCB layers themselves.

The three-layered PCB sandwich keeps components sealed away and protected, while also providing a nice big touch-sensitive pad on the top, flanked by status LEDs. Space was a real constraint, and required a PCB redesign as well as moving to 0402 sized components, but in the end he made it work. As for being able to see the LEDs while not having any component exposed? No problem there; [Samuel] simply filled in the holes over the status LEDs with some hot glue, creating a cheap, effective, and highly durable diffuser that also sealed away the internals.

Making enclosures from PCB material can really hit the spot, and there’s no need to re-invent the wheel when it comes to doing so. Our own [Voja Antonic] laid out everything one needs to know about how to build functional and beautiful enclosures in this way.

The Thin-Film Flexible 6502

While our attention is mostly directed towards ever smaller-integrated silicon circuits providing faster and faster computing, there’s another area of integrated electronics that operates at a much lower speed which we should be following. Thin-film flexible circuitry will provide novel ways to place electronics where a bulky or expensive circuit board with traditional components might be too expensive or inappropriate, and Wikichip is here to remind us of a Leuven university team who’ve created what is claimed to be the fastest thin-film flexible microprocessor yet. Some of you might find it familiar, it’s our old friend the 6502.

The choice of an archaic 8-bit processor might seem a strange one, but we can see the publicity advantage — after all, you’re reading about it here because of it being a 6502. Plus there’s the advantage of it being a relatively simple and well-understood architecture. It’s no match for the MHz clock speeds of the original with an upper limit of 71.4 kHz, but performance is not the most significant feature of flexible electronics. The production technology isn’t quite ready for the mainstream so we’re unlikely to be featuring flexible Commodore 64s any time soon, but the achievement is the impressive feat of a working thin-film flexible microprocessor.

Meanwhile, if you’re curious about the 6502, we took a look at the life of its designer, [Chuck Peddle].

Sisyphean Ball Race Robot Toils Gracefully, Magnetically

Aren’t ball races and marble runs fun? Wouldn’t they be so much more enjoyable if you didn’t have to climb back up the ladder each time, as it were, and reset the thing? [Johannes] wrote in to tell us about a wee robot with the Sisyphean task of setting a ball bearing on a simple but fun course, collecting it from the end, and airlifting it back to the start of the track.

[Johannes] built this ‘bot to test small-scale resin printing strength as well as the longevity of some tiny linear actuators from Ali that may or may not be available at a moment’s notice. The point was to see how these little guys fared when connected directly to an Arduino or other microcontroller, rather than going the safer route with a motor driver of some kind.

Some things worked well, like the c-clips that keep the axles together, and using quick pulses to release the magnetically-linked ball from the gripper. Other aspects didn’t work out so well. Tiny resin parts do not respond well to force, for starters. And then there’s the actuators themselves. The connections are fragile and the motors are weak, but they vary wildly in quality from piece to piece, so YMMV. Some lose steps, and others occasionally seize. But you wouldn’t know any of that from the graceful movement capture in the video below. Although it appears to be automated, the bot is under remote control because of the motor issues.

Not into ball runs? There are other Sisyphean tasks available, such as moving sand around in the name of meditation.

Continue reading “Sisyphean Ball Race Robot Toils Gracefully, Magnetically”

many revisions of the ball and socket robot

Practice Makes Perfect For This Ball And Socket Robot

Ball and socket joints are useful, but making a part slide over the surface of a sphere, held by magnets, requires a lot of fiddling to get right. We admire persistence and nailing all the details. [Matthew Finlay] has been doing just that with his ball and socket robot. He’s on version six, a testament to his desire to do the idea justice. Luckily for us, he’s documented each version as he went.

Version one, made from a DIY Christmas ornament ball, had no stability around the radial axis, and oscillated badly. Version two demonstrated the problem of centering the mechanism in the ball. Version 3 fixed this problem (it’s covered in the same video). Then version four fixed many of the assembly issues and replaced the servo controllers with an Arduino, but the ‘arm’ piece was too small and mechanically iffy.

Version five used a fabricated bearing. Matthew used airsoft rounds as the balls. Not a good idea. And assembly was a nightmare. So all this progress up to version six shows his improving technique.  Artists say ‘work on your process, not on your pieces’. He’s become much more analytic about what’s needed. He’s started measuring the strength of the robot, and handled issues like adding limit switches so it doesn’t crash at the limits of travel.

Fun build, reminds us of [Stephen Dufresne]’s BB-8.

Continue reading “Practice Makes Perfect For This Ball And Socket Robot”