CAPSTONE: The Story So Far

After decades of delays and false starts, NASA is finally returning to the Moon. The world is eagerly awaiting the launch of Artemis I, the first demonstration flight of both the Space Launch System and Orion Multi-Purpose Crew Vehicle, which combined will send humans out of low Earth orbit for the first time since 1972. But it’s delayed.

While the first official Artemis mission is naturally getting all the attention, the space agency plans to do more than put a new set of boots on the surface — their long-term goals include the “Lunar Gateway” space station that will be the rallying point for the sustained exploration of our nearest celestial neighbor.

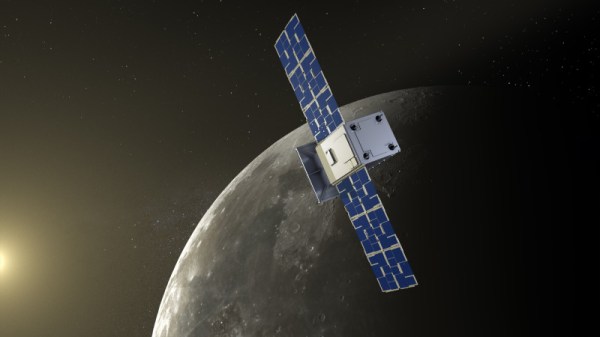
But before launching humanity’s first deep-space station, NASA wants to make sure that the unique near-rectilinear halo orbit (NRHO) it will operate in is as stable as computer modeling has predicted. Enter the Cislunar Autonomous Positioning System Technology Operations and Navigation Experiment, or CAPSTONE.

CAPSTONE in the clean room prior to launch.

Launched aboard an Electron rocket in June, the large CubeSat will hopefully become the first spacecraft to ever enter into a NRHO. By positioning itself in such a way that the gravity from Earth and the Moon influence it equally, maintaining its orbit should require only periodic position corrections. This would not only lower the maintenance burden of adjusting the Lunar Gateway’s orbit, but reduce the station’s propellant requirement.

CAPSTONE is also set to test out an experimental navigation system that uses the Lunar Reconnaissance Orbiter (LRO) as a reference point instead of ground-based stations. In a future where spacecraft are regularly buzzing around the Moon, it will be important to establish a navigation system that doesn’t rely on Earthly input to operate.

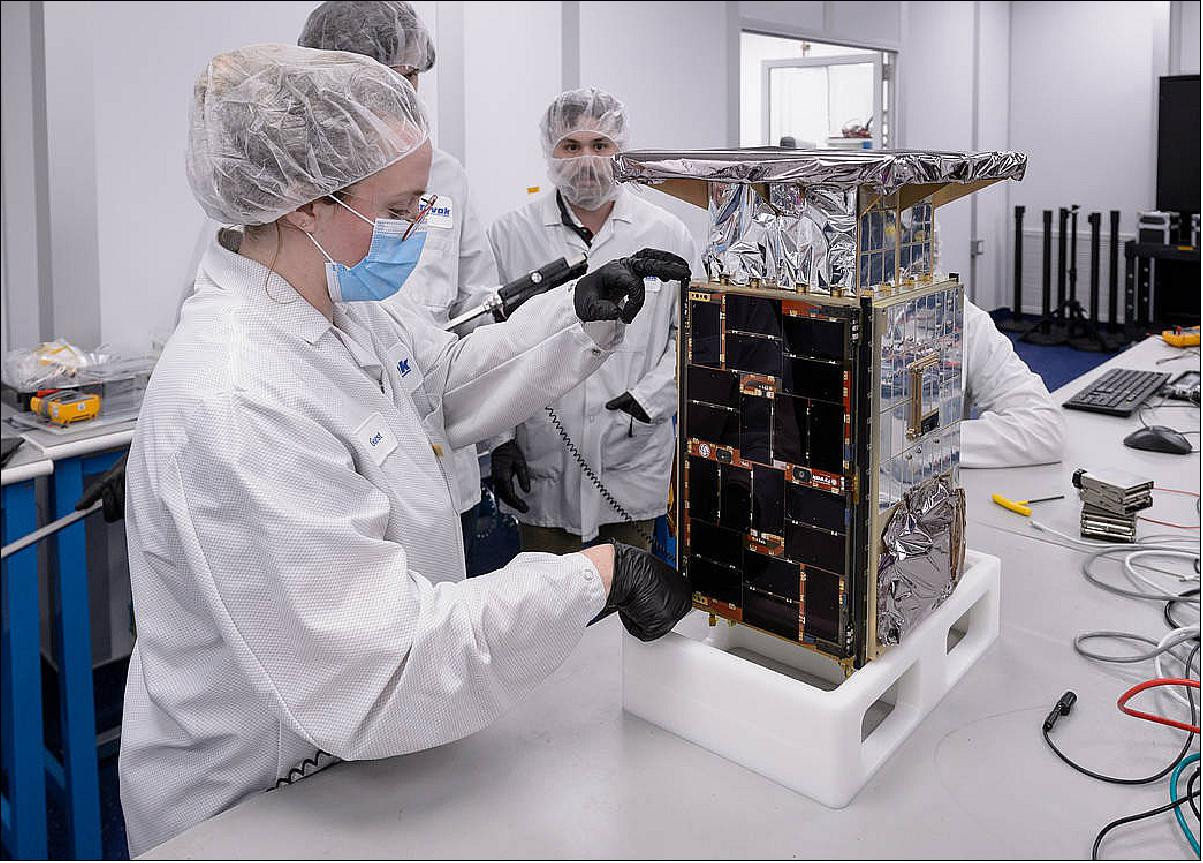
So despite costing a relatively meager $30 million and only being about as large as a microwave oven, CAPSTONE is a very important mission for NASA’s grand lunar aspirations. Unfortunately, things haven’t gone quite to plan so far. Trouble started just days after liftoff, and as of this writing, the outcome of the mission is still very much in jeopardy.

Continue reading “CAPSTONE: The Story So Far”

Overhead satellite view of a coal-fired power plant next to a heat map showing the suitability of terrain in the region for siting a nuclear power plant

Coal To Nuclear Transition To Decarbonize The Grid

We love big projects here at Hackaday, and one of the biggest underway is the decarbonization of the electric grid. The US Department of Energy (DOE) recently published a report (PDF) on how placing nuclear reactors on coal plant sites in the US could help us get closer to the zero carbon grid of our dreams.

After evaluating both operating and recently retired coal-fired plants in the US, the researchers determined that around 80% of medium and large coal plants would be good candidates for coal to nuclear (C2N). Up to 263 GWe could be installed at over 315 different sites around the country which would be more than the 145 GWe expected to go offline as the remaining coal plants in the country shut down. Siting nuclear reactors at these existing sites could reduce installation costs 15-35% while also providing jobs for workers in the area who might otherwise be displaced when the coal plants shut down. Local greenhouse gas emissions (GHG) could drop up to 86% along with a significant drop in other air pollutants which would be another win for the fenceline communities living and working around these coal plants.

Nuclear power is certainly not without its drawbacks, but new reactor designs like TerraPower’s Natrium promise lower costs than current light water reactor designs while also being able to reuse the spent fuel from our current nuclear fleet. TerraPower is developing the first C2N project in the US at the Naughton Power Plant in Kemmerer, Wyoming.

We’ve recently covered Cogeneration and District Heating which would get a boost from more nuclear power, but, if that’s too grounded for you, might we suggest Space-Based Solar Power?

An All-In-One Serial Printer Playground

One of the peripherals of most desire for a microcomputer-obsessed youth in the 1980s was a printer, probably a dot-matrix device. In the decades since, printers have passed into being almost a piece of discardable junk as cheap inkjets can be found in any garage sale. That’s not to say that there’s not plenty of fun to be had hacking older types though, and there are plenty of small thermal printers out there to play with. [Tanmoydutta] has provided a platform that may help, in the form of an ESP32-C3-based serial printer controller.

On board is a level shifter for the 5 volt printer electronics and all the appropriate connectors for the printer, as well as the ESP and onboard USB interface. It’s a networked print server, but one which is entirely and completely hackable. We think the printer in question is this one sold by Adafruit.

So this board makes easier a whole host of printer-related projects, and should you try it you will no doubt finding yourself ankle-deep in little curly pieces of paper. This printer’s not the only one in town though, don’t forget the cheap Bluetooth printers!

3D Print Yourself A Tiny Steam Train Complete With Smoke Effects

Model trains are fun, but sometimes little whirring motors in electric models feel a long way from the hulking metal beasts of the real railways. [Lewis] of [DIY Machines] adds back some of the flavor with this little steam train build, smoke effects included!

The body of the train itself is 3D printed in PLA. It’s designed to O-gauge scale, and comes complete with models for 3D printed track as well. The parts are given a coat of paint to better approximate the finish of the real thing; sometimes bare plastic just won’t suffice, after all.

Propulsion is thanks to an onboard battery and a simple gearmotor, driven by a HG7881 motor driver. An ESP32-CAM is responsible for running the show, allowing the train to be commanded wirelessly. As a bonus, the camera is mounted in the very front of the train, allowing one to watch a livestream of its progress about the tracks. Meanwhile, the smoke effect is thanks to a small water atomizer fitted in the train’s chimney, which makes the train look that little bit more authentic.

The combination of a self-powered train and 3D-printed tracks is a compelling one. [Lewis] has been able to leave his PETG 3D-printed track outside for over two years and it’s still in working order. That’s not something easy to achieve when using metal rails to deliver power.

Overall, this is a fun way to get into building your own model trains, and is a lot more hands-on than simply buying pre-built models from a store. From there, the sky is really the limit for your creativity! Video after the break.

Continue reading “3D Print Yourself A Tiny Steam Train Complete With Smoke Effects”

Trojans Can Lurk Inside AVR Bootloaders

If there’s one thing we’ve learned over the years, it’s that if it’s got a silicon chip inside, it could be carrying a virus. Research by one group focused on hiding a trojan inside an AVR Arduino bootloader, proving even our little hobbyist microcontrollers aren’t safe.

The specific aim of the research was to hide a trojan inside the bootloader of an AVR chip itself. This would allow the trojan to remain present on something like a 3D printer even if the main firmware itself was reinstalled. The trojan would still be able to have an effect on the printer’s performance from its dastardly hiding place, but would be more difficult to notice and remove.

The target of the work was the ATmega328P, commonly used in 3D printers, in particular those using the Marlin firmware. For the full technical details, you can dive in and read the research paper for yourself. In basic terms, though, the modified bootloader was able to use the chip’s IVSEL register to allow bootloader execution after boot via interrupt. When an interrupt is called, execution passes to the trojan-infected bootloader’s special code, before then returning to the program’s own interrupt to avoid raising suspicion. The trojan can also execute after the program’s interrupt code too, increasing the flexibility of the attack. Continue reading “Trojans Can Lurk Inside AVR Bootloaders”

Metric And Inch Threads Fight It Out For Ultra-Precise Positioning

When you’re a machinist, your stock in trade is precision, with measurements in the thousandths of your preferred unit being common. But when you’re a diemaker, your precision game needs to be even finer, and being able to position tools and material with seemingly impossibly granularity becomes really important.

For [Adam Demuth], aka “Adam the Machinist” on YouTube, the need for ultra-fine resolution machinist’s jacks that wouldn’t break the bank led to a design using off-the-shelf hardware and some 3D printed parts. The design centers around an inch-metric thread adapter that you can pick up from McMaster-Carr. The female thread on the adapter is an M8-1.25, while the male side is a 5/8″-16 thread. The pitches of these threads are very close to each other — only 0.0063″, or 161 microns. To take advantage of this, [Adam] printed a cage with compliant mechanism springs; the cage holds the threaded parts together and provide axial preload to remove backlash, and allows mounting of precision steel balls at each end to make sure the force of the jack is transmitted through a single point at each end. Each full turn of the jack moves the ends by the pitch difference, leading to ultra-fine resolution positioning. Need even more precision? Try an M5 to 10-32 adapter for about 6 microns per revolution!

While we’ve seen different thread pitches used for fine positioning before, [Adam]’s approach needs to machining. And as useful as these jacks are on their own, [Adam] stepped things up by using three of them to make a kinematic base, which is finely adjustable in three axes. It’s not quite a nanopositioning Stewart platform, but you could see how adding three more jacks and some actuators could make that happen.

Continue reading “Metric And Inch Threads Fight It Out For Ultra-Precise Positioning”

Old Barcode Scanner Motherboards Live Again

Sometimes, hacking is just for the pleasure of diving into the secrets of old hardware. That was very much the case when [glitch] and a friend started hacking on some old Intel 8080 boards that had been living in the junk pile for too long.

The boards in question were motherboards from Identicon barcode scanners, running the Intel 8080 CPU. Hacking on the 8080 is a little different, with the ancient CPU requiring three separate voltages to run. However, with the power rails figured out and power applied, it was possible to get the old boards up and running.

The boards were first run with test ROMs which showed the 8080 CPU to be functional. The ROMs hosted a simple program which got the 8080 to spit out the word “HELO” on to an HP HDSP-2416 ASCII character display. From there, the barcode scanner boards were installed in a chassis and hooked up to a bigger Siemens character display, and the memory was mapped out.

The result was that [glitch] and co were able to largely reverse engineer the Identicon hardware, learning it was fairly similar to the Intel MCS-80 reference design of the era. They were able to get code running on the platform, access the RAM, and fit a larger 8-character display. However, without the original barcode scanner attachment, the boards weren’t able to return to their original duty.

As far as hacks go, it’s pretty old school. The boards don’t talk to Twitter, nor run the lights or help with the dishes. However, plenty of fun was had seeing if this old metal could be made to follow instructions once more. Hacking for the pleasure of it is always a good thing by our book!