Printable Carbide Opens Up Interesting Possibilities

Sandvik, a large company headquartered in Sweden, has apparently been producing cemented carbide for a long time — according to them, since 1932. The material is known for being highly wear-resistant. Now the company says they have a process to 3D print the material. You can see a video about the new material, below.

If you haven’t encountered this material, it is essentially fine carbide particles bound in metal. You’ll find the material widely used in cutting tools. The slogan “Freedom of Design has Never Been Harder” is both clever and confusing, but we took their point.

The process is more or less like other metal binder technology. A powder of tungsten carbide and cobalt mixed with glue creates a green body which you still need to fire to get to the finished part.

What kind of things can you make? Here’s a quote from one of Sandvik’s engineers:

For instance, in wire drawing, productivity is usually limited by how fast the wire can be drawn with maintained quality, which in turn depends on the temperature in the wire drawing die. People have been trying to solve this problem for decades, but it’s been extremely difficult. A 3D printed, cooled wire nib is the answer to this riddle. It took a mere four days to produce, from the first basic sketch to the fully sintered product – thanks to our materials and proprietary process.

Don’t plan on loading up your Ender 3 with cemented carbide filament. This is, after all, a metal material. However, 3D printing can offer geometries that would be difficult to obtain with traditional methods. So even if you have to turn to a professional 3D printing shop, it is good to know you can create in this ultra-hard material.

Printing in metal has a different set of issues than using plastics. If you really want your current printer to do metal, it can, but you’ll have to cheat a bit. Or try electroplating.

Continue reading “Printable Carbide Opens Up Interesting Possibilities”

This Week In Security: OpenSSH, Git, And Sort-of NGINX 0-day

OpenSSH has minted their 9.0 release, and it includes a pair of security changes. Unlike most of the releases we cover here, this one has security hardening to prevent issues, not emergency fixes for current ones. First up, the venerable scp/rcp protocol has been removed. Your scp commands will now use SFTP under the hood. The more interesting security change is the new default key exchange, the NTRU algorithm. NTRU is thought to be quantum-hard.
Continue reading “This Week In Security: OpenSSH, Git, And Sort-of NGINX 0-day”

Mini DarkTower Clone Restores Your Childhood

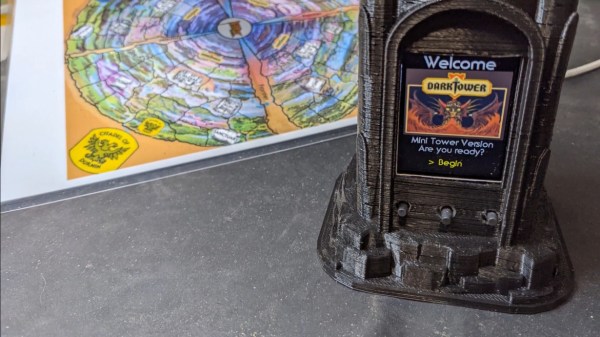
Remember DarkTower? No? Well, it’s a really cool combination board game, RPG, and computer game from 1981. Orson Welles pimped it on TV and explained it thusly: “collect three keys, lay siege to the tower, and defeat the enemy within”. The Tower itself was a battery-powered computer on lazy Susan that showed numbers on a couple of 7-segment displays, pictures via three carousels, and had a 12-button keypad. Thanks to a lawsuit, few copies remain, and even fewer of them are in working condition.

Working copies of DarkTower go for hundreds online, but who can afford such an extravagance when these 40+ year old towers are prone to battery leakage and loose connections? Certainly not [Mighty Studios], who was hoping to give the gift of DarkTower to a friend and decided to build a mini reproduction instead. Fortunately for us, the project is completely open source. You can check out the build video below, which has plenty of links, including one that goes to the code.

In this day and age, it doesn’t take much to reproduce the internals of the Tower. [Mighty Studios] pulled it off with a Feather S2, a 320 x 420 TFT LCD screen, a speaker, and a couple of momentary buttons. The screen can show all the pictures, (which were only displayed one at a time in the original game anyway), any necessary numbers, and all the requisite menu options.

[Mighty Studios] got mighty lucky when it came to the case, as [Stinkevil] had already created a dice tower version and put it on Thingiverse. After a bit of tweaking and some hole-punching, [Mighty Studios] had a mini tower scaled to the Feather S2 with just enough room to stuff in all the components and wires. Between a PDF of the original rule book and someone’s Java version of the game, [Mighty Studios] had plenty to use as a guide for programming in the rule set before mailing it off to their friend. We have to admit, we’re pretty jealous.

Don’t want to amass an army and conquer evil forces? There are all types of board games you could emulate with a microcontroller.

Continue reading “Mini DarkTower Clone Restores Your Childhood”

This DIY UPDI Programmer Is Nice And Cheap

[Daumemo] likes experimenting with DIY electronics, and like many people, eventually ran across an AVR microcontroller with a Unified Program and Debug Interface (UPDI). One option is of course to purchase an UPDI programmer, but an even better solution was to make a DIY USB version from nice, cheap parts.

Programming an Attiny404 over the UPDI interface.

UPDI is an interface for external programming and on-chip debugging of microcontrollers, and [Daumemo]’s solution is based on the jtag2updi project. It combines an Arduino Nano (in this case, a clone) with a single resistor, a single capacitor, and a six pin angled header (with a cleverly bent pin) to enable programming UPDI devices over a USB connection. [Daumemo] is happy to report that the device works just fine in both Microchip Studio with AVRDUDE, or PlatformIO.

Is an Arduino Nano a bit overpowered in this role? Maybe, but the price is certainly right. There’s no need for a custom PCB either, since everything can be soldered direct to the Nano board. A matching 3D printed enclosure is about all that’s needed to make a robust and reliable DIY USB UPDI programmer out of a handful of parts, and that sounds good to us.

On the other hand, if you do find yourself making custom PCBs, you may be interested in another of [Daumemo]’s DIY projects: a printable structure to turn a rotary tool into a PCB drill press.

We’ve Heard Of Bricking A Hard Drive, But…

Mass storage has come a long way since the introduction of the personal computer. [Tech Time Traveller] has an interesting video about the dawn of PC hard drives focusing on a company called MiniScribe. After a promising start, they lost an IBM contract and fell on hard times.

Apparently, the company was faking inventory to the tune of $15 million because executives feared for their jobs if profits weren’t forthcoming. Once they discovered the incorrect inventory, they not only set out to alter the company’s records to match it, but they also broke into an outside auditing firm’s records to change things there, too.

Senior management hatched a plan to charge off the fake inventory in small amounts to escape the notice of investors and government regulators. But to do that, they need to be able to explain where the balance of the nonexistent inventory was. So they leased a warehouse to hold the fraud inventory and filled it with bricks. Real bricks like you use to build a house. Around 26,000 bricks were packaged in boxes, assigned serial numbers, and placed on pallets. Auditors would see the product ready to ship and there were even plans to pretend to ship them to CompuAdd and CalAbco, two customers, who had agreed to accept and return the bricks on paper allowing them to absorb the $15 million write off a little at a time.

Unfortunately, the fictitious excellent financial performance led to an expectation of even better performance in the future which necessitated even further fraud. The company had turned around, but only on paper. A downturn in the computer business and maxed-out credit signaled the beginning of the end. Suppliers and employees weren’t getting paid. A senior manager violated insider trader rules and dumped a lot of stock.

The turnaround CEO finally resigned and a new CEO found the fraud and released the findings that they were in the hole for $100 million. Bankruptcy pushed the company’s assets to Maxtor and criminal charges against 16 people ensued ending in fines and jail time. It isn’t clear if any of the boxed bricks were shipped to anyone by accident or by a disgruntled employee with a rubber paycheck. [Tech Time Traveller] speculates that if someone has one, it would be quite the collector’s item.

We hear about companies doing questionable things, of course, but this really is impressive in scope. At least they weren’t scamming end users as some tech companies have done.

Continue reading “We’ve Heard Of Bricking A Hard Drive, But…”

A Nitrogen Soldering Iron Review

If you’ve ever welded, you know that some welders blow a shield gas over the work for different reasons. For example, you often use a gas to displace oxygen from the area and avoid oxidation. You can also solder using a nitrogen shield. This allows higher temperatures and a reduction of flux required in the solder. Wave soldering often uses nitrogen, and JBC offers a soldering iron that can employ nitrogen shield gas. [SDG Electronics] puts that iron through its paces in the video below.

As you might expect, this isn’t a $50 soldering iron. The price for the iron is just under $1,000 and that doesn’t include the power supply or the nitrogen source. The nitrogen generator that converts compressed air into nitrogen is particularly expensive so [SDG] just used a cylinder of gas.

Continue reading “A Nitrogen Soldering Iron Review”

Engineering On A Deadline For Squid Game

If you asked us for an epic tale of designing and building under a deadline, one of the last places we would think to look is a MrBeast video.  Yet here we are, thanks in no small part to the epic skills of one [William Osman].

What do you do when a major YouTube celebrity asks you to handle a project with an impossible deadline?  If you’re [William], you say “heck yeah” and figure out the details later. In this case, it was famed YouTuber [Jimmy Donaldson], aka MrBeast, who was planning his own version of Squid Game. In this version, no one dies, but a few players do walk away with a lot of cash.

The premise is simple — “kill” people with a motion-sensing gun turret, just like the one in the show. The problem is that the show had all the tools of movie magic – multiple takes, video editing, you name it. [William] was tasked with handling a live event, with 456 real people, and no do-overs. Oh, and the whole thing had to be ready in 3 weeks.

The kills had to be pretty obvious too – we’re talking simulated blood squirting everywhere. So [William] decided to build his own version of a blood squib – the device Hollywood has used for decades to simulate bullet wounds. Initial work with pneumatic systems proved to be impractical. That’s when he put on his manager hat — and hired people to solve the problem for him. You might recognize a few of them — [Allen Pan] makes an appearance, as well as chemical genius [NileRed]. Even [TheBackYardScientist] shows up.

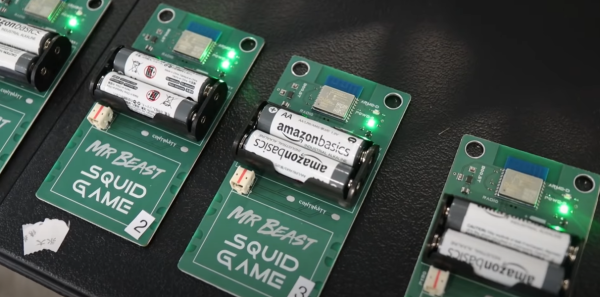
The video documents [William]’s journey, getting 500 copies of a board built and delivered on deadline. As such, there isn’t a ton of detail about the internal workings of the system. A pair of AA batteries feed into a boost converter, which powers an ESP8266 inside an ESP-WROOM-02 module. The ESP drives a few LEDs and a MOSFET. The MOSFET is connected to the star of the show – an MGJ firewire initiator – think of it as a model rocket igniter on steroids.  The initiator hides behind a bag of YouTube-friendly yellow “blood”. When the system is commanded to kill, the initiator pops the bag, spraying blood everywhere.

Doing this for one device isn’t so bad, but we’re following Squid Game rules – which means 456 competitors. Further, there were 100 iPhones loaded with a custom kill app for the workers. Add a central server into the mix, and you’ve got 557 devices in close quarters basting on 2.4 GHz and 5.8 GHz. Did we mention that [William] had never done a test with more than a handful of devices?

Want to find out what happens? Check out the video below!

Continue reading “Engineering On A Deadline For Squid Game