Much Better VGA From An ESP32

The ESP32 series from Espressif have been a successful line of products, offering a powerful microcontroller with on-chip wireless networking. There’s a snag though in their practice of calling all of them ESP32s despite wildly varying specifications and even different processor cores, such that it’s easy to lose track of exactly what the chip in front of you can do. [Bitluni] was faced with updating his VGA library to include a newer variant, and was pleasantly surprised to find that it includes a far more capable display peripheral which enables significantly higher resolutions than previously.

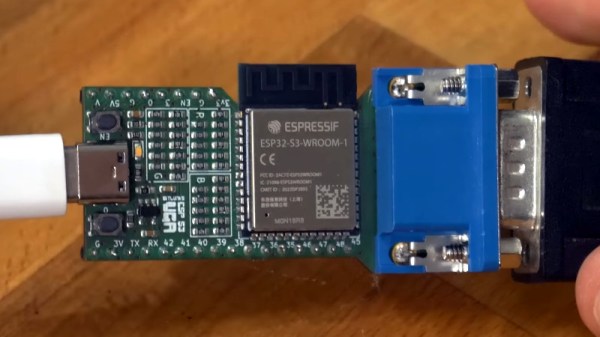
The part in question is the ESP32-S3, a version of the chip with the dual Extensa cores we’re familiar with from earlier versions, but the interesting addition of an LCD controller. His previous VGA on ESP32 used the I2S peripheral and sacrificed some of the available bits to create sync pulses, while this version is not only faster but also includes dedicated sync hardware. He can now do up to 16-bit colour in as much as 1024×768 resolution as can be seen in the video below the break, though this feat requires a slightly out of spec framerate that only works on some screens. It’s by no means perfect because the peripheral is intended for LCD rather than VGA use, but it’s pushing microcontroller VGA to new heights and we look forward to any other uses people will put it to.

We covered the original Bitluni ESP32 VGA library when it first appeared.

Continue reading “Much Better VGA From An ESP32”

A BASIC Interpreter For The Raspberry Pi Pico

It’s pretty easy to program the Raspberry Pi Pico in Python, or you can use C or C++ if you so desire. However, if you fancy the easy language of yesteryear, you might like PiccoloBASIC from [Gary Sims].

Putting it simply, piccoloBASIC is a BASIC interpreter that runs on the Raspberry Pi Pico. It features all the good bits of BASIC such as GOTO and GOSUB commands, that fancier languages kind of look down upon. It’s also got enough built-in routines to handle regular programming life, like sleeps, delays, a basic pseudorandom number source, trigonometric functions, and the ability to deal with floating point numbers. As far as microcontroller tasks go, it’s got rudimentary support for talking to GPIOs right now via the pinon and pinoff commands. However, it’s probably not the way to go if you want to bit-bang an SD card to within an inch of its speed rating.

Down the road, [Gary] hopes to add support for features like the Pico’s I2C, SPI, and PIO hardware, along with networking protocols and Bluetooth. PEEK and POKE are also hopefully on the way for those that like to fiddle with memory directly.

Meanwhile, if you’re looking for a different yet similar take, explore the port of MMBasic to the Pico platform. Video after the break.

Continue reading “A BASIC Interpreter For The Raspberry Pi Pico”

An open engine bay for a small car. The wheels are off so the hubs and brakes are visible to the side and the electric motor mounted on top of the vehicle's original engine block is in the center of the image.

A Different Approach To EV Conversions

While there are a lot of exciting electric vehicles finally coming to market, many of us feel nostalgic for the fossil cars of our youth. [Mihir Vardhan] restored his grandfather’s car with an unusual gas-to-EV conversion.

While this conversion starts in the usual fashion by pulling out the gas engine, [Vardhan] takes a different tack than most by not just bolting an electric motor up to the transmission. Instead, he and his crew removed the head and pistons from the petrol burner and bolted the electric motor to the top on an L-shaped bracket. Using the timing belt to transfer power to the crankshaft, there is no need to figure out additional motors for the A/C compressor or power steering pump, greatly simplifying implementation.

[Vardhan] did need to add a vacuum pump for the braking system and used a DC/DC converter to step down the 72V traction battery voltage to the 12V needed to charge the accessory battery. While it doesn’t exactly boast the performance of a Tesla, his bargain-basement conversion does yield a converted vehicle that can get around town for only around $3k US, even if it does mean your EV still needs oil changes. We think this could work even better on a vehicle with a timing chain instead of a belt, but it’s certainly an interesting way to go about the conversion process.

We’ve covered our fondness for EV conversions in the past for cars, motorcycles, and boats if you’d like to dig deeper. Have your own EV conversion you think we should cover? Send us a tip!

Continue reading “A Different Approach To EV Conversions”

Do-Everything LED Indicator Light Runs From 4V To 60V

If you’re working with 3.3V or 5V circuits, it’s easy for you to throw on a power or status LED here or there. [Tom Gralewicz] has found himself in a pickle, though, often working on projects with voltages like 36V or 48V. Suddenly, it’s no longer practical to throw an LED and a resistor on a line to verify if it’s powered or not. Craving this simplicity, [Tom] invented the Cheap Universal LED Driver, or CULD, to do the job instead.

The CULD is designed as a simple LED indicator that will light up anywhere from 5V to 50V. It’s intended to be set-and-forget, requiring no fussing with different resistor values and no worries for the end user that excessive current draw will result.

The key part ended up being the LV2862XLVDDCR – a cheap switching regulator. It can output 1 mA to 600 mA to drive one or several LEDs, and it can do so anywhere from a 4V to 60V input. Assemble this on a coin-sized PCB with some LEDs, and you’ve got your nifty do-everything indicator light. With a bridge rectifier onboard, it’ll even work on AC circuits, too.

[Tom] has built a handful himself, but he open-sourced the design in the hopes it will go further. By his calculations, it would be possible to build these in quantities of 1000 for a BOM cost of less than $0.50 each, not counting assembly or the PCB itself. We’d love to see them become a standard part of hacker toolkits, too. If you’ve got a pick-and-place plant that’s looking for work this week, maybe get them on to something like this and see what you can do! If it turns out to be a goer, maybe drop us a note on the tipsline, yeah?

You Can 3D Print A 12,500 RPM Brushless Motor

Typically, when most of us need a motor, we jump online to order one from a catalogue. [Levi Janssen] recently had to build his own for a college project, however, and learned a lot along the way.

[Levi] whipped up his brushless DC motor design in OnShape. The motor has six coils in the stator, with the rotor carrying eight neodymium magnets. It’s an axial flux design, with the rotor’s magnets sitting above the coils. This makes construction very easy using 3D printed components. Axial flux motors also have benefits when it comes to power density and cooling, though optimization is outside the scope of [Levi]’s work here.

[Levi]’s video covers both the development of the motor itself as well as the drive circuit, too. The latter is of key value if you’re interested in the vagaries of driving these motors, which is far more complex than running a simple brushed motor. He even gets his motor up to 12,500 rpm with his homebrewed drive circuit.

Making your own motors can help you solve some difficult engineering challenges, like building motorized rollerblades. Alternatively, if winding coils sounds too slow and too hard, you can just use off-the-shelf gear and hack it to make it work. Here, we support both methods.

Continue reading “You Can 3D Print A 12,500 RPM Brushless Motor”

Democratizing Space, One Picosatellite At A Time

There was a time when putting an object into low Earth orbit was the absolute pinnacle of human achievement. It was such an outrageously expensive and complex undertaking that only a world superpower was capable of it, and even then, success wasn’t guaranteed. As the unforgiving physics involved are a constant, and the number of entities that could build space-capable vehicles remained low, this situation remained largely the same for the remainder of the 20th century.

Nathaniel Evry

But over the last couple of decades, the needle has finally started to move. Of course spaceflight is still just as unforgiving today as it was when Sputnik first streaked through the sky in 1957, but the vast technical improvements that have been made since then means space is increasingly becoming a public resource.

Thanks to increased commercial competition, putting a payload into orbit now costs a fraction of what it did even ten years ago, while at the same time, the general miniaturization of electronic components has dramatically changed what can be accomplished in even a meager amount of mass. The end result are launches that don’t just carry one or two large satellites into orbit, but dozens of small ones simultaneously.

To find out more about this brave new world of space exploration, we invited Nathaniel Evry, Chief Research Officer at Quub, to host last week’s DIY Picosatellites Hack Chat.

Continue reading “Democratizing Space, One Picosatellite At A Time”

Field Testing A Home Made WiFi Antenna

Most readers will be aware that a good way to extend WiFi range is to use a better antenna for those 2.4 GHz signals, but at the same time such high frequency hijinks have something of a reputation of being not for the faint-hearted. [Dereksgc] puts that reputation to the test by building a helical WiFi antenna — and if that weren’t enough — he also subjects it to a field test. In a real field, is there any other way?

We’ve put both videos below the break, and you can find his helical antenna calculator on his website and the parametric CAD file for the scaffold in his GitHub repository. He first delivers a crash course in the fundamentals of helical antennas before diving into the construction, and even soldering on an impedance matching strip. The field testing involves setting up a base station with an FTP server on a phone, and connecting to it with a variety of antennas over increasing distance across farmland. We’ve characterised antennas in this way before, and it really does give an immediate view of their performance.

In this case the helix comfortably outperforms a commercial patch antenna and a laptop’s internal antenna, making such an antenna a very worthwhile piece of work whether you’re making a fixed link or indulging in a bit of casual wardriving.

The tools mentioned here will make helical antennas a snap, but this isn’t the first time we’ve touched on the subject.

Continue reading “Field Testing A Home Made WiFi Antenna”