From Cans To Sheet Metal, With Ease

Aluminium drinks cans make a great source of thin sheet metal which can be used for all manner of interesting projects, but it’s safe to say that retrieving a sheet of metal from a can is a hazardous process. Cut fingers and jagged edges are never far away, so [Kevin Cheung]’s work in making an easy can cutter is definitely worth a look.

Taking inspiration from a rotary can opener, he uses a pair of circular blades in an adjustable injection moulded plastic frame. If you’ve used a pipe cutter than maybe you are familiar with the technique, as the blade rotates round the can a few times it slowly scores and cuts through the metal. Doing the job at both ends of the can reveals a tube, which cna be then cut with scissors and flattened to make a rectangular metal sheet. Those edges are probably sharp, but nothing like the jagged finger-cutters you’d get doing the same by hand. The full video can be seen below the break, and the files to 3D print the plastic parts of the cutter can be found at the bottom of a page describing the use of cans to make a shingle roof.

Continue reading “From Cans To Sheet Metal, With Ease”

Modular Breadboard Snaps You Into Benchtop Tidiness

Solderless breadboards are a fantastic tool for stirring the creative juices. In a few seconds, you can go from idea to prototype without ever touching the soldering iron. Unfortunately, the downside to this is that projects tend to expand to occupy all the available space on the breadboard, and the bench surrounding the project universally ends up cluttered with power supplies, meters, jumpers, and parts you’ve swapped in and out of the circuit.

In an attempt to tame this runaway mess, [Raph] came up with this neat modular breadboard system. It hearkens back to the all-in-one prototyping systems we greatly coveted when the whole concept of solderless breadboards was new and correspondingly unaffordable. Even today, combination breadboard and power supply systems command a pretty penny, so rolling your own might make good financial sense. [Raph] made his system modular, with 3D-printed frames that lock together using clever dovetail slots. The prototyping area snaps to an instrumentation panel, which includes two different power supplies and a digital volt-amp meter. This helps keep the bench clean since you don’t need to string leads all over the place. The separate bin for organizing jumpers and tidbits that snaps into the frame is a nice touch, too.

Want to roll your own? Not a problem, as [Raph] has thoughtfully made all the build files available. What’s more, they’re parametric so you can customize them to the breadboards you already have. The only suggestion we have would be that making this compatible with [Zack Freedman]’s Gridfinity system might be kind of cool, too.

The Automatic Battery Charger You Never Knew You Needed

When we saw [Max.K]’s automatic NiMh battery charger float past in the Hackaday tips line, it brought to mind a charger that might be automatic in the sense that any modern microcontroller based circuit would be; one which handles all the voltages and currents automatically. The reality is far cooler than that, a single-cell charger in which the automatic part comes in taking empty cells one by one from a hopper on its top surface and depositing them charged in a bin at the bottom.

Inside the case is a PCB with an RP2040 that controls the whole shop as well as the charger circuitry. A motorized cam with a battery shaped insert picks up a cell from the bin and moves it into the charger contacts, before dumping it into the bin when charged. What impresses us it how slick this device is, it feels like a product rather than a project, and really delivers on the promise of 3D printing. We’d want one on our bench, and after watching the video below the break, we think you will too.

Continue reading “The Automatic Battery Charger You Never Knew You Needed”

Unique 3D Printer Has A Print Head With A Twist

If you’re used to thinking about 3D printing in Cartesian terms, prepare your brain for a bit of a twist with [Joshua Bird]’s 4-axis 3D printer that’s not quite like anything we’ve ever seen before.

The printer uses a rotary platform as a build plate, and has a linear rail and lead screw just outside the rim of the platform that serves as the Z axis. Where things get really interesting is the assembly that rides on the Z-axis, which [Joshua] calls a “Core R-Theta” mechanism. It’s an apt description, since as in a CoreXY motion system, it uses a pair of stepper motors and a continuous timing belt to achieve two axes of movement. However, rather than two linear axes, the motors can team up to move the whole print arm in and out along the radius of the build platform while also rotating the print head through almost 90 degrees.

The kinematic possibilities with this setup are really interesting. With the print head rotated perpendicular to the bed, it acts like a simple polar printer. But tilting the head allows you to print steep overhangs with no supports. [Joshua] printed a simple propeller as a demo, with the hub printed more or less traditionally while the blades are added with the head at steeper and steeper angles. As you can imagine, slicing is a bit of a mind-bender, and there are some practical problems such as print cooling, which [Joshua] addresses by piping in compressed air. You’ll want to see this in action, so check out the video below.

This is a fantastic bit of work, and hats off to [Joshua] for working through all the complexities to bring us the first really new thing we’ve seen in 3D printing is a long time.

Continue reading “Unique 3D Printer Has A Print Head With A Twist”

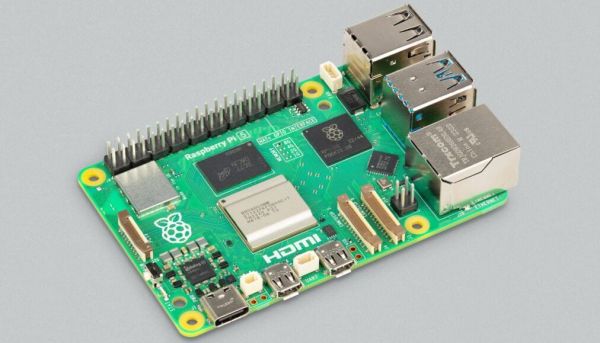
A Free Speed Boost For Your Pi 5

The world of the overclocker contains many arcane tweaks to squeeze the last drops of performance from a computer, many of which require expert knowledge to understand. Happily for Raspberry Pi 5 owners the Pi engineers have come up with a set of tweaks you don’t have to be an overclocker to benefit from, working on the DRAM timings to extract a healthy speed boost. Serial Pi hacker [Jeff Geerling] has tested them and thinks they should be good for as much as 20% boost on a stock board. When overclocked to 3.2 GHz, he found an unbelievable 32% increase in performance.

We’re not DRAM experts here at Hackaday, but as we understand it they have been using timings from the Micron data sheets designed to play it safe. In consultation with Micron engineers they were able to use settings designed to be much faster, we gather by monitoring RAM temperature to ensure the chips stay within their parameters. Best of all, there’s no need to get down and dirty with the settings, and they can be available to all with a firmware update. It’s claimed this will help Pi 4 owners to some extent as well as those with a Pi 5, so even slightly older boards get some love. So if you have a Pi 5, don’t wait for the Pi 6, upgrade today, for free!

A Brief History Of Calculator Watches

When humans counted on their fingers, everyone had a state-of-the-art (at the time) calculator at all times. But as we got smarter about calculation, we missed that convenience. When slide rules were king, techies were known to carry them around like swords swinging from their belts. These were replaced with electronic calculators, some also swinging from belt loops, but no matter how small they were, they still were not that handy, no pun intended. That changed around 1975. The Time Computer Calculator company produced an amazing calculator watch for Pulsar. At the time, Pulsar was a brand of the Hamilton Watch Company.

A Pulsar calculator watch (photo: The Smithsonian)

There were a few problems. First, the watch was thick. Despite its size, it had tiny keys, so you had to use a little stylus to push the keys — not as handy as you might wish. On top of that, 1975 display technology used power-hungry LEDs. So, the display was prone to turning off quickly, and the batteries died quickly.

Unsurprisingly, Hamilton, in conjunction with Electro/Data, had earlier rolled out the first LED watch in 1972. With an 18-karat gold case, it went for a cool $2,100 — a whole lot of money in 1972. The first calculator watch was also gold and went for almost $4,000. Soon, though, they brought out a stainless and a gold-filled version that came in at under $500.

Continue reading “A Brief History Of Calculator Watches”

Small Feathers, Big Effects: Reducing Stall Speeds With Strips Of Plastic

Birds have long been our inspiration for flight, and researchers at Princeton University have found a new trick in their arsenal: covert feathers. These small feathers on top of birds’ wings lay flat during normal flight but flare up in turbulence during landing. By attaching flexible plastic strips – “covert flaps” – to the top of a wing, the team has demonstrated impressive gains in aircraft performance at low speeds.

Wind tunnel tests and RC aircraft trials revealed a fascinating two-part mechanism. The front flaps interact with the turbulent shear layer, keeping it close to the wing surface, while the rear flap create a “pressure dam” that prevents high-pressure air from moving forward. The result? Up to 15% increase in lift and 13% reduction in drag at low speeds. Unfortunately the main body of the paper is behind a paywall, but video and abstract is still fascinating.

This innovation could be particularly valuable during takeoff and landing – phases where even a brief stall could spell disaster. The concept shares similarities with leading-edge slats found on STOL aircraft and fighter jets, which help maintain control at high angles of attack. Imitating feathers on aircraft wings can have some interesting applications, like improving control redundancy and efficiency.

Continue reading “Small Feathers, Big Effects: Reducing Stall Speeds With Strips Of Plastic”