Most retrocomputer builds seem to focus on either restoring old machines or rebuilding them from scratch. Either way, the goal is to get as close as possible to the original machine, and while we certainly respect those builds, there are other ways to celebrate the computers of yesterday, as this Z80 single-board computer nicely demonstrates.
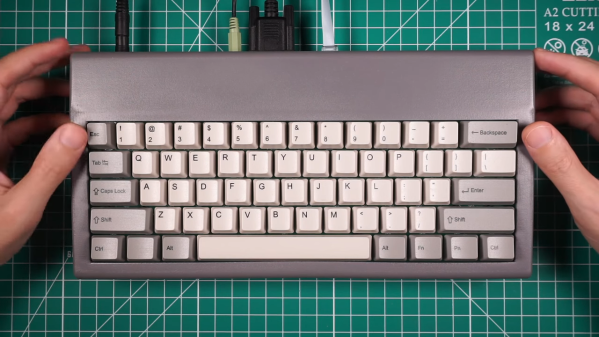
[Ivan Farafontov]’s SBC is sort of a “Z80 that never was” build, one that would almost have been possible back in the heyday of 8-bit computing, and would have made quite a splash if it had. Most of the peripheral chips are from Zilog and would have been found in many of the Z80 machines of the day, like the TRS-80 and ZX Spectrum. Where it goes off the old-school path is with the video section, which uses an Atmel CPLD chip and a dual-port RAM to drive a VGA monitor. It still looks the part, though, with a 256×192 pixel, 16-color display. The compact video section helps keep the overall footprint of this machine pretty small, at least by the standards of the old machines. The machine is barely larger than its custom keyboard, which is populated with mechanical switches and really nice-looking custom keycaps, and everything fits into a 3D-printed case.
The demo that starts at the 4:30 mark of the video below will be a nostalgia storm for a lot of readers, starting as it does with a version of Boulder Dash that [Ivan] wrote from scratch, along with the tile editor he used to create the sprites for the game. All the design files and code are available if you want to build your own, of course. We recently featured another Z80 that never was, but [Ivan]’s machine really makes a statement with its compact size and its capabilities.
[Plasmode] has created several Z80-compatible board designs, at least four of them using the oddball Z280. The Z280 was a special variant of a Z80 that could bootstrap itself with no external PROM, making it ideal for anyone trying to build a system on a breadboard. According to his post, the cost to build the board is about $35.
Although the 8080 CPU got a lot of glory, it was much harder to use than the Zilog Z80. The Z80 only required a single clock and power supply, so it was much easier to build a system, even on a breadboard. On top of that, the bus wasn’t multiplexed and it could refresh DRAM memory by itself. Maybe that’s why you can still get Z80-derived chips readily. There was one thing, though, you needed an EPROM or some other way to run some initial code to bootstrap your system. Zilog knew this was a problem. In those days, you had to use a special tool to burn a PROM and, unless it was erasable and you had the special UV light to erase it, any mistakes cost you a chip.
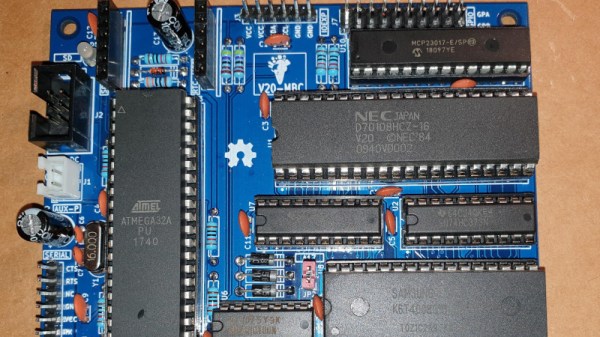
In the days when the best an impoverished student could hope to find in the way of computing was a cast-off 1980s PC clone, one upgrade was to fit an NEC V20 or V30 processor in place of the Intel 8088 or 8086. Whether it offered more than a marginal advantage is debatable, but it’s likely that one of the chip’s features would never have been used. These chips not only supported the 8086 instruction set, but also offered a compatibility mode with the older 8080 processor. It’s a feature that [Just4Fun] has taken advantage of, with V20-MBC, a single board computer that can run both CP/M-86 and CPM/80.
If this is starting to look a little familiar then it’s because we’ve featured a number of [Just4Fun]’s boards before. The Z80-MBC2 uses the same form factor, and like this V20 version, it has one of the larger ATMega chips taking place of the acres of 74 chips that would no doubt have performed all the glue logic tasks of the same machine had it been built in the early 1980s. There is a video of the board in action that we’ve placed below the break, showing CP/M in ’80, ’86, and even ’80 emulated in ’86 modes.
The only time a V20 has made it here before, it was in the much more conventional home of a home-made PC.
There have been plenty of Z80 computer builds here on Hackaday, but what sets them apart is what you do with them. [Andrew] writes in with his Z80 single-board computer made from scratch, using the Arduino standard headers for its I/O. In turn, since he needed an easy way to program the flash memory which holds the software to run on the Z80, he used an Arduino Mega as a debugger, making the SBC an Arduino shield itself.
Using such a common header pinout for the Z80 computer allows it to be used with a variety of readily-available Arduino shields. This compatibility is achieved with an analog-digital converter and a 3.3 V regulator, mimicking the pins found in an Arduino Uno. The code, available on GitHub, includes an extensive explanation and walkthrough over the process in which the Mega takes over the bus from the Z80 to function as a fully-featured debugger. Programs can be loaded through embedding an assembly listing into the Mega’s sketch, or, once the debugger is up you can also upload a compiled hex file through the serial connection.
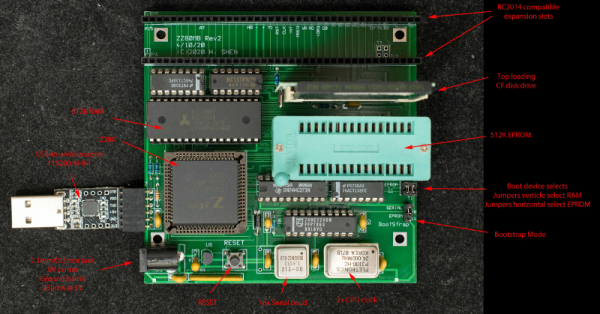
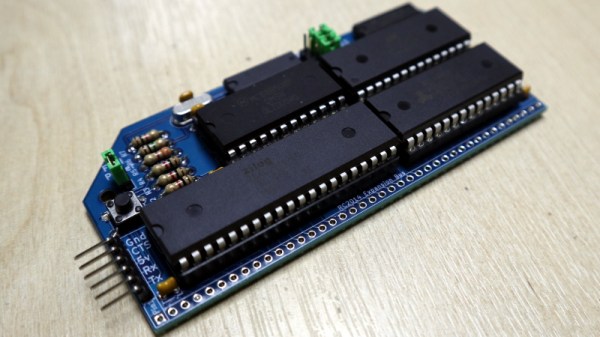
At the end of August I made the trip to Hebden Bridge to give a talk at OSHCamp 2019, a weekend of interesting stuff in the Yorkshire Dales. Instead of a badge, this event gives each attendee an electronic kit provided by a sponsor, and this year’s one was particularly interesting. The RC2014 Micro is the latest iteration of the RC2014 Z80-based retrocomputer, and it’s a single-board computer that strips the RC2014 down to a bare minimum. Time to spend an evening in the hackerspace assembling it, to take a look!
It’s An SBC, But Not As You Know It!
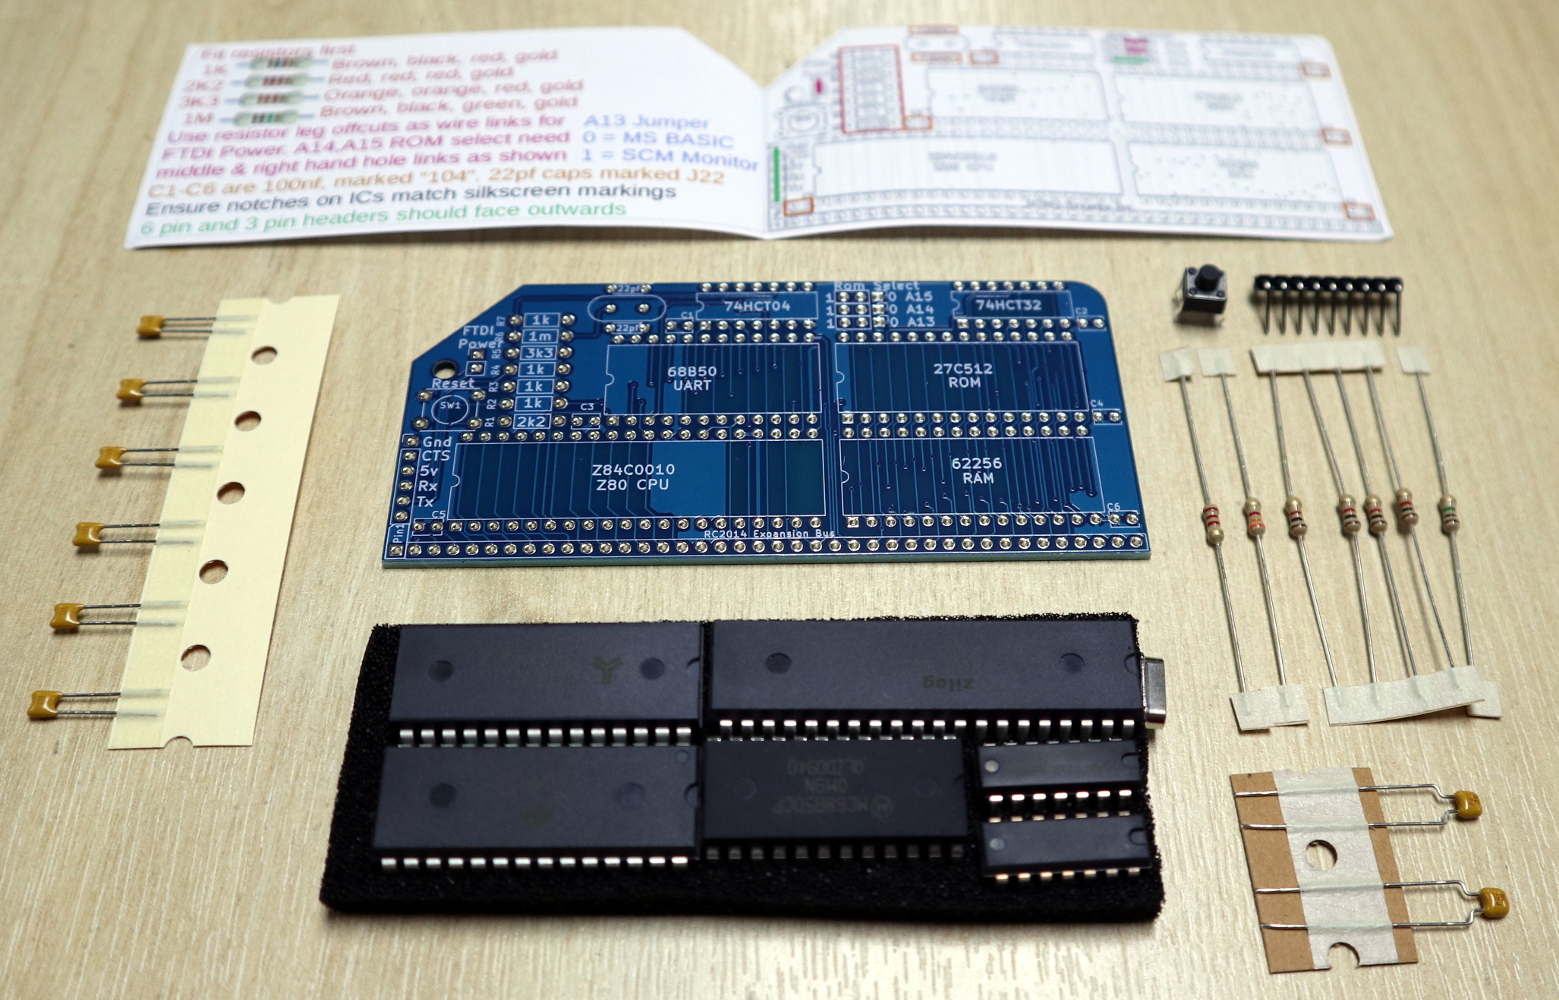
The kit contents
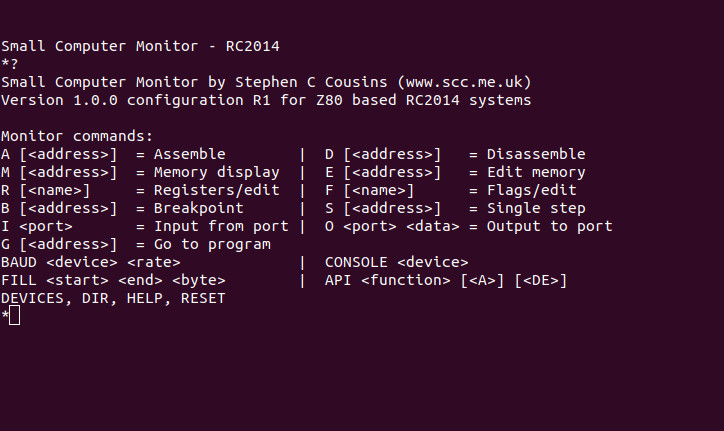
The kit arrives in a very compact heat-sealed anti-static packet, and upon opening was revealed to contain the PCB, a piece of foam carrying the integrated circuits, a few passives, and a very simple getting started and assembly guide. The simplicity of the design becomes obvious from the chip count, there’s the Z80 itself, a 6850 UART, 27C512 ROM, 62256 RAM, 74HCT04 for clock generation, and a 74HCT32 for address decoding. The quick-start is adequate, but there is also a set of more comprehensive online instructions (PDF) available.
I added chip sockets and jumpers to my kit.
Assembly of a through-hole kit is hardly challenging, though this one is about as densely-packed as it’s possible to make a through-hole kit with DIP integrated circuits. As with most through-hole projects, the order you pick is everything: resistors first, then capacitors, reset button and crystal, followed by integrated circuits.
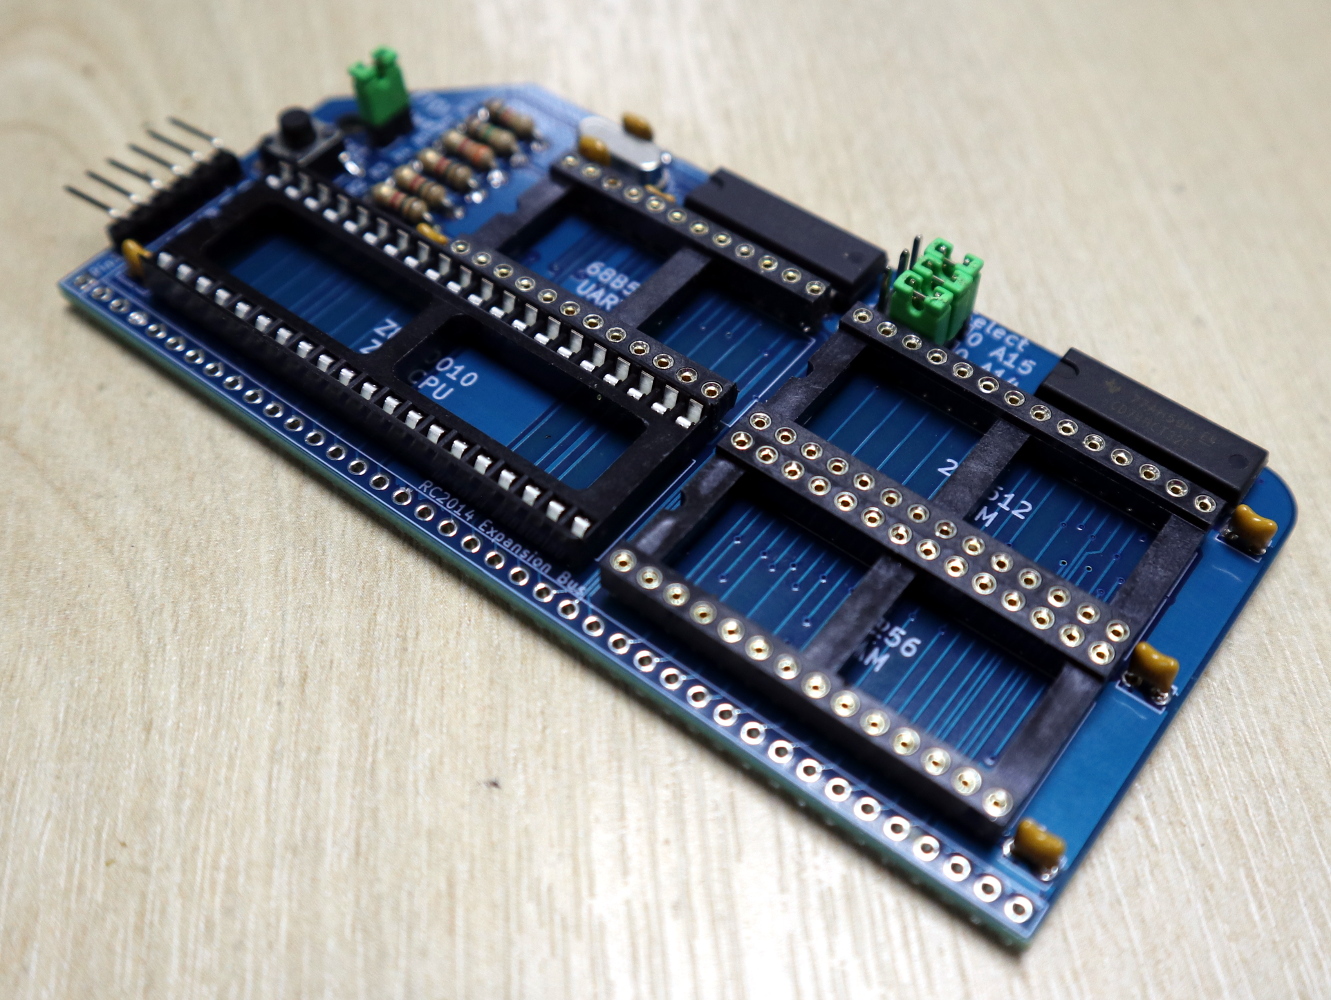
I’m always a bit shy about soldering ICs directly to a circuit board so I supplemented my kit with sockets and jumpers. The jumpers are used to select an FTDI power source and ROM addresses for Grant Searle’s ROM BASIC distribution or Steve Cousins’ SCM 1.0 machine code monitor, and the kit instructions recommended hard-wiring them with cut-off resistor wires. There was no row of pins for the expansion bus because this kit was supplied without the backplane that’s a feature of the larger RC2014 kits, but it did have a set of right-angle pins for an FTDI serial cable.
Your Arduino Doesn’t Have A Development Environment On Board!
Having assembled my RC2014 Mini and given it a visual inspection it was time to power it up and see whether it worked. Installing the jumper for FTDI power, I attached my serial cable and plugged it into a USB port.
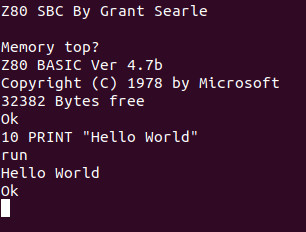
A really nice touch is that the Micro has the colours for the serial cable wires on the reverse side of the PCB, taking away the worry of getting it the wrong way round. A quick screen /dev/ttyUSB0 115200 to get a serial terminal from a bash prompt, hit the reset button, and I was rewarded with a BASIC interpreter. My RC2014 Micro worked first time, and I could straight away give it BASIC commands such as PRINT "Hello World!" and be rewarded with the expected output.
The SCM ROM monitor.
So I’ve built a little Z80 single board computer, and with considerably less work than that required for the fully modular version of the RC2014. Its creator Spencer tells me that the Micro was originally designed as a bargain-basement RC2014 as a multibuy for workshops and similar activities, being very similar to his RC2014 mini board but without provision for a Pi Zero terminal and a few other components. It lacks the extra hardware required for a more comprehensive operating system such as CP/M, so I’m left with about as minimal an 8-bit computer as it’s possible to build using parts available in 2019. My question then is this: What can I do with it?
So. What Can I Do With An 8-bit SBC?
My first computer was a Sinclair ZX81, how could it possibly compare this small kit that was a giveaway at a conference? Although the Sinclair included a black-and-white TV display interface, tape backup interface, and keyboard, the core computing power was not too far different in its abilities from this RC2014 Micro — after all, it’s the same processor chip. It was the platform that introduced a much younger me to computing, and straight away I devoured Sinclair BASIC and then went on to write machine code on it. It became a general-purpose calculation and computing scratchpad for repetitive homework due to the ease of BASIC programming, and with my Maplin 8255 I/O port card I was able to use it in the way a modern tech-aware kid might use an Arduino.
The RC2014 Micro is well placed to fill all of those functions as a BASIC and machine code learning platform on which to get down to the hardware in a way you simply can’t on most modern computers, and though the Arduino represents a far more sensible choice for hardware interfacing there is also an RC2014 backplane and I/O board available for the Micro’s expansion bus should you wish to have a go. Will I use it for these things? It’s certainly much more convenient than its full-sized sibling, so it’s quite likely I’ll be getting my hands dirty with a little bit of Z80 code. It’s astounding how much you can forget in 35 years!
The RC2014 Micro can be bought from Spencer’s Tindie store, with substantial bulk discounts for those workshop customers. If you want the full retrocomputer experience it’s a good choice as it provides about as simple a way into Z80 hardware and software as possible. The cost of simplicity comes in having no non-volatile storage and in lacking the hardware to run CP/M, but it has to be borne in mind that it’s the bottom of the RC2014 range. For comparison you can read our review of the original RC2014, over which we’d say the chief advantage of the Micro is its relative ease of construction.
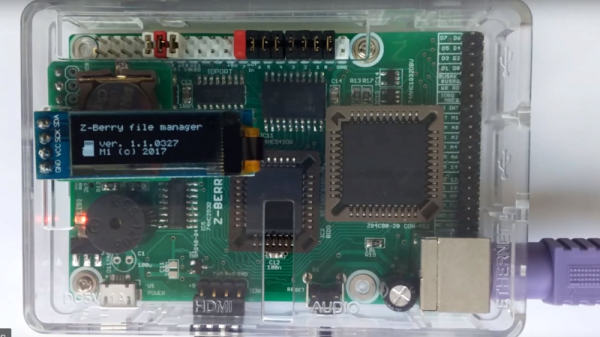
Homebrew computers are the ‘in thing’ these days and the Zilog Z80 is the most popular choice for making one on your own. We have seen some pretty awesome builds but [Martin K]’s Z-berry is the smallest on record yet. As the name suggests, the retrocomputer conforms to the Raspberry Pi form factor which includes the GPIO header.
The Z-berry is designed with a Z80 CPU running at 10 MHz (20 MHz possible) and comes with 32 kB ROM
and 512 kB RAM. In addition to the serial interface, the computer boasts an I2C bus, an SPI bus, and a PS/2 keyboard connector to boot. [Martin K] has a video where the finished system is enclosed in a Raspberry Pi case and has an I2C OLED display attached and working.
[Martin K] has posted a lot of details on how to make your own Z-berry which includes the BOM, schematic and preliminary information. We reached out to him to find out more about the software which is stable and available on request along with PCBs and sample code. Additionally, this project promises to draw much less current than the Raspberry Pi and should prove useful for anyone looking to create a retro solution to a modern problem.
[Alexis] sent in a single board computer he’s been working on. The project goal of his build was making it easily reproducible. From looking at the schematics, it’s one of the simplest fully-functional computers we’ve seen. The build runs CP/M 2.2 off of two 3.5 inch floppies. This opens up a lot of options as to what software is already available. Although it operates over a serial terminal, [Alexis] pretty much duplicated an Osborne I, only at double the speed.
[Alexis] got a little e-fame from his earlier 8088 homebrew computer built from very early 8088’s rescued from an electronics junk shop. These 8088 computers made the blog rounds by playing Still Alive with a SID chip from a Commodore 64 and a YM2151 FM synth chip.
For now, I guess we’ll have to settle for a video of [Alexis]’ Z80 computer running CP/M. Check out a video after the break of his computer running the greatest Infocom adventure, Hitchhiker’s Guide to the Galaxy.