Over-Engineered Mailbox Flag Machined Using Under-Engineered Mini-Lathe

[Tim Nummy] used his cheap, Chinese, bench mini-lathe to make a non-terrible mailbox flag holder (YouTube video, embedded below). Tim posts videos on his channel about garage hobby projects, many of which are built using his mini-lathe, often based on suggestions from his followers. One such suggestion was to do something about his terrible mailbox flag – we’re guessing he receives a lot of old-school fan mail.

He starts off by planning the build around 1 ¼ inch aluminum bar stock, a 688 bearing, three neodymium magnets and some screws. The rest of it is a “think and plan as you go along” project, but essentially, the new holder is in three pieces. An inner piece goes inside the mail box and holds the assembly to the mail box. The middle piece holds the two magnets which act as end-stops or limits for the flags raised and lowered positions. The final, outer piece holds the flag itself, and the bearing which allows it to rotate freely.

This part also has the third magnet embedded in it to work with the other two magnets for the limits. The use of magnets is cool, but a ball catch with two detents would have worked just as well. It’s a great simple project to follow for those who want to wet their feet on lathe work. [Tim] has also posted links to all of the tools and equipment seen in the video, so check that out if anything catches your fancy.

But workshop veterans will almost certainly cringe at several places along the video. The main one that caught our eye is obviously the shaky lathe itself. It could do with a heavier workbench, proper leveling, foundation bolts or anti-vibration mounts. And from the looks of it, the tail stock isn’t any rock steady too. Although the lathe is variable speed, the chuck rpm is set too high for aluminum, and the lack of cutting fluid makes it even more troublesome. Using oil, or even some cutting fluid, while tapping would have been wise too.

We’re not sure if it’s the shaky foundation or poor feed control, but the step cut for mounting the bearing is over-sized by a whole lot more and requires a big goop of retaining compound to glue the bearing in place. But the end result works quite well, including the magnetic catches – a complex solution for a simple problem.

We’re sure our keen-eyed readers will likely spot some more issues in [Tim]’s methods, so go at it in the comments below, but please make sure to rein in the snark and keep your feedback positive.

Continue reading “Over-Engineered Mailbox Flag Machined Using Under-Engineered Mini-Lathe”

Hackaday Prize Entry: Dynamometer For Post Stroke Rehabilitation

For those who have suffered a stroke, recovery is a long and slow process that requires rehabilitation to start as early as possible. Quite often, secondary stroke attacks complicate matters. Spasticity — muscle contraction and paresis — muscular weakness, are two of the many common after-effects of stroke. Recovery involves doing repeated exercises to strengthen the muscles and bring back muscle memory. Benchmarking progress becomes difficult when caregivers are only able to use qualitative means such as squeezing tennis balls to monitor improvement. To help provide quantitative measurements in such cases, [Sergei V. Bogdanov] is building a Dynamometer for Post-Stroke Rehabilitation. It is an Open Source, 4-channel differential force gauge for measuring and logging the progress of the patient. The device measures, graphs, and logs the force exerted by the four fingers when they push down on the four force gauges.

The device consists of four strain gauges obtained from cheap kitchen scales. The analog outputs from these are fed to HX-711 24-bit ADC boards. An Arduino Nano processes the data and displays it on two banks of eight-digit LED modules. [Sergei] also experimented with a 20×4 character LCD in place of the LED display. In the standalone mode, the device can only indicate the measured forces on the LED (or LCD) display which is calibrated to display either numerical values or a logarithmic scale. When connected to a serial port and using the (Windows only) program, it is possible to not only view the same information but also save it at regular, set intervals. The data can also be viewed in graphical form.

The project page provides links to their Arduino code, Windows monitor program as well as build instructions. Check out the related assistive technology project that [Sergei] is working on — A Post Stroke Spasticity Rehab Helper.

Continue reading “Hackaday Prize Entry: Dynamometer For Post Stroke Rehabilitation”

Hackaday Prize Entry: TooWheels, The Open Source Wheelchair

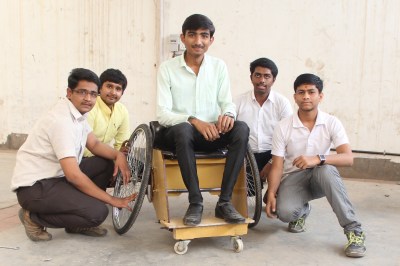
The Assistive Technology challenge of the Hackaday Prize received a large number of projects addressing many socially relevant problems. Mobility and transportation needs are a big challenge for those with limb disabilities. Not every country has proper, state-subsidised health care systems, and for many people in third world countries, devices such as wheel chairs are just not affordable. [Alessio Fabrizio] and his team developed TooWheels — an Open Source DIY wheelchair which can be customized and built using low-cost, local materials around the world and is one of the winners of the Assistive Technologies challenge round.

Originally conceived as a sport wheelchair, it has now evolved to answer different needs, due to feedback from the users and the community involved in the project. [Alessio] designed the project to be built from materials and resources easily available to any DIY maker at today’s Fab Labs and Makerspaces. The team have provided a detailed BOM to help procure all the required materials, instruction manual and drawings for assembly, and all the CAD files with customization instructions. Already, teams in Ecuador, India and Italy have replicated and built their own version of the TooWheel wheelchair. This confirms that the project is well documented and allows anyone around the world to download the plans and follow instructions to build their own wheelchair.

The wheelchair is built from CNC cut plywood sheets, aluminum pipes and bicycle parts and wheels. This makes it substantially cheaper compared to commercial wheelchairs, making it especially relevant for people in third world areas or where health care is not subsidised. The ease of customization allows fabrication of different wheelchair designs for sports, off-road or city use. The team is looking to bring this low-cost design to people around the world and are keen to collaborate with teams around the world to make it happen.

Cheap DIY MIDI To USB Adapter

[Joonas] became frustrated with cheap but crappy MIDI to USB converters, and the better commercial ones were beyond his budget. He used a Teensy LC to build one for himself and it did the job quite well. But he needed several converters, and using the Teensy LC was going to cost him a lot more than he was willing to spend. With some tinkering, he was able to build one using an Adafruit Pro Trinket which has onboard hardware UART (but no USB). This lack of USB support was a deal killer for him, so after hunting some more he settled on a clone of the Sparkfun Pro Micro. Based on the ATmega32U4, these clones were just right for his application, and the cheapest to boot. He reckons it cost him about $5 to build each of his cheap USB MIDI adapters which receive notes and pedal data from the keyboard’s MIDI OUT and transmit them to a computer

Besides the Pro Micro clone, the only other parts he used are a generic opto-coupler, a couple of resistors and a MIDI connector. After testing his simple circuit on a bread board, he managed to squeeze it all inside an old USB dongle housing, stuffing it in dead-bug style.

The heavy lifting is all done in the firmware, for which [Joonas] used LUFA — the Lightweight USB Framework for AVR’s. He wrote his own code to handle MIDI (UART) to USB MIDI messages conversion. The interesting part is his use of a 32.15 kbps baud rate even though the MIDI specification requires 31.25 kbps. He found that a slightly higher baud rate fixes a problem in the AVR USART implementation which tends to miss consecutive bytes due to the START edge not being detected. Besides this, his code is limited in functionality to only handle a few messages, mainly for playing a piano, and does not have full-fledged MIDI capabilities.

We’ve featured several of [Joonas]’s hacks here over the years, the most recent being the Beaglebone Pin-Toggling Torture Test and from earlier, How to Turn A PC On With a Knock And An ATTiny.

Hackaday Prize Entry: Post Stroke Spasticity Rehab Helper

A stroke is caused when poor blood flow to the brain causes cell damage, causing that part of the brain to stop functioning. Common causes are either blood vessel blockage or internal bleeding, and effects depend on the part of the brain that is affected. In most cases, spasticity (muscle contraction), poor motor control and the inability to move and feel are common after effects. Recovery is often a long, slow process and involves re-learning the affected lost skills. This is where physical therapy using assistive technologies becomes important. Rehabilitation must start as early as possible since the first few weeks are critical for good recovery. [Sergei V. Bogdanov] is building a cheap and simple Post-Stroke Spasticity Rehab Helper to address this problem.

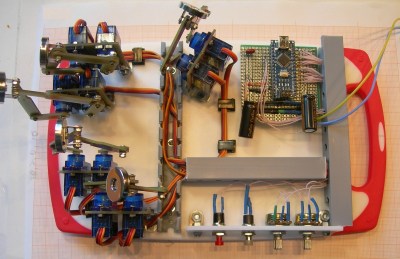
He’s using ten hobby micro servos connected to an Arduino Nano, all mounted on a kitchen chopping board, with a few other bits thrown in to round out the build. There’s one pair of servos for each finger. A five bar linkage converts the servo rotations to two-dimensional motion. The end of the linkage has a swiveling metallic disk. Patient fingers are attached to these discs via magnetic metal pads that are attached to the end of the fingers using adhesive plaster tape. Two push buttons cycle through a large number of exercise modes and two potentiometer’s help adjust the speed and smoothness (the number of points calculated for the desired motion). Two 7-segment LED display modules connected to the Arduino provides a visual interface showing program modes, speed, number of cycles and other relevant information. Replicating the project ought to be very straightforward since the device uses off-the-shelf parts which are easy to put together using the detailed build instructions, photos and code posted on [Sergei]’s project page. Check out the videos below to see the rehab helper in action.

Continue reading “Hackaday Prize Entry: Post Stroke Spasticity Rehab Helper”

Hackaday Prize Entry: Dementia-Friendly Music Player

The loss of memory is an extremely difficult situation, not just for those afflicted, but also for immediate family, close friends, and care givers. With no cure available for dementia, providing care is an extremely demanding task for everyone involved – both mentally and physically. Patients are unable to retain recent events and information, but will most likely be able to recall some amount of past memories. This presents serious challenges when they encounter “modern” technology and cannot figure out how to use and operate everyday devices that normal people take for granted.

[rosswesleyporter]’s Dad had trouble using modern iPods and CD players, so he built DQMusicBox — a Dementia friendly music player. It’s very simple interface resembling a radio from half a century ago. There are just two large, clearly marked rotary dials — one for Volume, the other for Songs, and a headphone socket. The inspiration came from a very moving documentary called “Alive Inside” which explores how music brings extreme joy to people with dementia.

The device is built around a Raspberry Pi, enclosed in a laser cut enclosure and requires no soldering — making it easy for anyone to build one for themselves using easily available parts. The Raspberry Pi runs on a lightweight, optimized version of Raspbian called DietPi. The music playback is handled by VLC ensuring support for a large number of music formats. A Python script looks for music files, sets up the VLC-NOX player and handles knob and button events. A bundled image file for the software includes everything needed to get it running, making setup easy and quick. Since Raspberry Pi’s are prone to OS corruption when power is disconnected without performing a proper shutdown, [Ross] uses write protection on the SD-card and walks you through the process of how it works.

Between his Project page, Github and DQMusicBox website, you will be able to get all the information needed to replicate this excellent project. And for his next version, he already has a few ideas for improvement and would like to hear if other hackers have suggestions.

Continue reading “Hackaday Prize Entry: Dementia-Friendly Music Player”

The 1980s Called – Asking For The Z80 Membership Card

The ’80’s and early ’90’s saw a huge proliferation of “personal” computers, spawning an army of hacker kids who would go on to hone their computing chops on 8-bit and 16-bit computers from brands such as Sinclair, Commodore, Acorn, Apple, Atari, Tandy/RadioShack and Texas Instruments. Fast forward to 2017, and Raspberry-Pi, BeagleBone and micro:bit computers reign supreme. But the old 8-bit and 16-bit computer systems can still teach us a lot.

[Lee Hart] has built the amazing Z80 Membership Card — a Z80 computer that fits in an Altoids tin. His design uses generic through hole parts mounted on a PCB with large pads, thick tracks and lots of track clearances, making assembly easy. Add to this his detailed documentation, where he weaves some amazing story telling, and it makes for a really enjoyable, nostalgic build. It makes you want to get under the hood and learn about computers all over again. The Z80 Membership Card features a Zilog Z80 microprocessor running at 4 MHz with 32k RAM and 32K EPROM, loaded with BASIC interpreter and monitor programs. A pair of 30-pin headers provide connections to power, I/O pins, data, address and control signals.

To accompany this board, he’s built a couple of companion “shield” boards. The Front Panel Card has a 16-key hex pad, 7-digit 7-segment LED display and Serial port. [Lee] has packed in a ton of features on the custom monitor ROM for the front panel card making it a versatile, two board, 8-bit system. Recently, he finished testing a third board in this series — a Serial/SD-Card/RAM shield which adds bank-switchable RAM and SD-card interface to provide “disk” storage. He’s managed to run a full CP/M-80 operating system on it using 64k of RAM. The two-board stack fits nicely in a regular Altoids tin. A fellow hacker who built the three-board sandwich found it too tall for the Altoids tin, and shared the design for a 3D printable enclosure.

[Lee] provides detailed documentation about the project on his blog with schematics, assembly instructions and code. He’s happy to answer questions from anyone who wants help building this computer. Do check out all of his other projects, a couple of which we’ve covered in the past. Check out Lee Hart’s Membership Card — a similar Altoids tin sized tribute to the 1802 CMOS chip and how he’s Anthropomorphizing Microprocessors.

Finally, we have to stress this once again — check out his Assembly Manuals [PDF, exhibit #1] — they are amazingly entertaining.

Thanks to [Matthew Kelley] who grabbed one of [Lee]’s kits and then tipped us off.