Acoustic Coupler Pole-Vaults Over China’s Firewall

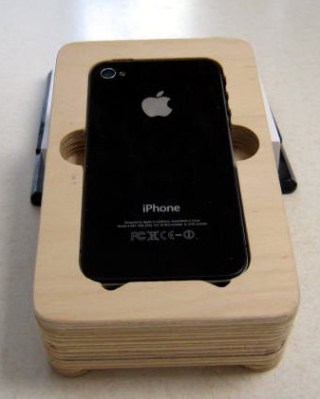
[agp.cooper]’s son recently went to China, and the biggest complaint was the Great Firewall of China. A VPN is a viable option to get around the Great Firewall of China, but [agp] had a better idea: an acoustic coupler for his son’s iPhone.

Hackaday readers of a recent vintage might remember an old US Robotics modem that plugged into your computer and phone line, allowing you to access MySpace or Geocities. Yes, if someone picked up the phone, your connection would drop. Those of us with just a little more experience under our belts will remember the acoustic coupler modem — a cradle that held a phone handset that connected your computer (indirectly) to the phone line.

With a little bit of CNC work, [agp] quickly routed out a block of plywood that cradled his son’s iPhone. Add in a speaker and a microphone, and that’s an acoustic coupler. There’s not much to it, really. The real challenge is building a modem.

In the late 90s, there were dedicated chipsets for modems, and before that, there was a 74xx-series chip that was a 300-baud modem. [agp] isn’t using anything like that. He’s building a modem with an Arduino. This is a Bell 103A-compatible modem, allowing an iPhone to talk to a remote computer at 300 bits per second. This is a difficult challenge; we’re not able to get 33kbps over a smartphone voice connection simply because of the codecs used. However, with a little bit of work, [agp] managed to build a real modem with an Arduino.

Making More Of Me Money

For the last few years, Hackaday has really been stepping up our game with marketing materials. Our t-shirts and swag are second to none, and last year we introduced the ‘Benchoff Buck’ (featured above), a bill replete with Jolly Wrencher EURions that is not yet legal currency. At least until we get a sweet compound in the desert, that is.

[Andrew Sowa] created the Benchoff Nickel. It’s a visage of yours truly emblazoned on a PCB, rendered in FR4, silkscreen, gold, and OSHPark’s royal purple. In doing so, [Andrew] has earned himself a field commission to the rank of lieutenant and can now reserve the dune buggy for a whole weekend.

The Benchoff Nickel was created in KiCad using the Bitmap2Component functionality. Planning this required a little bit of work; there are only five colors you can get on an OSH Park PCB, from white to gold to beige to purple (soldermask on top of copper) to black (soldermask with no copper). Luckily, the best picture we have of me renders very well in five colors.

The Bitmap2Component part of KiCad will only get you so far, though. It’s used mainly to put silkscreen logos on a board, and messing around with copper and mask layers is beyond its functionality. To import different layers of my face into different layers of a KiCad PCB, [Andrew] had to open up Notepad and make a few manual edits. It’s annoying, but yes, it can be done.

OSH Park’s fabs apparently use two different tones of FR4

The Benchoff Nickel can be found on Github and as a shared project on OSH Park ($22.55 for three copies). One little curiosity of the OSH Park fabrication process presented itself with [Andrew]’s second order of Benchoff Nickels. OSH Park uses at least two board houses to produce their PCBs, and one of them apparently uses a lighter shade of FR4. This resulted in a lighter skin tone for the second order of Benchoff Nickels.

This is truly tremendous work. I’ve never seen anything like this, and it’s one of the best ‘artistic’ PCBs I’ve ever held in my hands. It was a really great surprise when [Andrew] handed me one of these at the Hackaday Unconference in Chicago. I’ll be talking to [Andrew] again this week at the Midwest RepRap festival, and we’re going to try and figure out some way to do a small run of Benchoff Nickels.

Edit: OSH Park revealed why there are different tones of FR4. In short, there aren’t. The lighter shade of skintone is actually FR408, which is used on 4-layer boards.

Converting An Easy Bake Oven To USB

[Jason] converted an Easy Bake Oven to USB. If you have to ask why you’ll never know.

Easy Bake Ovens have changed a lot since you burnt down your house by installing a 100 Watt light bulb inside one. Now, Easy Bake Ovens are [bigclive] material. It’s a piece of nichrome wire connected through a switch across mains power. Part of the nichrome wire is a resistor divider used to power a light. This light assembly is just a LED, some resistors, and a diode wired anti-parallel to the LED.

This is a device designed for 120 V, but [Jason] wanted it to run on USB-C. While there are USB-C chargers that will supply enough power for an Easy Bake Oven, the voltage is limited to 20V. Rather than step up the USB-C voltage, [Jason] added some nichrome wires to divide it into six equal segments, then wired all the segments in parallel. This lowers the voltage by one sixth and increases the current by a factor of six. Good enough.

The power supply used for this hack is the official Apple 87W deal, with a USB-C breakout board (available on Tindie, buy some stuff on Tindie. Superliminial advertising) an Arduino Uno connected to the I2C pins. A few bits of code later, and [Jason] had a lot of power coming over a USB cable.

With the Easy Bake Oven fully converted, [Jason] whipped up a batch of cookie mix. After about 15 minutes the cookies crisped up and started to look almost appetizing.

While the result is weird — who on Earth would ever want a USB-powered Easy Bake Oven — this is honestly a fantastic test of [Jason]’s USB-C PHY breakout board. What better way to test a USB-C than a big resistive load, and what better resistive load is there than an Easy Bake Oven? It’s brilliant and hilarious at the same time.

Hackaday Links: March 19, 2017

This is from the Daily Fail, but a working Apple I is going up on the auction block. It’s expected to bring in $317,693 USD. In other news, we’re going to be at the Vintage Computer Festival East at the end of the month. There is usually an Apple I there.

The most popular crowdfunding campaign of the month is Lego tape. It’s an adhesive-backed tape with studs on the top, allowing you to clip Lego pieces into place. How easy would this be to create at home? It’s really just a silicon mold and some 3M stickytape. Anyone up for a home casting challenge?

You guys know the Hackaday Overlords have a Design Lab, right? What’s a Design Lab? It’s a place filled with tools where we allow residents to come in for free, build stuff, give them training, and let them keep all their IP. It’s like a hardware accelerator, but focused on Open Source hardware. It is our gift to the community and we ask nothing in return. But that’s not important right now. We’re doing shots.

2017 will be the first year Maker Faire will have three flagship faires. New York is a given, as is the Bay Area. and A few weeks ago, Chicago grabbed the third flagship faire. If you’ve already bought tickets and scheduled your trip, terrible news: the Chicago Maker Faire has been postponed until late fall.

Flip clocks are cool. What’s a flip clock? The clock in Groundhog Day, or a bunch of flaps, gears, and a synchronous motor that displays the time. You know what’s not cool about flip clocks? They’re usually stuffed in horrible 70s plastic enclosures painted Harvest Gold or Avacado. [bentanme] found a flip clock and stuffed it in a glass jar. It’s kept in place by a few 3D printed parts that ingeniously keep the clock from moving around while still allowing you to see the gears. Neat.

The Best Pi Emulation Console You Can Build

By far the most popular use for a Raspberry Pi is an emulation console. For an educational device, that’s fine – someone needs to teach kids how to plug a USB cable into a device and follow RetroPi tutorials on the Internet. These emulation consoles usually have one significant drawback: they’re ugly, with wires spilling everywhere. Instead of downloading a 3D printed Pi enclosure shaped like a Super Nintendo, [depthperfection] designed his own. It looks great, and doesn’t have a donglepocalypse hanging out the back.

The biggest factor in building an enclosure for a Pi Zero is how to add a few USB ports. There’s only one USB port on the Pi Zero, although if you’re exceptionally skilled, you can solder a hub onto the test points on the bottom of the board. This stackable USB hub solves the problem with the help of pogo pins for the power and USB pair. It’s only $17 USD, too.

With the USB and power sorted, [depthperfection] set out to design an enclosure. This was modeled in Fusion360, with proper vent holes, screw bosses, and cutouts for all the ports. It’s designed to be 3D printable, and with a little ABS smoothing, this enclosure looks great.

For software, [depthperfection] turned to Recallbox, a retrogaming platform that also doubles as a media player. It’s simpler than a RetroPi installation, but for playing Super Mario 3, you don’t really need many configuration options. This is a great project that just works and looks good doing it. The world — and the Raspberry Pi community — needs more projects like this, and we’re glad [depthperfection] sent this one in.

A Wireless Oscilloscope Isn’t As Dumb As It Sounds

The latest CrowdSupply campaign is a wireless, Bluetooth oscilloscope that doesn’t make a whole lot of sense until you really think about it. Once you get it, the Aeroscope wireless oscilloscope is actually a pretty neat idea.

If the idea of battery-powered, Bluetooth-enabled test and measurement gear sounds familiar, you’re not dreaming. The Mooshimeter, also a project on CrowdSupply, is a multichannel multimeter with no buttons, no dial, and no display. You use the Mooshimeter through an app on your phone. This sounds like a dumb idea initially, but if you want to measure the current consumption of a drone, or under the hood of your car while you’re driving, it’s a really, really great idea.

The specs of the Aeroscope aren’t bad for the price. It is, of course, a one-channel scope with 20 MHz bandwidth and 100Msps. Connection to the device under test is through pokey bits or grabby bits that screw into an SMA connector, and connection to a display is over Bluetooth 4.0. You’re not getting a scope that costs as much as a car here, but you wouldn’t want to put that scope in the engine bay of your car, either.

The Aeroscope is currently on CrowdSupply for $200. Compared to the alternatives, that’s a bit more than the no-name, USB scopes. Then again, those are USB scopes, not a wireless, Bluetooth-enabled tool, and we can’t wait to see what kind of work this thing enables.

Panel Mount Display Solves The Problem Of Drilling Square Holes

[Absolutelyautomation] has a problem with seven-segment displays. Fitting these displays in an enclosure is a pain because you can’t drill perfectly square holes, and you will invariably mess up a few enclosures with overzealous file work. There is a solution to this problem – panel mount meters.

The bezels on these panel mount meters hide the imperfections in the enclosure, and usually don’t require screws. They are, however, dedicated displays, usually for temperature, RPM, or some other measurement.

[Absolutelyautomation] took one of these dedicated panel mount displays and turned it into an all-purpose device. Basically, it’s a panel mount Arduino with three seven-segment displays.

This project is built on perfboard cut down to fit inside the enclosure of a very cheap panel meter found at the usual suppliers. Tucked away underneath this perfboard is an ATmega, a few resistors, and the support parts to make everything go. This panel mount meter can either be a serial slave or as a standalone controller, programmable with the Arduino IDE. It’s cheap, too. You can check out [Absolutelyautomaion]’s video below.

Continue reading “Panel Mount Display Solves The Problem Of Drilling Square Holes”