Building A Sheet Metal Pistol

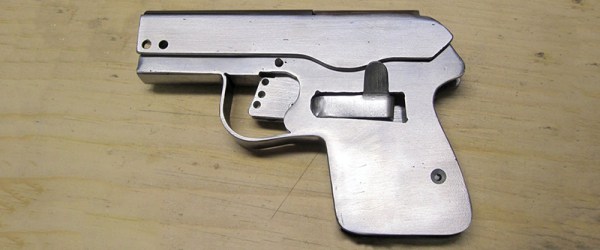
Floating around the Internet are plans for a semi-automatic pistol constructed out of sheet metal. Like so many plans for 3D printed guns, it appears no one has actually built one of these pistols. It exists only as a technological construct, with diagrams you can photocopy, trace onto a few bits of metal, and presumably assemble into a gun. The only proof these parts can be turned into a gun-shaped object are a few random blog posts from two years ago showing a very ugly pistol spray painted matte black.

[Clinton Westwood] decided to take up the challenge of turning these plans into a real, working gun. He’s documented his efforts on YouTube and put a bunch of pictures up of the entire build process. The gun doesn’t work quite yet, but it almost does, and he’s doing this entirely in a garage shop, with tools anyone can pick up from Home Depot.

Most of the construction of this gun is simple enough – it’s just sheet metal, after all. The magazine was constructed by tracing the pattern onto a piece of metal, wrapping it around a mandrel, and welding it together. The side plates of the gun, again, were created with a jigsaw. Rifling the barrel – the thing that makes this gun both accurate and legal – required the construction of a few interesting tools. The rifling tool is just a piece of round bar that fits through the barrel. A small piece of a hacksaw blade was cut to fit inside this round bar, and the barrel was cut very slowly with a shop-built tool.

The finished result is something that looks like it came from the finest post-apocalyptic craftsman. A gun that looks cool is useless if it doesn’t work, and here the DIY pistol falls short. The spent casings don’t eject. It’s still a step up from the first build of this gun that was only rumored to fire blanks.

Recently, the world of gunsmithing has been inundated with 3D printed pistols that don’t work, and 3D printed guns that do work, but are somehow 200 years behind the state of the art. We’re happy to see some people are still building things with their hands, and hope [Clinton] can eventually get this gun to work.
Continue reading “Building A Sheet Metal Pistol”

A Quadcopter Controlled By A Pi Zero

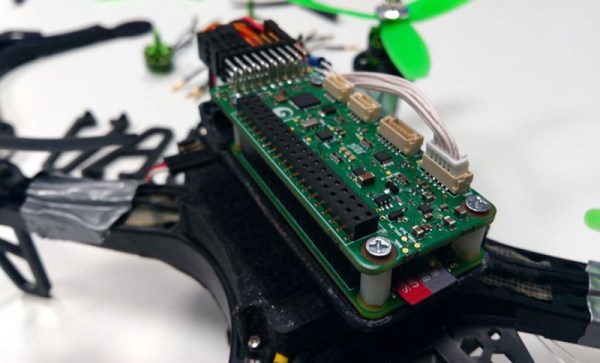
Flight controllers for quadcopters and other drones are incredible pieces of engineering. Not only do these boards keep an aircraft level, they do so while keeping the drone in one place, or reading a GPS sensor and flying it from waypoint to waypoint. The latest of these flight controllers is built on everyone’s favorite $5 computer, the Raspberry Pi Zero.

The PXFmini controller and autopilot shield is the latest project from Erle Robotics that puts eight servo outputs on the Pi, barometer and IMU sensors, a power supply, and all the adapters to turn the Raspberry Pi Zero into a capable flight controller. Since the Pi Zero will have some computational horsepower left over after keeping a quadcopter level, there’s a possibility of some very cool peripherals. Erle Robotics has been working with depth cameras and Lidar on more than a few drones. This makes for some interesting applications we can only imagine now.

The schematics for the PXFmini are open source in the best traditions of the RC and drone community and will be available soon. You can check out a video of the FXPmini flying around an office below.

Continue reading “A Quadcopter Controlled By A Pi Zero”

Repairing And Improving Cheap Bench Power Supplies

Cheap benchtop power supplies are generally regarded as pieces of junk around these parts. They can measure well enough under perfect conditions, but when you use them a little bit, they fall over. There’s proof of this in hundreds of EEVblog posts, Amazon reviews, and stories from people who have actually owned these el-cheapo power supplies.

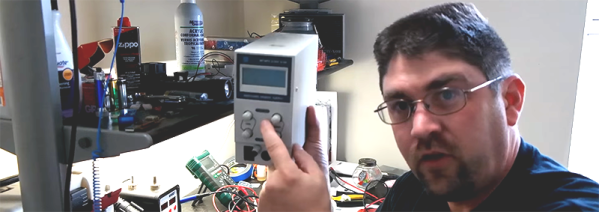
One of the guys who has had a difficult time with these power supplies is [Richard]. He picked up a MPJA 9616PS (or Circuit Specialists CSI3003SM) for a song. It quickly broke, and that means it’s time for a repair video. [Richard] is doing this one better – he has the 3A power supply, that sells for $55. With a stupidly simple modification, he upgraded this power supply to the 5A model that usually sells for $100.

The problem with [Richard]’s broken power supply were voltage and current adjustments knobs. This cheap power supply didn’t use rotary encoders – voltage and current were controlled by a pair of 1k and 10k pots. Replacing these parts cost about $5, and [Richard]’s power supply was back up on its feet.

After poking around inside this power supply, [Richard] noticed two blue trim pots. These trim pots were cranked all the way to the left, and by cranking them all the way to the right, the power supply could output 5 Amps. Yes, the 3A version of this power supply was almost identical to the 5A version, with the only difference being the price. It’s a good repair to a somewhat crappy but serviceable supply, but a great mod that puts a beefier power supply on [Richard]’s desk.

Continue reading “Repairing And Improving Cheap Bench Power Supplies”

Controlling RGB LEDs With The Pi Zero

The Pi Zero is a great piece of hardware, even if you’re not designing another USB hub for it. [Marcel] wanted to control a few RGB LED strips from his phone, and while there are a lot of fancy ways you can do this, all it really takes is a Pi Zero and a few parts that are probably already banging around your parts drawers.

This isn’t a project to control individually addressable RGB LEDs such as NeoPixels, WS2812s, or APA102 LEDs. This is just a project to control RGB LEDs with five four connectors: red, green, blue, power, and or ground. These are the simplest RGB LEDs you can get, and sometimes they’re good enough and cheap enough to be the perfect solution to multi-colored blinkies in a project.

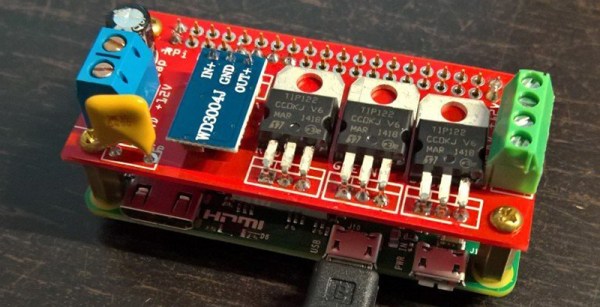
Because these RGB LEDs are simple, that means controlling them is very easy. [Marcel] is just connecting a transistor to three of the PWM pins on the Pi and using a TIP122 transistor to drive the red, green, and blue LEDs. You’ve got to love those TIPs package parts!

Control of the LEDs is accomplished through lighttpd. This does mean a USB WiFi dongle is required to control the LEDs over the Internet, but it is so far the simplest way we’ve seen to add multicolor blinkies to the web.


Raspberry_Pi_LogoSmall

The Raspberry Pi Zero contest is presented by Hackaday and Adafruit. Prizes include Raspberry Pi Zeros from Adafruit and gift cards to The Hackaday Store!
See All the Entries || Enter Your Project Now!

Hackaday Links: Valentine’s Day, 2016

A few months ago, we posted all the videos from the 2015 Hackaday SuperConference. Putting all of these videos up on YouTube isn’t the greatest idea, and thanks to [Jason Scott] of the Internet Archive and a little bit of sneakernetting, all the talks are also available on archive.org.

As an aside, the SuperCon was filmed on two Blackmagic URSA cameras. The resulting files for the talks on both cameras came in at a little over one Terabyte. These were edited down into the finished videos for YouTube, at around 20 Gigs per video. Once those hit the YouTube servers, they were converted once again (trust me, this made the most sense), and I was able to download the YouTube files and sneakernet all the talks to [Jason] on an 8GB thumb drive. The next time we do this, we’ll build a Xeon-based SLI Titan rig for video editing.

The German TV show NEO MAGAZIN Royale asked their viewers to send in old hardware. These old floppy drives, scanners, typewriters, hard drives, modems, and speakers would be turned into instruments. The German hip hop group, Fettes Brot performed Die da on these instruments with sufficiently electronic results.

You know we’re having a con in Belgrade on April 9, right? Wait, I’m sorry. 9 April. The call for proposals ends very, very soon. If you have something cool to talk about, fill out the form.

Montreal has a lot of great architecture, all of which is coincidently held together by Robertson screws. Now one of those famous old buildings, the Saint-Sulpice Library is turning into a hackerspace or tech incubator sort of thing thanks to a $17 Million Canadian Peso investment from the city and province.

Just a reminder that the NL6621 WiFi SoC exists. It’s been called the ESP8266 killer, but some of the most recent posts on the English language development forum are for buying phentermine – an appetite suppressant – without a prescription. The people demand information, so if you have some, put it in the comments below.

Did you know Hackaday has an email newsletter? It’s true! Sign up here!

Valentines

Super Sizing The Printrbot Metal Simple

The Printrbot Simple Metal is a good 3D printer, with a few qualifications. More accurately, the Printrbot Simple Metal is a good first 3D printer. It’s robust, takes a beating, can produce high-quality prints, and is a great introduction to 3D printing for just $600. There are limitations to the Printbot Simple Metal, the most important is the relatively small 150mm cubed build volume.

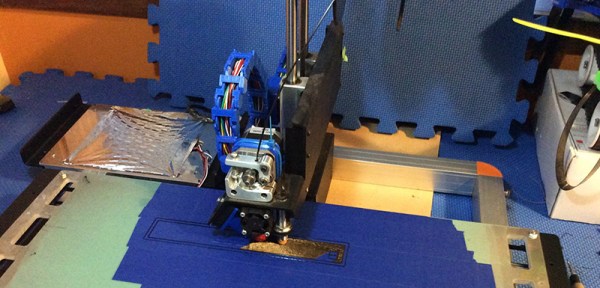
[ken.do] wanted to print large parts, specifically scale aircraft wings and panels. While the Printrbot can’t handle these things normally, the design of the printer does lend itself to increasing the size of the build volume to 500mm long and 500mm high.

Increasing the build height on the Printrbot is as simple as adding two longer smooth rods and a single threaded rod to the Z axis. Increasing the X axis is a bit trickier: it requires a very flat sheet that doesn’t warp or bend over 500 mm, even when it’s being supported in different places. [ken.do] is engineering stiffness into a build plate here. The solution to a huge bed is a two kilogram aluminum bed supported by heavier rails and riding on a massive printed bushing block. Does it work? Sure does.

If you want to print tall objects, the current crop of 3D printers has you covered: just get a delta, and you’re limited only by the length of the extrusion used in the body. Creating big objects in all three dimensions is a marginally solved problem – just get a big printer. Big printers have drawbacks, notably the incredible power requirements for a huge heated build plate.

The ability to print long objects is a problem that’s usually not addressed with either commercial 3D printers or RepRaps. We’re glad to see someone has finally realized the limitations of the current crop of 3D printers and has come up with a way to turn a very good first printer into something that solves a problem not covered by other 3D printers.

Deaccelerating The Apple IIc Plus

The Apple IIc Plus is arguably – very arguably from my experience – the best Apple II computer ever made. It’s portable, faster than the IIe, had a much higher capacity built-in drive, and since the Plus could run at 4MHz, it was faster than the strange eight or sixteen bit Apple IIGS. Recently, [Quinn] has been fascinated with the IIc Plus, and has gone so far as to build a custom gamepad and turn the IIc Plus into a laptop. Now, she’s turned her attention to the few things Apple got wrong with the Apple IIc Plus – the startup beep and defaulting to 4MHz on every boot instead of Apple II’s standard 1MHz that’s used in the Apple II, II Plus, IIe, and IIc non-Plus.

The original Apple II is surprisingly primitive. Apart from writing a loop of NOPs and counting cycles, there’s no way to keep time. There is no clock, no timer, no tick counters, and no interrupts. If you’re writing a game for the Apple II that depends on precise timing, the best you’ll be able to manage is a delay loop. This worked for a time, until the Apple IIc Plus was released with a default clock of 4MHz. It was a great idea for AppleWorks and other productivity apps, but [Quinn] is doing retrocomputing, and that means games. Booting the Apple IIc Plus into its 1MHz mode means turning it on and holding escape while resetting the computer every time. It’s very annoying, but a mod to make the IIc Plus run at 1MHz by default would turn her into one of the most accomplished currently active Apple II developers.

The process of booting into the IIc Plus’ 1MHz mode requires holding down escape while restarting the computer. This should tell you something: it’s not a hardware switch that changes speed. It’s in the ROM, and that means diving into the Technical Reference Manual, looking at the listings in the ROM monitor, and figuring out how everything works.

The IIc Plus ROM is incredibly complex – it’s 32k of hand assembled code with jump tables bouncing everywhere. After a ton of research, [Quinn] successfully reverse engineered the ‘slow down if the ESC key is pressed’ routine, allowing her to boot the machine at 1MHz by default, and 4MHz if there’s a soft reset with the option key pressed. Everything works great, and [Quinn] has the video to prove it

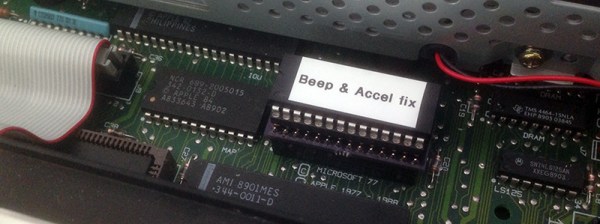
This isn’t [Quinn]’s first attempt at hacking the lowest levels of the Apple IIc Plus ROM. Because the IIc Plus ran at 4MHz by default, the startup beep was so very wrong. She fixed that, and with two very useful patches under her belt, she burned a few new chips with her ROM patches. In total, there’s only a few dozen bytes of hers in the new 32k ROM, but that’s enough to make her one of the top current firmware developers for the Apple II platform.