Servo Stock, The Future Of 3D Printers

printerIf you think about it, the RepRaps and other commercial 3D printers we have today are nothing like the printers that will be found in the workshops of the future. They’re more expensive than they need to be, and despite the RepRap project being around for a few years now, no one has cracked the nut of closed loop control yet. [mad hephaestus], [Alex], and [Will] over on the Hackaday Projects site are working on the future of 3D printing with the Servo Stock, a delta printer using servos and closed loop control to build a printer for about a quarter of the price as a traditional 3D printer.

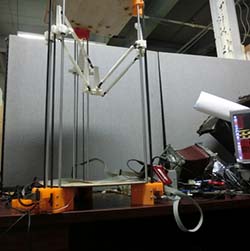
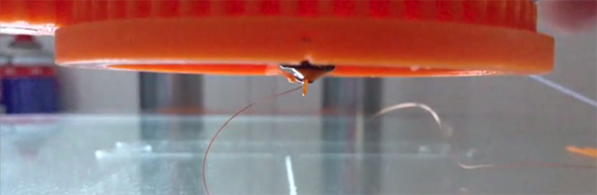
The printer itself is a Kossel derivative that is highly modified to show off some interesting tech. Instead of steppers, the printer has three axes controlled by servos. On each axis is a small board containing a magnetic encoder, and a continuous rotation servo. With this setup, the guys are able to get 4096 steps per revolution with closed loop control that can drive the servo to with ±2 ticks.

The electronics and firmware are a clean sheet redesign of the usual 3D printer loadout. The motherboard uses a Pic32 running at 80MHz. Even the communication between the host and printer has been completely redesigned. Instead of Gcode, the team is using the Bowler protocol, a system of sending packets over serial, TCP/IP, or just about any other communications protocol you can think of.

Below is a video of the ServoStock interpreting Gcode on a computer and sending the codes and kinematics to the printer. It seems to work well, and using cheap servos and cut down electronics means this project might just be the first to break the $200 barrier for a ready to run 3D printer.

Continue reading “Servo Stock, The Future Of 3D Printers”

Adding Copper Wire To A 3D Print

Conductive filaments and printing solder are one thing, but what if you could spice up your 3D prints by embedding wire right inside the filament? That’s what [Bas] is doing, paving the way for printable electronics, PCBs, coils, and odd-shaped antenna.

The general idea of [Bas]’ technique of embedding thin copper wire inside a single layer of a print is to lay the wire down in front of the nozzle, effectively turning bare wire into insulated wire in whatever shape you can imagine. The trick, however, is figuring out how to put wire  down in front of a nozzle. [Baz] accomplished this with a slew ring turned by a stepper motor connected to a 5th axis on the control board.

There are a few things this prototype doesn’t cover – cutting the wire, connecting the wire to components, fine-tuning, and a host of other things that prevent [Bas]’ machine from building real functional circuits. Despite these limitations, the machine could probably fabricate the secondary for a tesla coil right now, something that’s really annoying to make unless you have a lathe.

Video demo below.

Continue reading “Adding Copper Wire To A 3D Print”

The Automated Pickup Winding Machine

winder
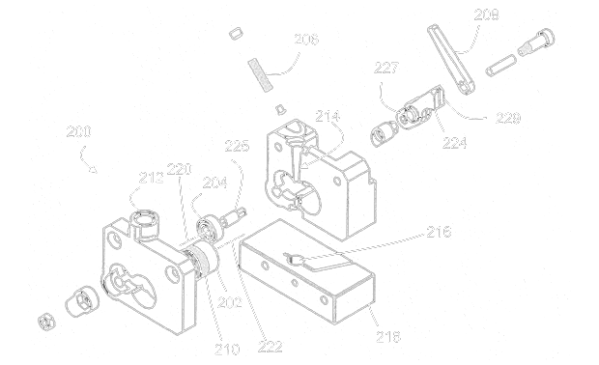
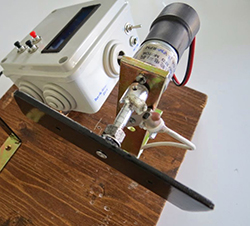
Back when electric guitars were a new thing, winding pickups was a very labor intensive and error-prone process. The number of windings could easily vary by a few hundred turns of wire, making the resulting pickup either anemic or much more powerful than the other pickups in the guitar. [Davide] is starting to wind his own pickups, and desiring a little more precision than simply guessing how many winds are on a coil he built an AVR coil winding machine.

The machine uses a DC gear motor running at 1200 RPM. A magnet is glued onto the motor shaft, and a hall effect sensor connected to an ATMega8 keeps track of how many windings are on the coil.

The interface is simple, using character LCD to display a wind counter, motor direction, and current motor speed. There are some useful features in this machine; slow start-up and automatic stop makes winding pickups much easier than the traditional home method of winding pickups with a sewing machine.

Continue reading “The Automated Pickup Winding Machine”

VoCore, The Tiny Internet Of Things Thing

vocore
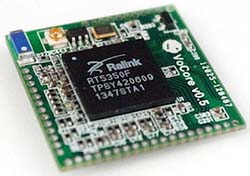
With tiny Linux boards popping up like dandelions, it was only a matter of time before someone came out with a really tiny Linux board.
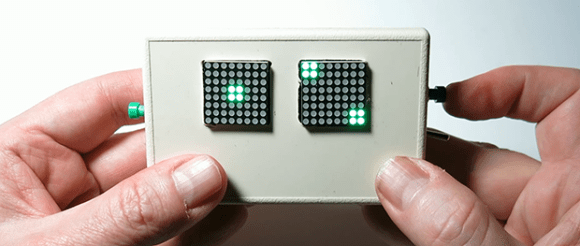
 This is it. It’s a tiny board less than an inch on each side with an 802.11n System on Chip running OpenWrt on Linux. The best part? You can pick one up for $20 USD.

The VoCore isn’t so much as a cut down ARM dev board as it is a cut down router capable of running OpenWrt. It’s not a power house by any means with 8MB of Flash, 32MB of SDRAM, and a 360MHz CPU, but if you ever need something that’s less than an inch square, you probably don’t need that much power.

The VoCore features interfaces for 100M Ethernet, USB host and device, UART, SPI, I2C, I2S, and 20 GPIOs for blinking LEDs and listening to sensors. There’s also a dock that breaks out the Ethernet and USB ports, available as a kit or already assembled.

It’s a pretty cool device, and with low current draw (about 200mA) and being able to accept +5V power, we can easily see this tiny board popping up in a few projects.


The Most Random Electronic Dice Yet

di

If you’ve written a great library to generate random numbers with a microcontroller, what’s the first thing you would do? Build an electronic pair of dice, of course.

[Walter] created the entropy library for AVRs for a reliable source of true random numbers. It works by using the watchdog timer’s natural jitter; not fast by any means but most sources of entropy aren’t that fast anyway. By sampling a whole lot of AVR chips and doing a few statistical tests, it turns out this library is actually a pretty good source of randomness, at least as good as a pair of dice.

The circuit itself uses two 8×8 LED matrices from Adafruit, an Arduino, and a pair of buttons. The supported modes are 2d6, 2d4, 2d8, 2d10, 1d12, 1d20, a deck of cards, a single hex number, a single 8-bit binary number, or an eight character alphanumeric password. It’s more than enough for D&D or when you really need an unguessable password. Video demo below.

Continue reading “The Most Random Electronic Dice Yet”

MakerBot Files Patents, Internet Goes Crazy

In the past month, a few patent applications from MakerBot were published, and like everything tangentially related to the prodigal son of the 3D printer world, the Internet arose in a clamor that would be comparable only to news that grumpy cat has died. That’s just an analogy, by the way. Grumpy cat is fine.

The first patent, titled, Three-dimensional printer with force detection was filed on October 29th, 2013. It describes a 3D printer with a sensor coupled to the hot end able to sense a contact force between the nozzle and build plate. It’s a rather clever idea that will allow any 3D printer to perform software calibration of the build plate, ensuring everything is printed on a nice, level surface. Interestingly, [Steve Graber] posted an extremely similar design of a bed leveling probe on October 6th, 2013. In [Steve]’s video, you can see his bed level probe doing just about everything the MakerBot patent claims, all while being uploaded to YouTube before the patent application.

When it rains it pours, and the Quick-release extruder patent application, filed on October 28, 2013, bears this out. It claims an extruder that includes, “a bistable lever including a mechanical linkage to the bearing, the bearing engaged with the drive gear when the bistable lever is in a first position and the bearing disengaged from the drive gear when the bistable lever is in a second position.” Simple enough, a lever with two positions, where one presses a bearing against a drive gear, and the other position disengages the bearing from a drive gear. Here’s something that was published on Thingiverse in 2011 that does the same thing. Hugely famous RepRap contributor [whosawhatsis] has weighed in on this as well.

It is important to note that these are patent applications. Nothing has been patented yet. The US Patent and Trademark Office does seem to have a lot of rubber stamps these days, so what is the average Internet denizen to do? Here are easy to follow, step-by-step instructions on how to notify the USPTO of prior art. Remember, just because prior art does not completely invalidate a patent application’s claims doesn’t mean you shouldn’t send it in. It is a patent examiner’s job to review the prior art.

So there you go. MakerBot applies for patents, people complain, but not to the USPTO. Highly relevant video and transcription below.

Continue reading “MakerBot Files Patents, Internet Goes Crazy”

Homemade Liquid Nitrogen

As far as DIY cryogenics are concerned, dry ice is easy mode. You can get frozen carbon dioxide at WalMart, or from a nozzle that screws onto a CO2 tank. It’s all very ordinary, and not really special at all. Want to know what’s cool? Making liquid nitrogen at home.

[imsmooth] is getting his nitrogen from a standard tank, sending the gas through a CO2 and H2O scrubber, compressing it, putting the compressed gas in an ice bath, and slowly diffusing the compressed, cooled gas into a vacuum reservoir. When the cold compressed gas is released into the reservoir, Boyle’s law happens and liquid nitrogen condenses in a flask.

As far as materials and equipment are concerned, [imsmooth] is using a PVC tower filled with zeolite to filter out the CO2 and H2O, a SCUBA compressor (no oil), and an almost absurd amount of stainless steel tubing for the precooler and regenerative cooling tower. Except for a few expensive valves, dewar, and the SCUBA compressor, it’s all stuff you could easily scrounge up from the usual home improvement stores.

[imsmooth] is producing about 350cc/hr of liquid nitrogen,  or more than enough for anyone who isn’t running an industrial process in their garage. Check out the video of the build below.

Continue reading “Homemade Liquid Nitrogen”