The Pi CNC Controller

pi

Back in the olden days, the latest and greatest CNC machines had minicomputers bolted onto their frames, replete with paper tape readers and seven segment displays. For the home CNC machinist of today, these hulking electronic brains are replaced with something a little more modern – desktop computers with parallel ports. Having a box filled with computers and motor drivers is just too cool though, and this tiny Raspberry Pi CNC controller fits the bill quite nicely.

The controller uses a Raspberry Pi as the brains of the device, but there aren’t too many options out there for stepper motor control in Pi land. There are, however, dozens of CNC shields or the Arduino. The Pi AlaMode board is able to provide voltage level conversion between the CNC shield and the pi, and also has the nice bonus of a battery-backed real time clock.

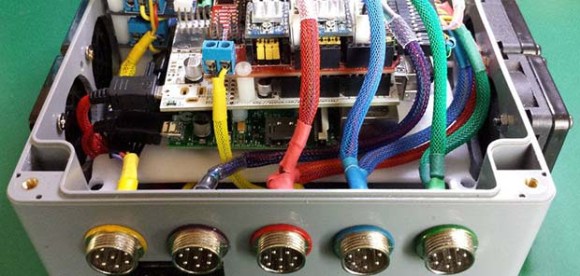
With some proper connectors, lighted buttons, and a beautiful cable sleeving job, this Pi CNC controller would be well suited for any of the desktop CNC  or engraving builds we see from time to time.


Capacitive Sensing And Old IBM Keyboards

The pen is mightier than the sword, but the IBM Model M keyboard, properly applied, can knock teeth in. There are a few more IBM keyboards even better suited to blunt force trauma – the extremely vintage beam spring keyboards made for terminals and desktop publishers. Being so very old, there’s no easy way to connect these keyboards to a modern system, so when [xwhatsit] wanted to make his work, he needed to build his own controller.

The beam spring keyboards use capacitive switches, and with 122 keys, the usual method of reading capacitance – putting a capacitor in an oscillator – would be far too slow to be of any use in a keyboard. There is another method of reading capacitance: measuring the current going through the capacitive switch. This can easily be accomplished with an LM339 comparator.

[xwhatsit]’s keyboard controller uses this capacitive sensing circuit to read the four rows of keys, with a few shift registers taking care of the columns. An ATMega32u2 is the brains of the outfit, running LUFA to translate the key presses to USB.

If you’re lucky enough to have one of these ancient keyboards, [xwhatsit] is selling a few over on the usual mechanical keyboard forums. There’s also a controller for the Model F keyboard using the same basic circuit. If you need one just drop him a line or grab the gerbers and roll your own.

Retrotechtacular: Once Upon A Punched Card

card

Ah, the heady days of the early 60s, where companies gave their salesmen exquisitely produced documentaries, filled with incidental music written by the best composers of the era, and a voice actor that is so unabashedly ordinary you would swear you’ve heard him a hundred times before. It’s a lot better than any PowerPoint presentation anyone could come up, and lucky for us, these 16mm films are preserved on YouTube for everyone to enjoy. This one was sent out to IBM sales reps pushing a strange technology called a ‘punched card’, a system so efficient it will save your company tens of thousands of dollars in just a few short years.

Like most explanations of what a punched card does, this IBM documercial begins with the history of the Jacquard loom that used punched cards for storing patterns for textile weaving. In a rare bit of historical context befitting IBM, this film also covers the 1880 US census, an important part in the evolution of punched cards being used not as instructions for a loom, but data that could be tabulated and calculated.

The United States takes a census every ten years. The tenth census of 1880 took so long to compile into the data – seven years – it was feared the next census of 1890 wouldn’t be complete until the turn of the century. This problem was solved by [Herman Hollerith] and his system of encoding census data onto punched cards for tabulation. [Hollerith] would later go on to found the Tabulating Machine Company that would later merge with two other companies to form IBM. Isn’t it great that IBM chose to include that little nugget in their film.

As a point of interest, the film does contain a short pitch for IBM punched card writers, sorters, and calculators – the backbone of IBM’s medium to large size business sales. At the time this film was produced (1964) IBM was ready to announce the System/360, what would become the de facto mainframe for businesses of all sizes.  Yes, the /360 also used punched cards, but we wonder how many angry phone calls the sales reps received months after showing this film.

Turning Lego Into A Groove Machine

lego

Last weekend wasn’t just about Maker Faire; in Stockholm there was another DIY festival celebrating the protocols that make electronic music possible. It’s MIDI Hack 2014, and [Kristian], [Michael], [Bram], and [Tobias] put together something really cool: a Lego sequencer

The system is set up on a translucent Lego base plate, suspended above a webcam that feeds into some OpenCV and Python goodness. From there, data is sent to Native Instruments Maschine. There’s a step sequencer using normal Lego bricks, a fader controlling beat delay, and a rotary encoder for reverb.

Despite being limited to studs and pegs, the short demo in the video below actually sounds good, with a lot of precision found in the faders and block-based rotary encoder. [Kristian] will be putting up the code and a few more details shortly. Hopefully there will be enough information to use different colored blocks in the step sequencer part of the build for different notes.

Continue reading “Turning Lego Into A Groove Machine”

The Solafide Forbes Nash Organ

analogue

A few years ago, [Chad] wanted to build a musical instrument. Not just any musical instrument, mind you, but one with just intonation. Where modern western music maps 12 semitones onto a logarithmic scale per octave, just temperament uses ratios or fractions to represent notes on a scale. For formal, academic music, it’s quite odd especially if you’re building an analog synth for this temperament. In a remarkable three-part write up (parts one, two, and three), [Chad] goes over the creation of this extremely strange musical instrument.

The idea was for this synth to produce sine waves for each of the tones on the just intonated scale. [Chad]’s initial experiments led him down the path of using strings and magnetic pickups to produce these sine waves. These ideas were initially discarded for producing sine waves electronically on dozens of different homemade PCBs, one for each tone.

The keys are an extremely interesting design, working on the principle of light from an LED shining on a photodetector, blocked by a shutter on a spring-loaded key made on a laser cutter. The glyphs on the keys seen above actually have meaning; each one describes the ratio of the interval that key plays, encoded in some schema that isn’t quite clear.

What does it sound like? There’s three videos below, but because this synth isn’t tuned to the scale you’re used to, it doesn’t sound like anything else you’ve heard before.

Continue reading “The Solafide Forbes Nash Organ”

Wake On LAN With A Dev Board

Screen

At home, [Daniel] has an extremely powerful dual quad-core Xeon system with ECC RAM that he uses for heavy lifting tasks – compiling, CUDA processing, and actual computing. Of course the electric bill for running this box all the time would be crazy, so Wake on LAN it is. There’s only one problem: for some reason, the BIOS doesn’t have Wake on LAN. The solution, of course, was a microcontroller system that would listen for the magic WoL packet and turn the computer on when it was received. This project eventually turned into a great case mod with an integrated LCD that powers the computer up over Ethernet, shows the current running processes, CPU and memory usage, and is an excellent use of a TI dev board.

The dev board in question is a TI Sitara AM355x starter kit that runs Linux, has two Ethernet ports and a touch sensitive LCD, and more than enough power to handle something as simple as a system monitor. To power on his monster computer from the dev board, [Daniel] is using a LED on the board, an inverter, a ULN2003 driver chip, and a relay connected to the computer’s power button. It’s not exactly a masterpiece of craftsmanship, but the dev board looks good mounted in the case, and from the videos below, it’s a great way to get system information embedded right into a computer case.

Continue reading “Wake On LAN With A Dev Board”

An Experiment To Test Radioactive Decay Varying Over Time

tritium_decay_experiment_black_box_electronics_top_view_IMG_3873

Here’s a hypothesis for you: radioactive decay varies over time, possibly with a yearly cycle. [Panteltje] decided to test this hypothesis, and so far has two year’s worth of data to comb over.

Radioactive decay can be easily detected with a photomultiplier tube, but these tubes are sensitive to magnetic fields and cosmic rays that would easily fly through just about any shielding [Pantelje] could come up with. Instead, the radiation in this setup is detected with simple photo detectors, pressed right up against a tritium-filled glass ampoule, a somewhat common lighting solution for fishing lures, watch faces, and compasses.

The experimental setup records the photo detectors, a temperature sensor, and a voltage reference, recording all the data to an EEPROM once an hour. All the important electronics are stuffed into a heatsinked, insulated, light-proof box, while the control electronics reside on a larger board with battery backup, alarm, indicator LEDs, and an RS232 connection.

After one year, [Pantelje] recorded the data and reset the experiment for another year. There are now two years worth of data available, ready for anyone to analyze. Of course, evidence that radioactive decay changes over the course of a few years would turn just about every scientific discipline on its head, so at the very least [Panteltje] has a great record of the output of tritium lights against the expected half-life.